All of these devices that we have been talking about communicate with each other via BlueTooth. Although commonly thought of as something that provides audio connectivity from to wireless headsets BlueTooth is much more.
BlueTooth devices can implement different profiles which cover anything from Hands Free Profile (HFP) typical used in cars to Dial-up Networking Profile (DUN) which is typically to provide internet access to other devices from a phone.
For a list, see: Wikipedia Bluetooth Profile http://en.wikipedia.org/wiki/Bluetooth_profile
The easiest profile for us to get a handle on for phone to device communication is probably the Serial Port Profile (SPP). Arduino has good support for Serial communication and with the addition of something like a Bluetooth Mate that gives us a wide range of possibilities.
Bluetooth Mate: https://www.sparkfun.com/products/10393
To get started using something like a Bluetooth Mate, you'll first need to get it working with an Arduino.
Sparkfun has a good tutorial online here: https://www.sparkfun.com/tutorials/264
After it is wired up to the Arduino, we can try out the following sketch from the tutorial:
#include <SoftwareSerial.h>

int bluetoothTx = 2;  // TX-O pin of bluetooth mate, Arduino D2
int bluetoothRx = 3;  // RX-I pin of bluetooth mate, Arduino D3

SoftwareSerial bluetooth(bluetoothTx, bluetoothRx);

void setup()
{
  Serial.begin(9600);  // Begin the serial monitor at 9600bps

  bluetooth.begin(115200);  // The Bluetooth Mate defaults to 115200bps
  bluetooth.print("$$$");  // Enter command mode
  delay(100);  // Short delay, wait for the Mate to send back CMD
  bluetooth.println("U,9600,N");  // Temporarily Change the baudrate to 9600, no parity
  // 115200 can be too fast at times for NewSoftSerial to relay the data reliably
  bluetooth.begin(9600);  // Start bluetooth serial at 9600
}

void loop()
{
  if(bluetooth.available())  // If the bluetooth sent any characters
  {
    // Send any characters the bluetooth prints to the serial monitor
    Serial.print((char)bluetooth.read());
  }
  if(Serial.available())  // If stuff was typed in the serial monitor
  {
    // Send any characters the Serial monitor prints to the bluetooth
    bluetooth.print((char)Serial.read());
  }
  // and loop forever and ever!
}
This sketch will relay serial data from the standard serial input through bluetooth and vice versa.
One thing we can do right away is enter into command mode and see what the device will tell us. After running the sketch, open up the Serial Monitor, make sure that it is set to 9600 baud and No line ending. Type "$$$" and click Send. The Arduino should relay that to the Bluetooth Mate which should respond with CMD.
At this point you should switch to Newline and type "D". The Mate should respond with something along these lines:
***Settings***
BTA=000666421FDF
BTName=RN42-1FDF
Baudrt=115K
Parity=None
Mode  =Slav
Authen=0
Encryp=0
PinCod=1234
Bonded=0
Rem=000666049D7B
These are interesting to us. The first entry is the Bluetooth MAC address which is also on the device's label. We'll need it to make a connection once we get there.
To exit out of command mode, type "---".
The next very interesting portion is the PinCod entry which is the code that we'll need to use to pair with the device. For this device it is fixed to "1234".
First we have to pairing the Mate with our computer. On a Mac, under System Preferences there is a Bluetooth panel which you can use to pair devices. To use the Bluetooth Mate with another device, it must be paired first.
After pairing, the Mac should automatically setup a serial port which you can use with any application that supports serial. I like goSerial: http://www.furrysoft.de/?page=goserial
Here are the settings in goSerial:
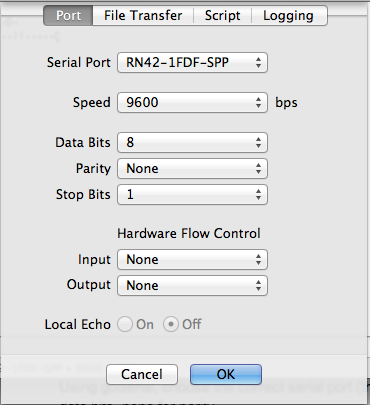
After connecting, we should be able send serial data through the serial monitor on the Arduino through the Mate and see it arrive in goSerial.
Now, istead of using goSerial and the Bluetooth on our computer, let's get it working with our Android devices.
First we have to pair it with our phone: In Settings, there is a Bluetooth section where you can turn Bluetooth on and pair your phone with it.
Following that we can test the connection by using a bluetooth serial app:
BlueTerm seems to be a good one: https://play.google.com/store/apps/details?id=es.pymasde.blueterm&feature=related_apps#?t=W251bGwsMSwyLDEwOSwiZXMucHltYXNkZS5ibHVldGVybSJd
We should now be able to do the same thing, send data back and forth from the Arduino via serial monitor to our phone and vice versa.
Now that we have that working, we can write an Android app that does something similar.
The Arduino folks have put together BtSerial, a nice Processing for Android bluetooth library that we can leverage.
https://github.com/arduino/BtSerialHere is a quick example: https://github.com/vanevery/BlueToothSerialTest (note: I made some significant changes to the BtSerial library and have included it in the project on GitHub as I haven't had a chance to clean it up and send it to the Arduino folks yet.)
Don't forget permissions:
android.permission.BLUETOOTH