Class Info
What: Intro to Physical Computing Wednesday Session ITPG-GT.2301.5
When: Wednesdays 12.10pm – 2.40pm, (Fall 2016 Class Dates)
Where: NYU Tisch Building, 4th floor, Room 442
Who: Benedetta Piantella
What: Intro to Physical Computing Thursday Session ITPG-GT.2301.6
When: Thursdays 12.10pm – 2.40pm, (Fall 2016 Class Dates)
Where: NYU Tisch Building, 4th floor, Room 442
Who: Benedetta Piantella
Contact
Best way to reach me is via email at: bp432@nyu.edu or benedetta.piantella@nyu.edu
Office Hours by appointment on Mondays & Fridays. Sign up on my Calendar with your NYU account NOT your gmail, or email me to set something else up outside of those times/days.
Grading
30% In-class lab work and participation
20% Physical interaction controller project (Stupid Pet Trick)
30% Final project
20% Blog & documentation
Supplies
See the following link for Parts Needed
Suppliers
Adafruit Industries
DigiKey
Sparkfun
Jameco
Mouser
Seeedstudio
DFRobot
NYU Bookstore
Tinkersphere
AC Gears
Microcenter
Useful Links
- Arduino website, check out the Getting Started and the Reference pages for starters
- Tom Igoe’s Pcomp Experiments
- ITP Sensor Workshop wiki from another class at ITP
- Dustyn Roberts’ class on mechanisms, very useful for when we do motors
- Good resources on movement and mechanisms
- How to solder tutorial including video
- One of my favorite project sites about soft circuits
- More soft circuit projects and links to tutorials
- Really cool soft sensors and other amazing wearables
Some Reference Books
- Arduino Starter Kit Booklet
- Physical Computing: Sensing and Controlling the Physical World with Computers
- Getting Started with Arduino
- Arduino Cookbook
- Make: Electronics
- Make: More Electronics
- Getting Started in Electronics
- Making Things Talk
- Making Things Move
- Practical Electronics For Inventors
- Energy
- There are no electrons; Electronics for earthlings
- Fashioning Technology: A DIY Intro to Smart Crafting
- Make: Wearable Electronics: Design, prototype, and wear your own interactive garments
- Code: The Hidden Language of Computer Hardware and Software
Class Blogs
Please email me the link to your blog documentation for the class so we can continue our conversations and offer feedback online too!
Wednesday Class
Jinhee Ahn
Dominic Barrett
Utsav Chadha
Lindsey Daniels
Nanou Dimachki
Grant Henry
Swapna Joshi
Laura Kerry
Dimos Markopoulos
Rushali Paratey
Jasmine Soltani
Elizabeth White
Chetan Hasabnis
Michael Kripchak
Thursday Class
Chloe Gao
Rita Cheng
Chester Dols
Ziyu He
Annie Kim
Dani Kim
Dorothy Lam
Nathaniel Padgett
Melissa Parker
Kar Rosen
Samantha Schulman
Reema Shah
Jarone Wright
Vesna Djokic
Michael Simpson
Class Notes
Here are some relevant notes from class.
Class 1
Examples of Tangible Interface:
Marble Answering Machine
Makey Makey
Sticky light
Interesting Interaction:
ZeroN
Class 2
Related to the readings:
Video by Bret Victor on “Thinking the Unthinkable”
Similar take on technology of the future by Corning
Future Tech in TV Show “Weeds”: http://venturebeat.com/2012/09/17/weeds-finale-tech/#s:weeds-2
(Scroll the image slideshow at the bottom and see different views of a similar technology to this week readings.)
Interesting read on Interaction:
Chapter 1 and 2 of Where the Action Is: The Foundations of Embodied Interaction, by Paul Dourish
From WED class conversations:
A new messenger app
Related to the principles discussed in the class readings:
Resistulator: http://www.zambetti.com/projects/resistulator
Online graphical resistor calculator: http://www.dannyg.com/examples/res2/resistor.htm
Related to the concepts discussed in class:
Electricity as water analogy:
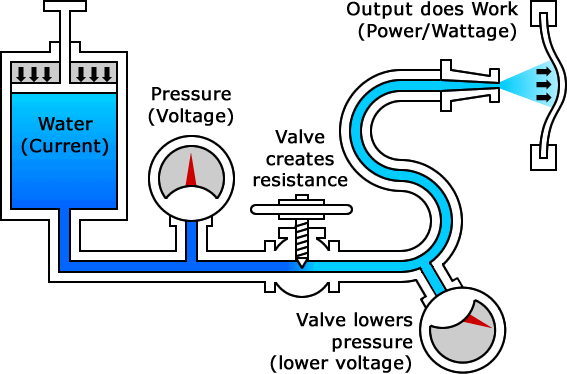
Voltage:

 ,
, 
High voltage, Low voltage
Volts, Ohms and Amps:

Class 3
Video by Don Norman on TED on “3 ways good design makes you happy”
And home made sensors and switches here:
One of my favorite project sites about soft circuits
More soft circuit projects and links to tutorials
Really cool soft sensors and other amazing wearables
Class 4
Related to the readings:
Eyewriter Project by Zach Lieberman
Open prosthetics projects:
OpenBionics
Open Hand Project
Open Prosthetics
A great example of digitally generated music by ITP Alumn Tristan Perich:
http://www.tristanperich.com/#Album/Noise_Patterns
http://www.1bitsymphony.com/
http://www.tristanperich.com/#Album/1_Bit_Music
Loud Objects performance
And by ITP Alumn and Adjunct Nick Yulman:
Bricolo
Ways of modifying pitch (frequency) at the same time as volume using a potentiometer:
http://garagelab.com/profiles/blogs/how-to-use-tone-function-arduino-playing-the-james-bond-theme
There are also digitally controllable potentiometers, so that is a way you can actually modify volume in code rather than by manually turning the knob. We will look at this in a few weeks.
Apparently there is also a new tone() library that can do volume and pitch at the same time (although it seems like the sound is not so good!):
http://playground.arduino.cc/Code/ToneAC
Also check out these other cool examples of things you can do with the tone library:
http://arduino.cc/en/reference/tone
Very old example not using the tone() library. I can’t vouch for this as I haven’t tried it in a while:
http://www.arduino.cc/en/Tutorial/PlayMelody
Movements and mechanisms:
Robives mechanisms
http://507movements.com/
http://www.flying-pig.co.uk
To connect a audio jack to the Arduino, replace the speaker with a jack as illustrated at the end of this post by Tom:
Analog Output
Class 5
Related to last week reading and conversation on Design for Disability:
Initiative by fellow ITP Alumn
DYI Ability
Related to our conversation on Fashion:
Kenneth Cole campaign The Curageous Class
https://www.kennethcole.com/campaign-the-courageous-class-fall-2016-rj.html
Working with sensors one of the most important aspects is to understand their behavior and understand how to take advantage of their range. Do you need the full range for your application? Or are you specifically looking at certain thresholds in order for something to happen? For every project you will have to thoroughly analyze your sensor options in order to identify the one that fits best as well as really understand what action/input/energy change you are looking to interpret and pick up on so that you can tune your sensors to that.
Here are some examples of things you can do:
https://itp.nyu.edu/physcomp/labs/labs-arduino-digital-and-analog/lab-sensor-change-detection/
Class 6
Notes from ICM Synthesis with 2 working examples:
https://github.com/ITPNYU/ICM-2016/wiki/Synthesis
Analog Into P5 example by Tom Igoe (works with Arduino Analog in, serial out example):
var serial; // variable to hold an instance of the serialport library
var sensorValue = 0; // ellipse position

function setup() {
createCanvas(320, 240);
serial = new p5.SerialPort(); // make a new instance of  serialport library
serial.on('list', printList); // callback function for serialport list event
serial.on('data', serialEvent); // callback for new data coming in
serial.list(); // list the serial ports
serial.open("/dev/cu.usbmodem1411"); // open a port
}

function draw() {
background("#2307AF");
fill(255);
ellipse(sensorValue, width / 2, 20, 20);
text(sensorValue, 20, 20);
}

// get the list of ports:
function printList(portList) {
for (var i = 0; i < portList.length; i++) {
// Display the list the console:
println(i + " " + portList[i]);
}
}

function serialEvent() {
var inString = serial.readLine();
if (inString.length > 0) {
inString = inString.trim();
sensorValue = Number(inString)/4;
// println(sensorValue);
}
}
Multiple analog inputs into P5, implementing Call/Response and Punctuation:
var serial; // variable to hold an instance of the serialport library
var sensorValue = 0; // ellipse position
var ballX, ballY, ballZ;

function setup() {
createCanvas(320, 240);
serial = new p5.SerialPort(); // make a new instance of  serialport library
serial.on('list', printList); // callback function for serialport list event
serial.on('data', serialEvent); // callback for new data coming in
serial.list(); // list the serial ports
serial.open("/dev/cu.usbmodem1421"); // open a port
}

function draw() {
background(0,180,155);
fill(255, 255, 255, ballZ);
ellipse(ballX, ballY, 20, 20);
//text(ballX + " " + ballY + " " + ballZ, 20, 20);
if (serial.available() === 0) {
serial.write("x");
}
}

// get the list of ports:
function printList(portList) {
for (var i = 0; i < portList.length; i++) {
// Display the list the console:
println(i + " " + portList[i]);
}
}

function serialEvent() {
var inString = serial.readLine();
if (inString.length > 0) {
inString = inString.trim();
var values = split(inString, ",");
if (values.length > 2) {
ballX = Number(values[0]);
ballY = Number(values[1]);
ballZ = Number(values[2]);
ballX = map(ballX, 0, 1023, 0, width);
ballY = map(ballY, 0, 1023, 0, height);
ballZ = map(ballZ, 0, 1023, 0, 255);
serial.write("x");
}

//sensorValue = Number(inString)/4;
// println(sensorValue);
}

}
This Arduino code:
int potValue = 0;
int potPin = A0;

void setup() {
// put your setup code here, to run once:
Serial.begin(9600);

}

void loop() {

if (Serial.available() > 0){
int inByte = Serial.read();

// put your main code here, to run repeatedly:
potValue = analogRead(potPin);
Serial.print(potValue);
Serial.print(",");
Serial.print(potValue);
Serial.print(",");
Serial.println(potValue);

}

}
Class 9
First documentation steps for a project:
0. a project description (you should have that by now)
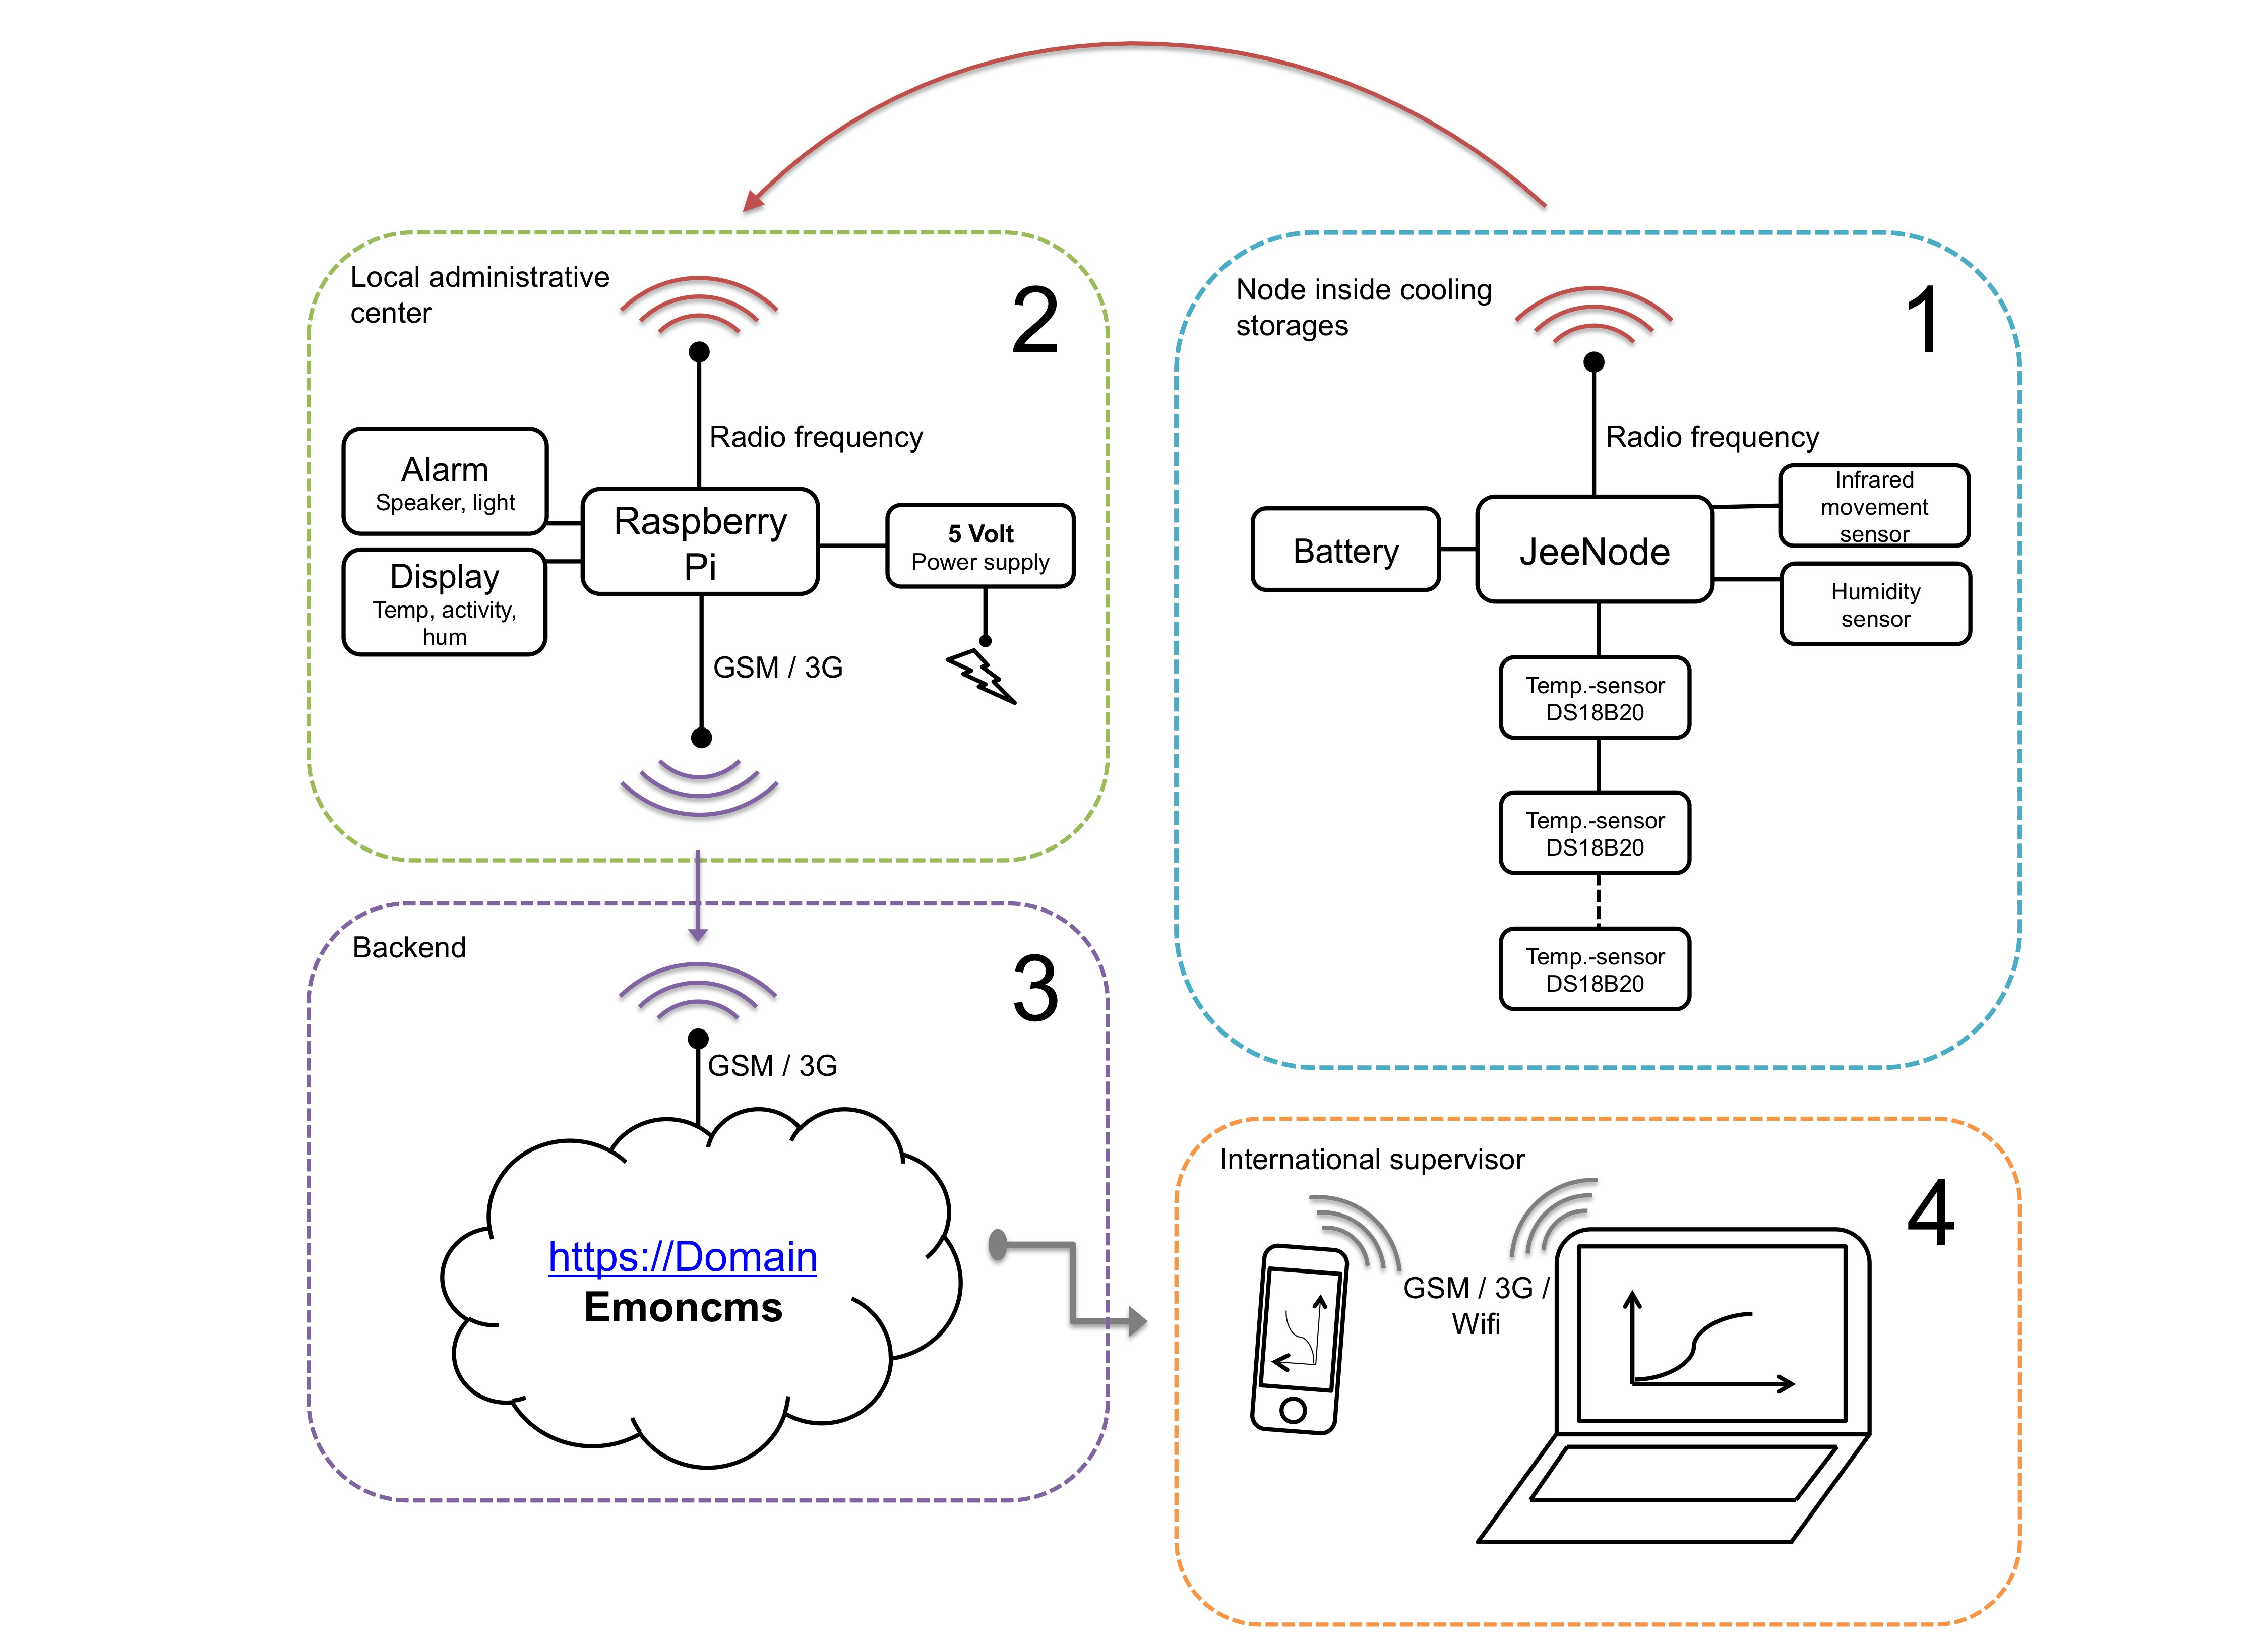
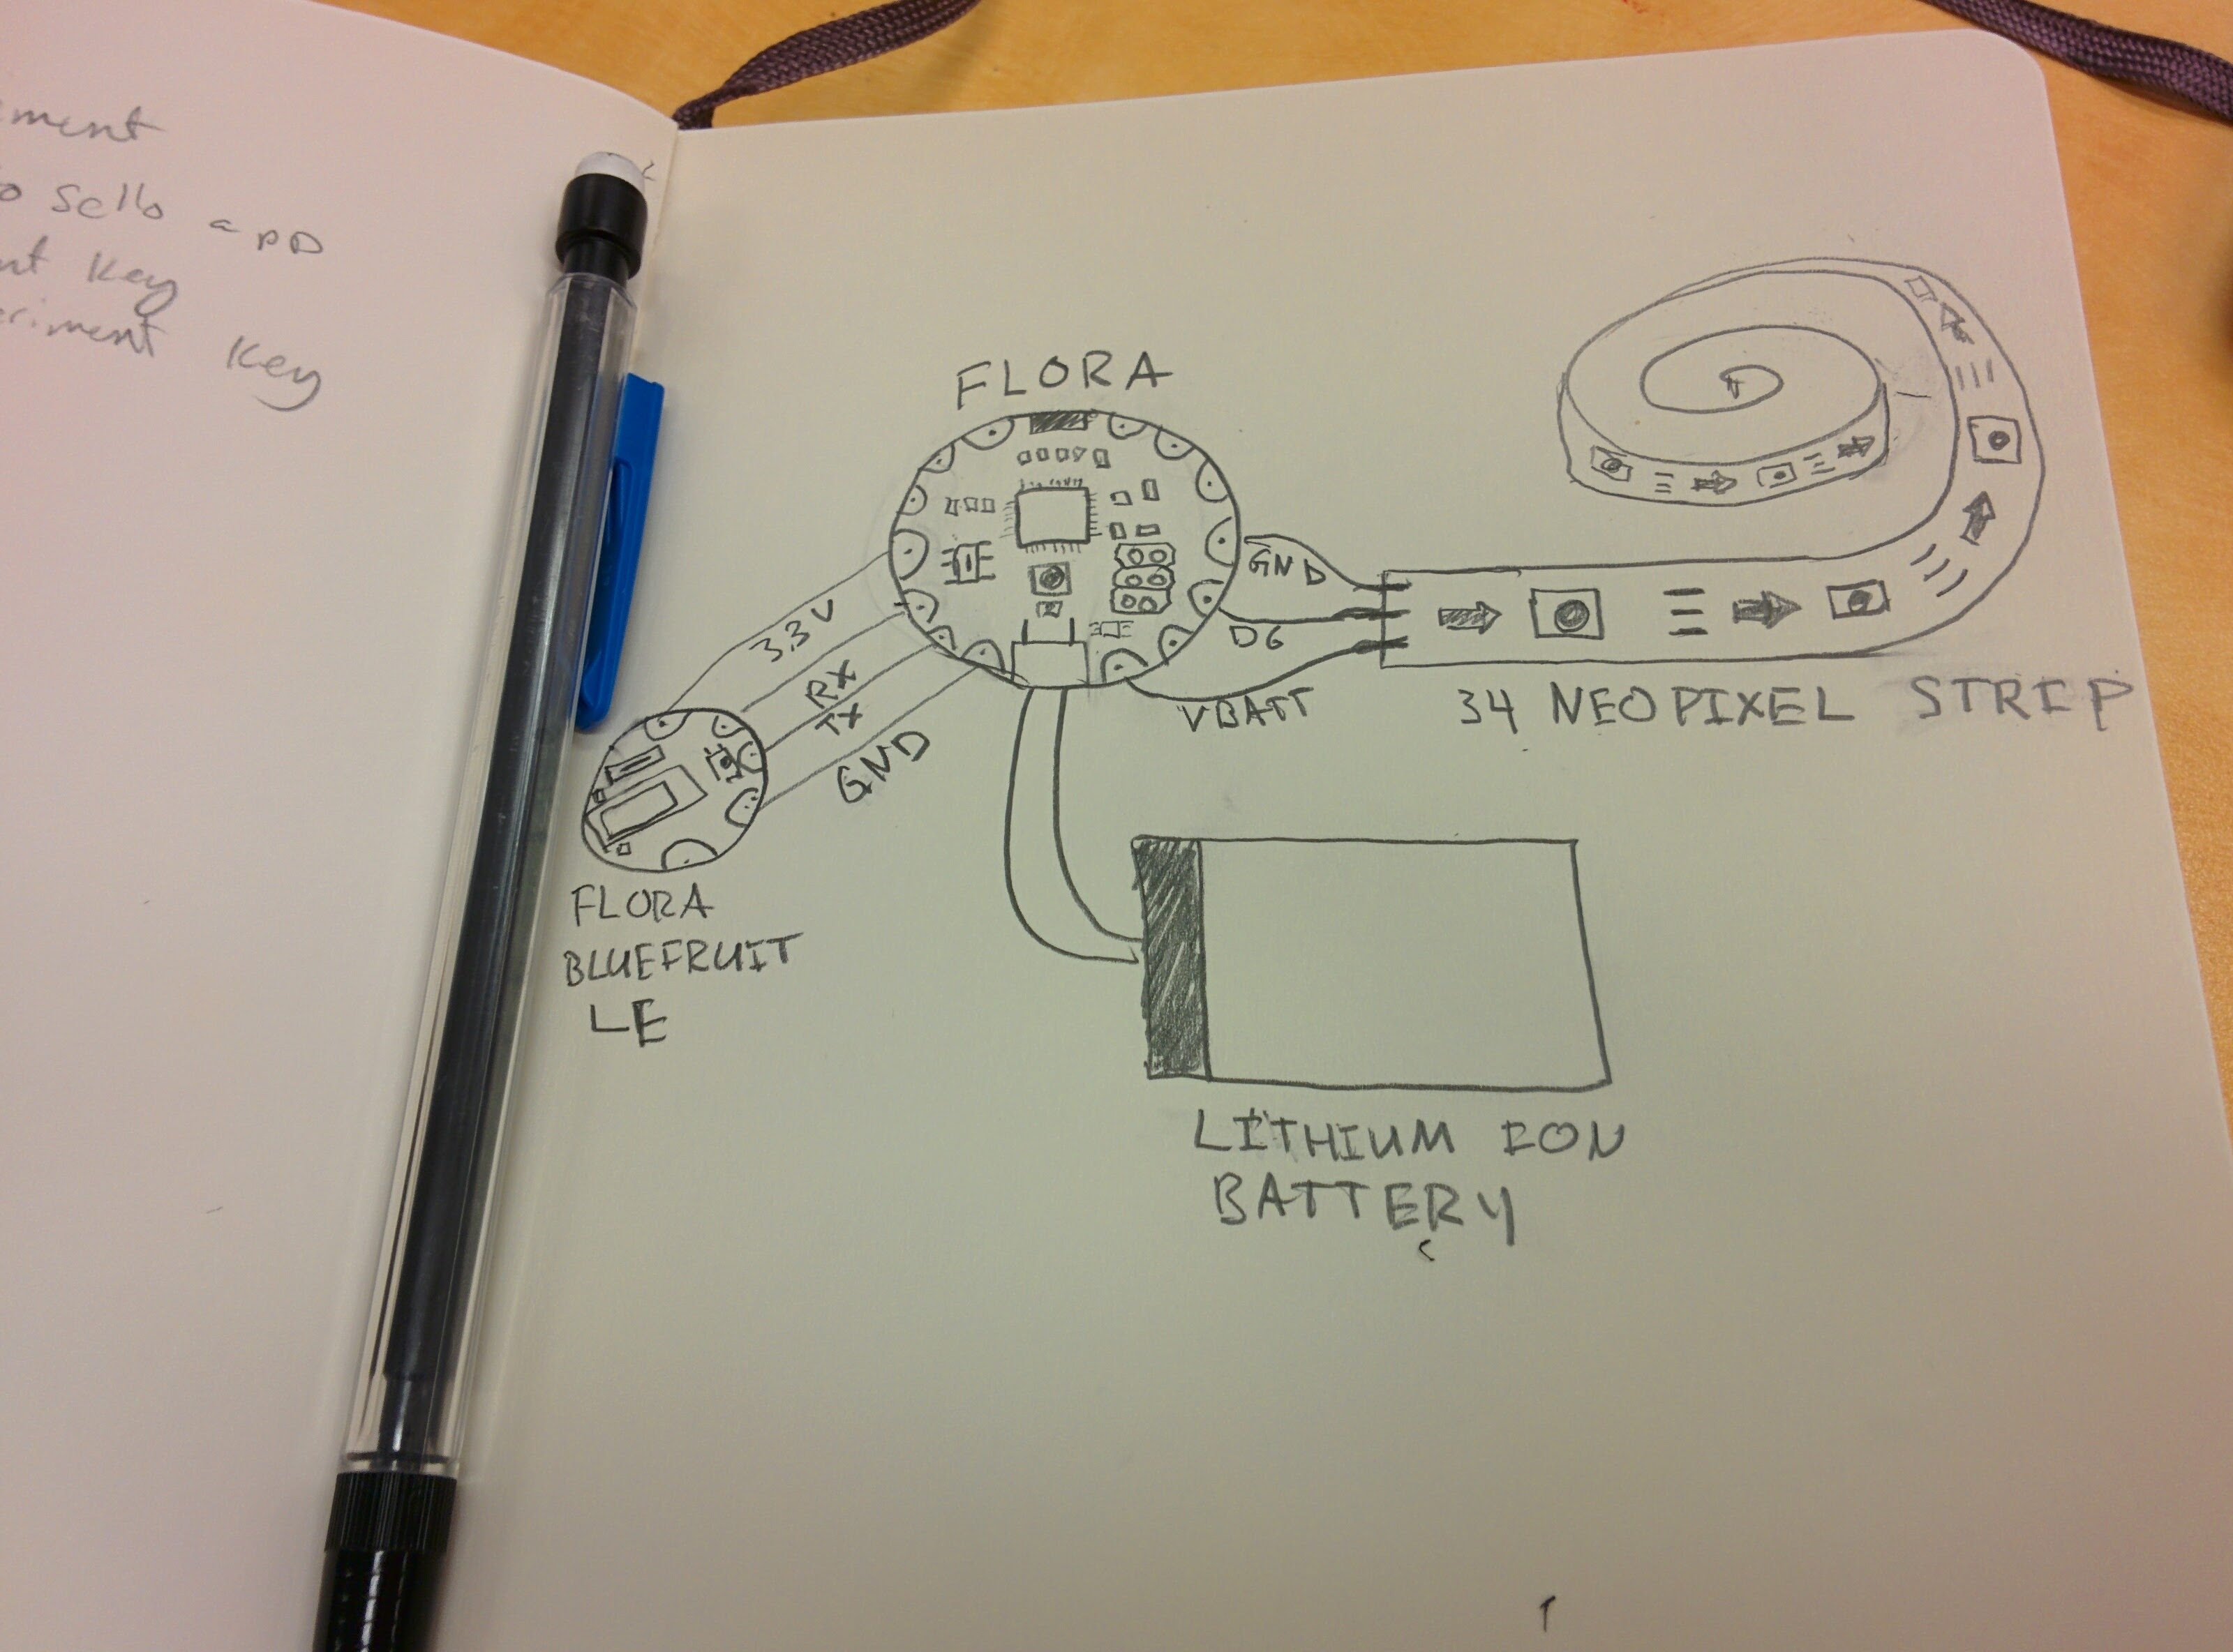
1. a system diagram: basically any diagram/sketch that lets you think through the project as a whole to gain a better understanding of all the pieces involved and how they relate to each other.
It could be a hand sketch of the components of the project (hardware, software) and how they connect with each other; it could be a conceptual mind map; it could be a block diagram of the different user interactions and programmatic flow etc. One or more diagrams that specifically address the needs of your project, but the 2 things I would focus on are:
– the interaction from your user perspective
– the technical components of your project
some examples here (but a google image search would show you lots more):


Also relevant: Various resources from the great Bill Verplank on Designing Interactions. Lots of papers and presentations you can find online. He is a fantastic resource on designing interactions and breaking that process up in steps.
http://www.billverplank.com/professional.html
http://www.designinginteractions.com/interviews/BillVerplank
Document the System diagrams on your blog! Together with your concept description.
1b. a technical diagram:
2. Bill Of Materials or BoM. (list of components, hardware pieces, software modules etc.). If any of these have cost associated with them, itemize them so you can build a budget alongside. If the project involves physical parts, usually is good practice to add a quick description, quantity, manufacturer name and product id, source where you are going to purchase from and price. A itemized list, an Excel spreadsheet or table is a good form for this.


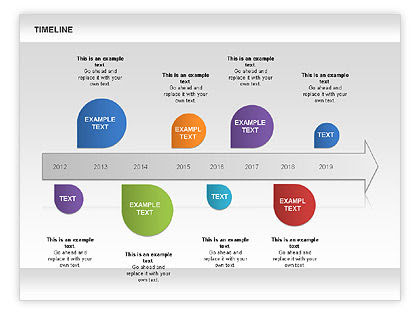
3. A timeline: an overall breakdown of the activities for the next weeks, deliverables and things to accomplish each step of the way. Formats for timelines vary, it can be a table, a hand written timetable or a more sophisticated graphics all the way up to Gantt charts.


———-
For an example of Serial communication in Binary happening between Arduino & P5 please refer to this example by Tom Igoe:
https://github.com/ITPNYU/physcomp/tree/master/labs2016/SerialBinary