Class Info
What: Intro to Physical Computing Wednesday Session ITPG-GT.2301.5
When: Wednesdays 12.10pm – 2.40pm, (Fall 2015 Class Dates)
Where: NYU Tisch Building, 4th floor, Room 406
Who: Benedetta Piantella
What: Intro to Physical Computing Thursday Session ITPG-GT.2301.6
When: Thursdays 12.10pm – 2.40pm, (Fall 2015 Class Dates)
Where: NYU Tisch Building, 4th floor, Room 442
Who: Benedetta Piantella
Contact
Best way to reach me is via email at: bp432@nyu.edu or benedetta.piantella@nyu.edu
Office Hours by appointment on Wednesdays, Thursdays and Fridays. Sign up on my Calendar with your NYU account NOT your gmail, or email me to set something else up outside of those times/days.
Grading
30% In-class lab work and participation
20% Physical interaction controller project (Stupid Pet Trick)
30% Final project
20% Blog & documentation
Supplies
See the following link for Parts Needed
Suppliers
Adafruit Industries
DigiKey
Sparkfun
Jameco
Mouser
Seeedstudio
DFRobot
NYU Bookstore
Tinkersphere
AC Gears
Microcenter
Useful Links
- Arduino website, check out the Getting Started and the Reference pages for starters
- Tom Igoe’s Pcomp Experiments
- ITP Sensor Workshop wiki from another class at ITP
- Dustyn Roberts’ class on mechanisms, very useful for when we do motors
- Good resources on movement and mechanisms
- How to solder tutorial including video
Some Reference Books
- Arduino Starter Kit Booklet
- Physical Computing: Sensing and Controlling the Physical World with Computers
- Getting Started with Arduino
- Arduino Cookbook
- Make: Electronics
- Make: More Electronics
- Getting Started in Electronics
- Making Things Talk
- Making Things Move
- Practical Electronics For Inventors
- Energy
- There are no electrons; Electronics for earthlings
- Fashioning Technology: A DIY Intro to Smart Crafting
- Code: The Hidden Language of Computer Hardware and Software
Class Blogs
Please email me the link to your blog documentation for the class so we can continue our conversations and offer feedback online too!
Wednesday Class
-
Dhruv Mehrotra
Jed Watson
Phil Guo
Jarrett Slavin
Jamie Ruddy
Aaron Parsekian
Wipawe Sirikolkarn
Isabel Donlon
Serena Xue
Daniel Silber-Baker
Gal Nissim
David Lockard
Thursday Class
-
Ruta Kruliauskaite
Lisa Jamhoury
Eva Huang
Kevin Stirnweis
Gustavo Abbott
Dana Abrassart
Ian Gibson
KC Lathrop
Shir David
Paula Ceballos Delgado
Olivia Cueva
Lindsey Johnson
Serena Parr
Danielle Butler
Melanie Hoff
Zoe Bachman
Class Notes
Here are some relevant notes from class.
Class 1
Examples of Tangible Interface:
Marble Answering Machine
Makey Makey
Sticky light
Interesting Interaction:
ZeroN
Class 2
Related to the readings:
Video by Bret Victor on “Thinking the Unthinkable”
Similar take on technology of the future by Corning
Future Tech in TV Show “Weeds”: http://venturebeat.com/2012/09/17/weeds-finale-tech/#s:weeds-2
(Scroll the image slideshow at the bottom and see different views of a similar technology to this week readings.)
Interesting read on Interaction:
Chapter 1 and 2 of Where the Action Is: The Foundations of Embodied Interaction, by Paul Dourish
Related to the principles discussed in the class readings:
Resistulator: http://www.zambetti.com/projects/resistulator
Online graphical resistor calculator: http://www.dannyg.com/examples/res2/resistor.htm
Related to the concepts discussed in class:
Electricity as water analogy:
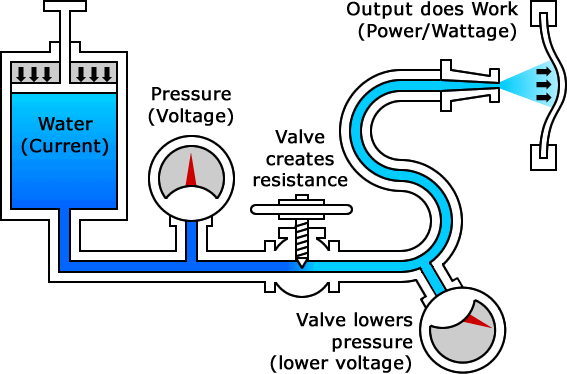
Voltage:

 ,
, 
High voltage, Low voltage
Volts, Ohms and Amps:

Class 3
Video by Don Norman on TED on “3 ways good design makes you happy”
Class 4
A great example of digitally generated music by ITP Alumn Tristan Perich:
http://www.1bitsymphony.com/
http://www.tristanperich.com/#Album/1_Bit_Music
http://www.loudobjects.com/
And by ITP Alumn and Adjunct Nick Yulman:
http://nysoundworks.org/
As discussed in class, ways of modifying pitch (frequency) at the same time as volume using a potentiometer:
http://garagelab.com/profiles/blogs/how-to-use-tone-function-arduino-playing-the-james-bond-theme
There are also digitally controllable potentiometers, so that is a way you can actually modify volume in code rather than by manually turning the knob. We will look at this in a few weeks.
Apparently there is also a new tone() library that can do volume and pitch at the same time (although it seems like the sound is not so good!):
http://playground.arduino.cc/Code/ToneAC
Also check out these other cool examples of things you can do with the tone library:
http://arduino.cc/en/reference/tone
Very old example not using the tone() library. I can’t vouch for this as I haven’t tried it in a while:
http://www.arduino.cc/en/Tutorial/PlayMelody
Movements and mechanisms:
http://507movements.com/
http://www.flying-pig.co.uk
Class 5
Working with sensors one of the most important aspects is to understand their behavior and understand how to take advantage of their range. Do you need the full range for your application? Or are you specifically looking at certain thresholds in order for something to happen? For every project you will have to thoroughly analyze your sensor options in order to identify the one that fits best as well as really understand what action/input/energy change you are looking to interpret and pick up on so that you can tune your sensors to that.
Here are some examples of things you can do:
https://itp.nyu.edu/physcomp/labs/labs-arduino-digital-and-analog/lab-sensor-change-detection/
Class 6
To communicate serially from Arduino to P5.js (there are also other programs and platforms that are able to read serial ports) here are some useful links:
Here is the repo for the p5.serialport library:
https://github.com/vanevery/p5.serialport
Download a version of the P5.js editor that has the p5.serialport server integrated (it is automatically launched when a sketch is launched), P5.js editor version 0.5.5 or later. Download from here: http://saaaam.s3.amazonaws.com/p5-5.5-beta-mac.zip
Instructions for installing the Serial library on Windows:
1. Download and install this version of node.js
2. Once it is installed, open up a command prompt and type: npm install p5.serialserver
3. Once that is done, you now have to navigate to the directory where it was installed and start the server. It should be:
cd node_modules
cd p5.serialserver
node startserver.js
(Keep command prompt running.)
4. Try one of the examples
5. In the sketches for p5 make sure to change the port to whatever your port is in the Arduino IDE (for me it was COM3). That line is serial.open(“NAMEOFYOURPORT”);
6. Test and make sure it works!
If it doesn’t work or if you have issues, come to my office hours and I’ll help you out:
https://itp.nyu.edu/inwiki/Signup/Shawn
Class 8
How to run the P5 Serial server from your Terminal:
1. install this version of node from here: https://nodejs.org/en/blog/release/v0.12.7/
after you installed node issue the following commands in terminal:
npm install p5.serialserver
3. issue the following command to list the files on your computer:
ls
4. find the folder called node_modules and get inside:
cd node_modules
run the serial server from terminal:
node p5.serialserver/startserver.js
5. open P5 and now you can run your sketch without having to start and stop the serial server from the editor. When you want to close the serial server running in your terminal window, press Control+C
Class 9
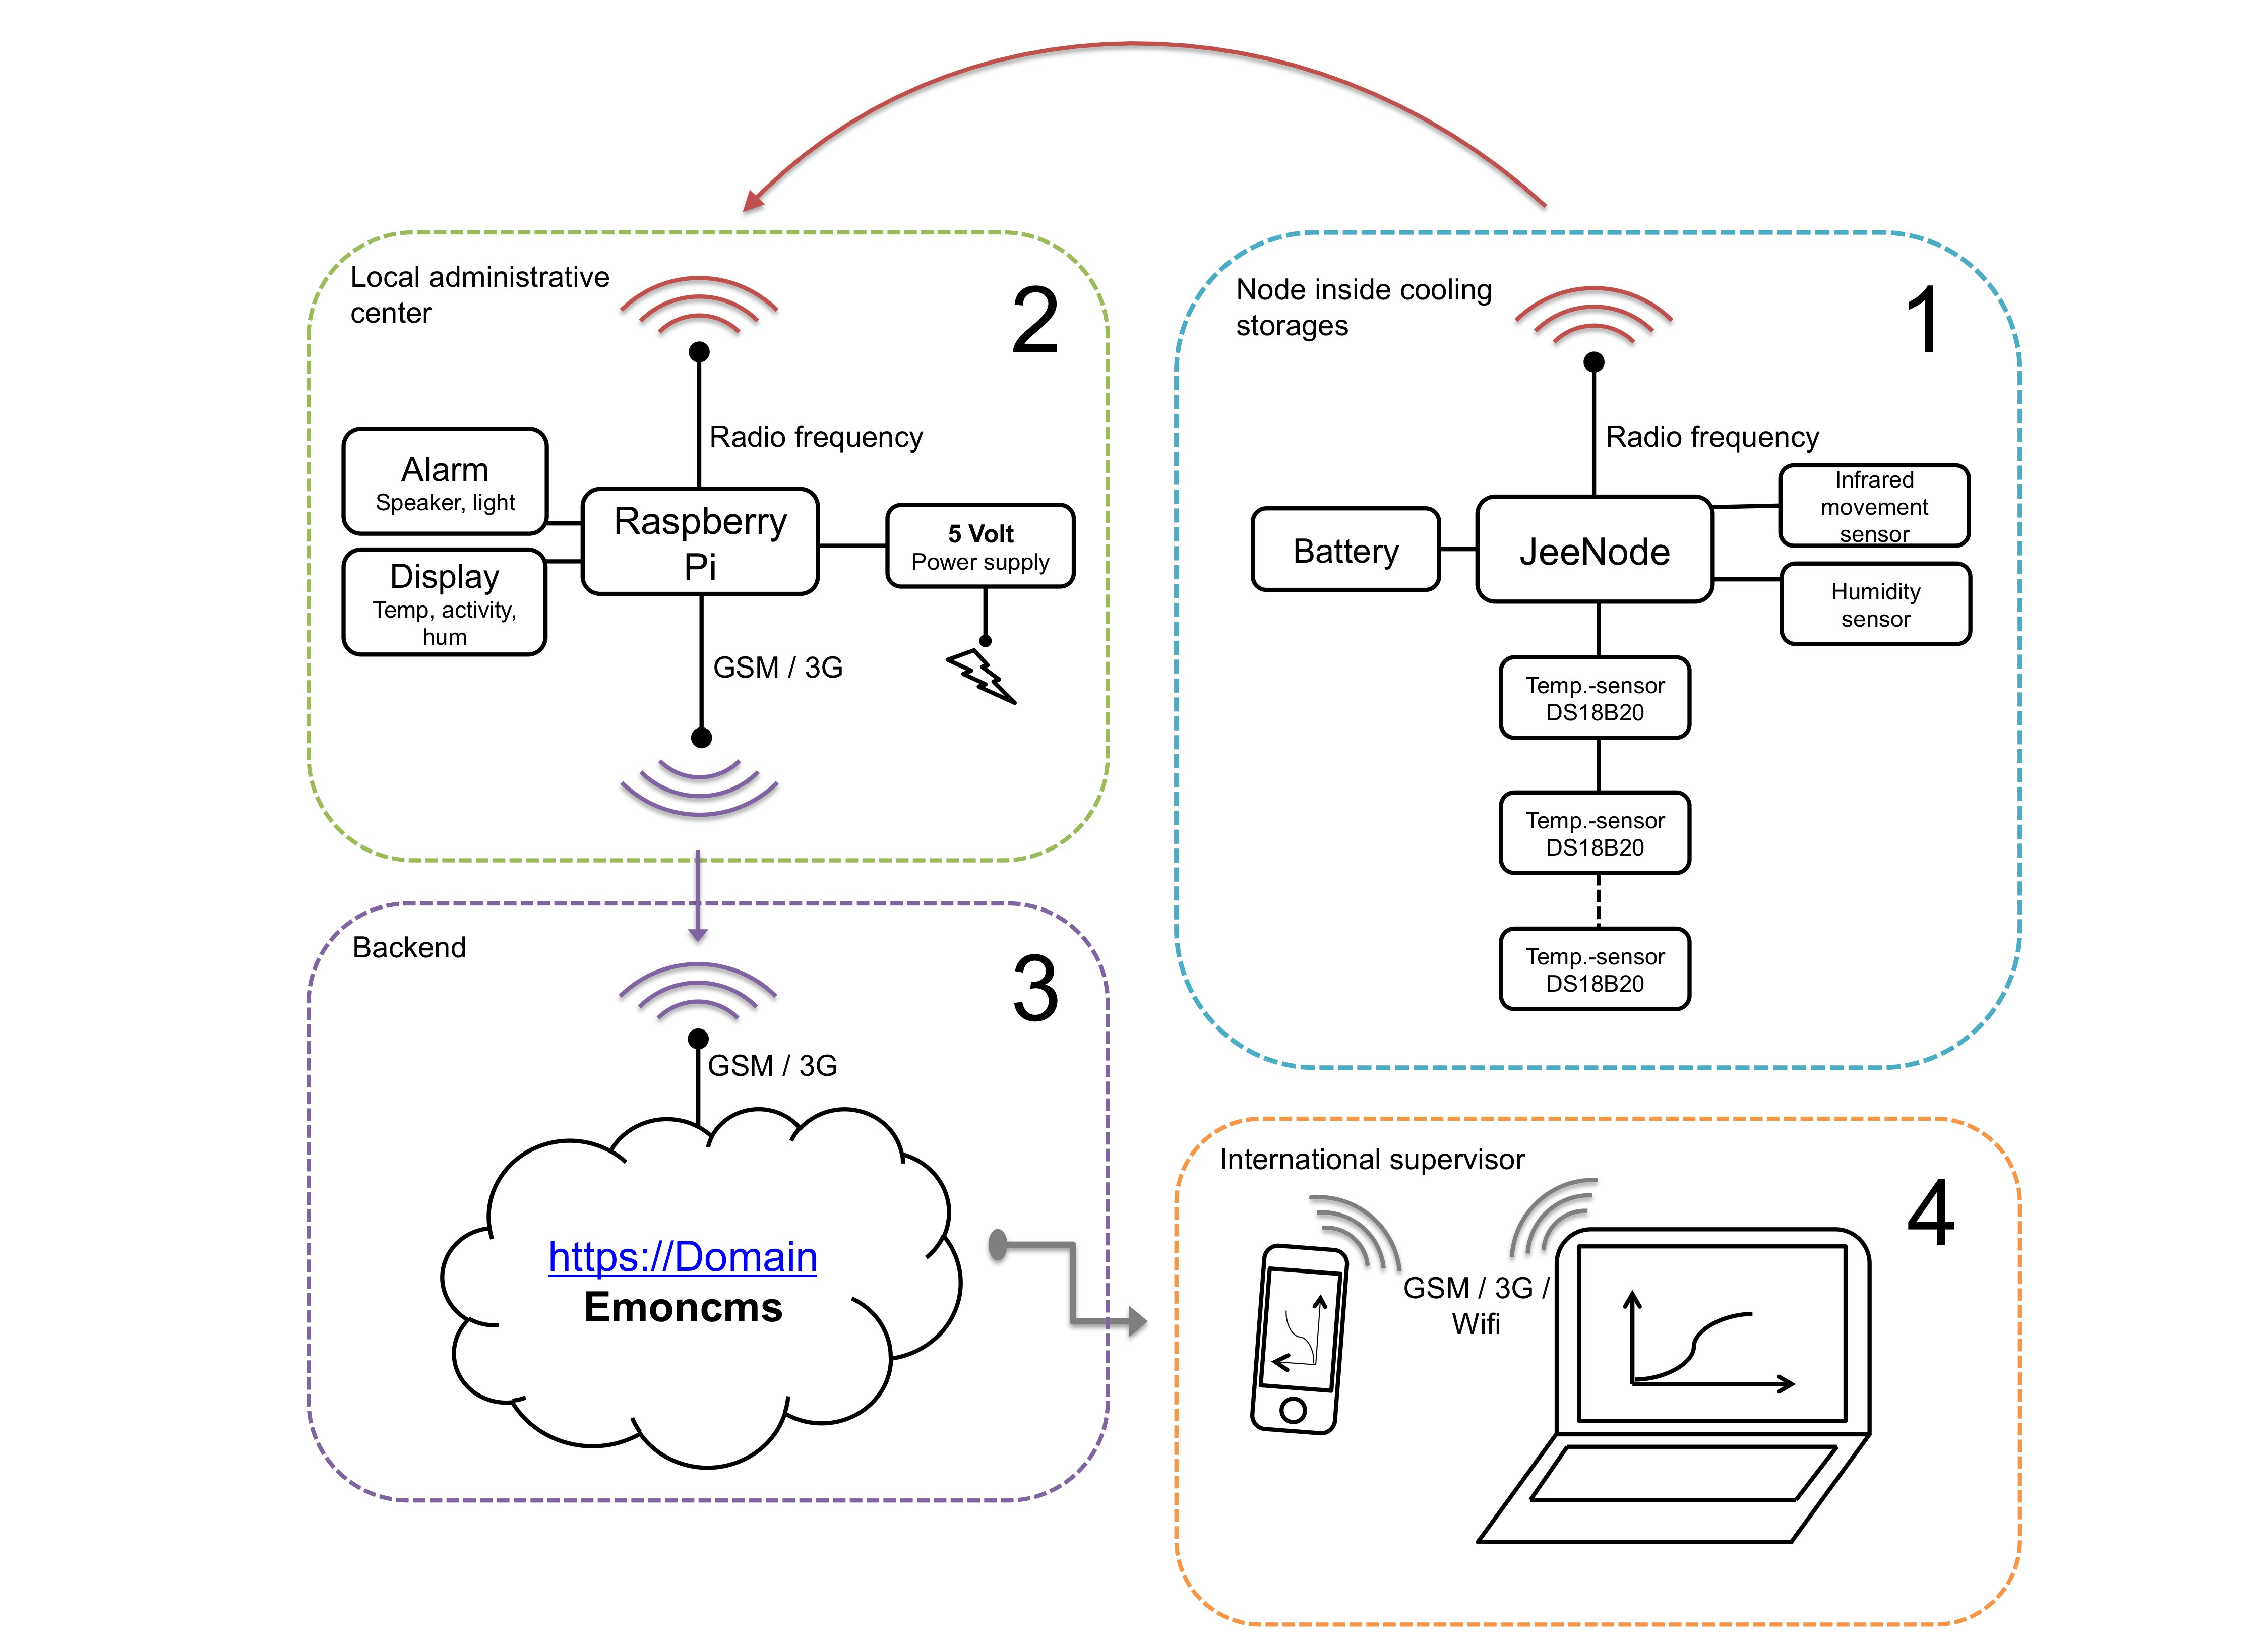
First documentation steps for a project:
0. a project description (you should have that by now)
1. a system diagram: basically any diagram/sketch that lets you think through the project as a whole to gain a better understanding of all the pieces involved and how they relate to each other.
It could be a hand sketch of the components of the project (hardware, software) and how they connect with each other; it could be a conceptual mind map; it could be a block diagram of the different user interactions and programmatic flow etc. One or more diagrams that specifically address the needs of your project, but the 2 things I would focus on are:
– the interaction from your user perspective
– the technical components of your project
some examples here (but a google image search would show you lots more):


Also relevant: Various resources from the great Bill Verplank on Designing Interactions. Lots of papers and presentations you can find online. He is a fantastic resource on designing interactions and breaking that process up in steps.
http://www.billverplank.com/professional.html
http://www.designinginteractions.com/interviews/BillVerplank
Document the System diagrams on your blog! Together with your concept description.
2. Bill Of Materials or BoM. (list of components, hardware pieces, software modules etc.). If any of these have cost associated with them, itemize them so you can build a budget alongside. If the project involves physical parts, usually is good practice to add a quick description, quantity, manufacturer name and product id, source where you are going to purchase from and price. A itemized list, an Excel spreadsheet or table is a good form for this.


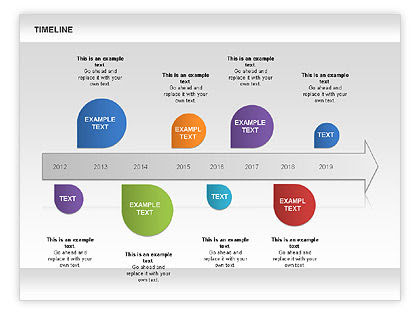
3. A timeline: an overall breakdown of the activities for the next weeks, deliverables and things to accomplish each step of the way. Formats for timelines vary, it can be a table, a hand written timetable or a more sophisticated graphics all the way up to Gantt charts.


Class 11
Code for Arduino to control speed and direction of DC Motor with HBridge
int switchPin = 2;
int enablePin = 9;
int motor1pin = 3;
int motor2pin = 4;
int potPin = A1;

void setup() {
// put your setup code here, to run once:
pinMode(switchPin, INPUT);
pinMode(enablePin, OUTPUT);
pinMode(motor1pin, OUTPUT);
pinMode(motor2pin, OUTPUT);
//digitalWrite(enablePin, HIGH);
}

void loop() {
// put your main code here, to run repeatedly:

int potValue = analogRead(potPin);
int motorSpeed = map(potValue, 0, 1023, 0, 255);

int switchState = digitalRead(switchPin);

if (switchState == HIGH){

digitalWrite(motor1pin, HIGH);
digitalWrite(motor2pin, LOW);

analogWrite(enablePin, motorSpeed);
}

else {
digitalWrite(motor2pin, HIGH);
digitalWrite(motor1pin, LOW);

analogWrite(enablePin, motorSpeed);
}
}