Always On, Always Connected Week 2 - Android Development Basics
Logging
Add the following import statement to your code:
import android.util.Log;
And within the onClick method add a line like this:
Log.v("Clicker", "Button Clicked");
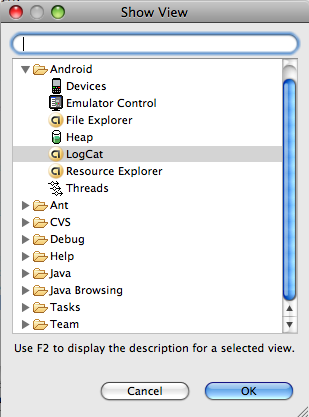
To see the log messages, we need to tell Eclipse to show them to us. Their is a panel in Eclipse (part of the Android integration) called LogCat. To open LogCat, select Window: Show View: Other: Android: LogCat
You should see a new panel open at the bottom of your Eclipse Workspace called "LogCat". Now when you run the application, you can use the "LogCat" pane to view what is happening.
Logging Screencast
Making Toast
As proof that Android has a sense of humor there is a class called Toast which allows us to pop-up messages. Let's make our onClick method in Hello World pop-up some toast.
We'll need to import android.widget.Toast along with the rest of our import statements. Following that we can just use it. We use the static method "makeText" to create a new Toast view and then the "show" method to display it.
Toast t = Toast.makeText(this,"Button Clicked!",Toast.LENGTH_LONG);
t.show();
Here is our full source code:
package com.mobvcasting.helloworld;

import android.app.Activity;
import android.os.Bundle;
import android.view.View;
import android.view.View.OnClickListener;
import android.widget.Button;
import android.widget.Toast;

public class HelloWorld extends Activity {

	Button aButton;

    /** Called when the activity is first created. */
    @Override
    public void onCreate(Bundle savedInstanceState) {
        super.onCreate(savedInstanceState);
        setContentView(R.layout.main);

        aButton = (Button) this.findViewById(R.id.Button01);
        aButton.setOnClickListener(new OnClickListener() {
			public void onClick(View v) {
				aButton.setText("You Clicked Me");

				Toast t = Toast.makeText(this,"Button Clicked!",Toast.LENGTH_LONG);
    				t.show();

			}});
    }
}
Toast Screencast
Activity
As we spoke about previously, an Activity is a class that represents something in between a single screen and a full application. In a model, view, controller world, an Activity would be a controller, providing the application logic.
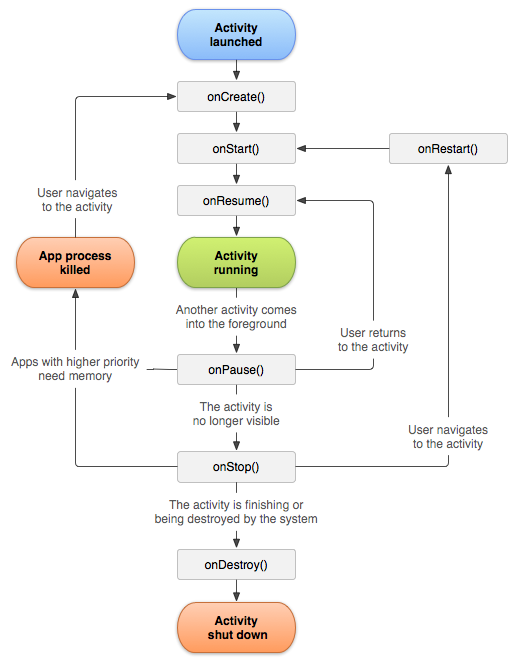
Activity Life Cycle
Up until now, we have only been dealing with the onCreate lifecycle method in our Activities
    @Override
    public void onCreate(Bundle savedInstanceState) {
        super.onCreate(savedInstanceState);
        setContentView(R.layout.main);
    }
The onCreate method is run once when the Activity is first created. This means that we can't count on the method being run everytime the application is brought to the front. For instance, if we have a Button that updates the contents of a TextView, the updated value may still be there next time the Application is run by the user.
Here is an example:
package com.mobvcasting.activitylifecycle;

import android.app.Activity;
import android.os.Bundle;
import android.view.View;
import android.view.View.OnClickListener;
import android.widget.Button;
import android.widget.TextView;

public class ActivityLifecycle extends Activity implements OnClickListener {

	Button aButton;
	TextView aTextView;

	@Override
	public void onCreate(Bundle savedInstanceState) {
		super.onCreate(savedInstanceState);
		setContentView(R.layout.main);

		aButton = (Button) this.findViewById(R.id.Button01);
		aTextView = (TextView) this.findViewById(R.id.TextView01);

		aButton.setOnClickListener(this);
	 }


	 public void onClick(View view) {
		  if (view == aButton) {
			   aTextView.setText("Button was pressed!");
		  }
	 }
}
Running this the first time, the TextView will display "Starting State" as specified in the layout XML. After pushing the button, it will change to "Button was pressed!". Leaving the app (by pushing the home button or by some other means) and then coming back, the text will most likely still read "Button was pressed!".
This is because Android by default doesn't quit the application when the user leaves. It continues running in the background and it's state may be retained as shown in this example.
We can force the Activity to quit by calling the finish() method. We can do this in one of the methods that is called when the Activity is left.
public void onPause() {
     super.onPause();
     finish();
}
The onPause() method is called when the Activity is no longer in front. It is guaranteed to be called whereas the onStop() method may not be called if Android decides to destroy the Activity before it is called (after onPause()).
As with all of the lifecycle methods, the corresponding method in the super class needs to be called first thing.
Forcing the Activity to finish() onPause probably isn't the best form and it goes against the way Android is supposed to work. To simply make something happen every time an Activity is brought to the front we can use the onResume() or the onStart() methods.
public void onResume() {
     aTextView.setText("Starting State");
}
Of course, we may actually want to save the state of an Activity in case Android destroys it.
To do this, we can use the onSaveInstanceState(Bundle outState) method:
As we talked about previously, one of the basic building blocks of Android applications are Activities. An Activity is conceptually somewhere between a full application and a screen of an application.
For instance, we could have an Activity that has multiple screens by switching the View that is displayed.
Here is one layout XML called main.xml:
Another thing we can do is set the visibility of individual elements in a view as in the following example:
package com.mobvcasting.multiplescreens;

import android.app.Activity;
import android.os.Bundle;
import android.view.View;
import android.view.View.OnClickListener;
import android.widget.Button;
import android.widget.TextView;

public class MultipleScreens extends Activity implements OnClickListener {

     Button changeButton;
     TextView textView;

     @Override
     public void onCreate(Bundle savedInstanceState) {
        super.onCreate(savedInstanceState);
        setContentView(R.layout.main);

        changeButton = (Button) this.findViewById(R.id.MainButton);
        changeButton.setOnClickListener(this);

        textView = (TextView) this.findViewById(R.id.MainTextView);
     }

     public void onClick(View v) {
          //setContentView(R.layout.other);
          textView.setVisibility(View.INVISIBLE);
          // Could also do
          //textView.setVisibility(View.GONE);
          // which will make it so the View no longer occupies any space
     }
}
View Visibility Screencast
LayoutInflator
Finally, if we have more than one view and we need to access members of the view before they are displayed, we use a LayoutInflator.
Using a LayoutInflator, we can turn our XML files into a regular View object (which Android normally does behind the scenes for us when we call setContentView). Doing this allows us to manipulate members of that View (such as a TextView within in) without first making it visible. It also means that we can call setContentView and pass in the actual View object rather than the resource ID.
Here is an example:
Instead of switching views within an Activity, we could instead go from Activity to Activity each with it's own view.
Let's create a second Activity in our existing project and have it load the other.xml layout:
package com.mobvcasting.multiplescreens;

import android.app.Activity;
import android.os.Bundle;

public class OtherActivity extends Activity {

     @Override
     public void onCreate(Bundle savedInstanceState) {
          super.onCreate(savedInstanceState);
          setContentView(R.layout.other);
     }
}
AndroidManifest.xml Adding Activities
Before we go any further, we have to tell the Android system about our new Activity by adding an entry for it in the AndroidManifest.xml file for our project.
The line we need to add is as follows:
It should appear within the tag but not inside the existing tag.
Here is my full AndroidManifest.xml file for this project:
Now we can modify the our first Activity to launch this second Activity when the button is pressed. To do this we use something called an Intent.
An Intent is another building block of Android applications. It essentially boils down to telling the OS to launch something or perform some action and give us the ability to pass a message or other data along.
Within an application, we use intents to launch other activities:
Intent i = new Intent(this, OtherActivity.class);
startActivity(i);
Now when we push the button on the first screen, the first activity is stopped (or paused) and the other activity is launched. One side effect here is that we can use the "back" button to go back to the first Activity.
If we add a button to our other activity and call finish(), we'll return to our first activity.
The button in other.xml:
    <Button
         android:id="@+id/OtherButton"
         android:layout_width="wrap_content"
         android:layout_height="wrap_content"
         android:text="Press Me to finish"
    />
What if though, we needed to return some information back to the first activity. In that case, we would launch our intent with startActivityForResult instead of just startActivity. We have to pass in a constant that identifies the result when it returns as well as implement a method onActivityResult to get the results.
Here is our new main activity:
package com.mobvcasting.multiplescreens;

import android.app.Activity;
import android.content.Intent;
import android.os.Bundle;
import android.view.LayoutInflater;
import android.view.View;
import android.view.View.OnClickListener;
import android.widget.Button;
import android.widget.TextView;
import android.widget.Toast;

public class MultipleScreens extends Activity implements OnClickListener {

     public static final int OTHER_ACTIVITY = 0;

     Button changeButton;
     TextView textView;

     LayoutInflater inflater;

     View mainView;

    @Override
    public void onCreate(Bundle savedInstanceState) {
        super.onCreate(savedInstanceState);

    inflater = LayoutInflater.from(this);
        mainView = inflater.inflate(R.layout.main, null);

        changeButton = (Button) mainView.findViewById(R.id.MainButton);
        changeButton.setOnClickListener(this);

        textView = (TextView) mainView.findViewById(R.id.MainTextView);

        setContentView(mainView);
    }

     public void onClick(View v) {
          Intent i = new Intent(this, OtherActivity.class);
          startActivityForResult(i, OTHER_ACTIVITY);
     }

     protected void onActivityResult(int requestCode, int resultCode, Intent intent) {
          super.onActivityResult(requestCode, resultCode, intent);

          if (requestCode == OTHER_ACTIVITY) {
               if (resultCode == RESULT_OK) {
                    // Get the data from the OtherActivity
                    String returnedData = intent.getStringExtra("thedatatoreturn");
                    Toast t = Toast.makeText(this, returnedData, Toast.LENGTH_SHORT);
                    t.show();
               }
        }
     }
}
To pass data back from the other activity, we have to put it as an "extra" in an Intent and call setResult before calling finish:
Intent resultData = new Intent();
resultData.putExtra("thedatatoreturn", "Yay!");
setResult(Activity.RESULT_OK, resultData);

finish();
Here is a full example of passing data around between two Activities: ActivityToActivity.zip
Passing Data Between Activities Screencast Part 1
Passing Data Between Activities Screencast Part 2
Launching Built-In Apps with Intents
Intents are extremely useful in leveraging the built-in capabilities on Android. Using an Intent, we can allow the user to send an SMS message, compose an email, launch a browser window, select a picture, take a picture and more.
Here is a code snippet for sending an SMS message via an Intent:
Intent smsIntent = new Intent(Intent.ACTION_VIEW);
smsIntent.setType("vnd.android-dir/mms-sms");
smsIntent.putExtra("address", "12125551212");
smsIntent.putExtra("sms_body","Body of Message");
startActivity(smsIntent);
For launching a web page in the browser:
Intent intent = new Intent(Intent.ACTION_VIEW);
Uri uri = Uri.parse("http://www.mobvcasting.com/");
intent.setData(uri);
startActivity(intent);
For taking a picture:
Intent i = new Intent(android.provider.MediaStore.ACTION_IMAGE_CAPTURE);
startActivityForResult(i, CAMERA_RESULT);
In this case, we called it with startActivityForResult so that we can get access to the picture once it is captured.
Here is the full example:
package com.apress.proandroidmedia.ch1.cameraintent;

import android.app.Activity;
import android.content.Intent;
import android.graphics.Bitmap;
import android.os.Bundle;
import android.widget.ImageView;

public class CameraIntent extends Activity {

     final static intCAMERA_RESULT = 0;

     ImageView imv;

     @Override
     public void onCreate(Bundle savedInstanceState) {
		super.onCreate(savedInstanceState);
		setContentView(R.layout.main);

		Intent i = new Intent(android.provider.MediaStore.ACTION_IMAGE_CAPTURE);
		startActivityForResult(i, CAMERA_RESULT);
	}

	protected void onActivityResult(int requestCode, int resultCode, Intent intent) {
		 super.onActivityResult(requestCode, resultCode, intent);

		if (resultCode == RESULT_OK) {
			Bundle extras = intent.getExtras();
			Bitmap bmp = (Bitmap) extras.get("data");
			imv = (ImageView) findViewById(R.id.ReturnedImageView);
			imv.setImageBitmap(bmp);
		}
	}
}
A whole slew of applications allow specific actions to be triggered via an intent. http://www.openintents.org offers a good list.
Leveraging Existing Applications using Intents Screencast Coming Soon!