Always On, Always Connected Week 2 - Android Development Basics - Part 2
Layouts/ViewGroups
Android's has a View class which is generally the base for all interface components. A ViewGroup is a subclass of View and is a user interface component that contains other components (Views) and how they are visually organized or layed out.
LinearLayout
LinearLayout Android Reference
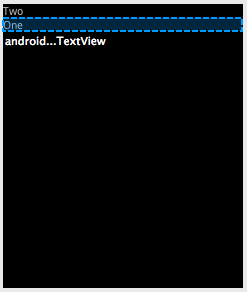
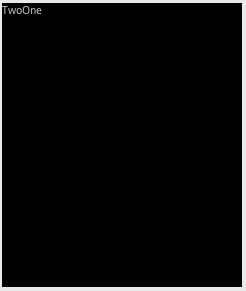
LinearLayout is a ViewGroup or layout which arranges it's children in either a single column or row as defined by it's "orientation" parameter.
Vertical:
<?xml version="1.0" encoding="utf-8"?>
<LinearLayout xmlns:android="http://schemas.android.com/apk/res/android"
    android:orientation="vertical"
    android:layout_width="fill_parent"
    android:layout_height="fill_parent"
    >
	<TextView
    	android:layout_width="fill_parent"
    	android:layout_height="wrap_content"
    	android:text="One"
    />
	<TextView
    	android:layout_width="fill_parent"
    	android:layout_height="wrap_content"
    	android:text="Two"
    />
</LinearLayout>

Horizontal:
<?xml version="1.0" encoding="utf-8"?>
<LinearLayout xmlns:android="http://schemas.android.com/apk/res/android"
    android:orientation="horizontal"
    android:layout_width="fill_parent"
    android:layout_height="fill_parent"
    >
	<TextView
    	android:layout_width="wrap_content"
    	android:layout_height="wrap_content"
    	android:text="Two"
    />
	<TextView
    	android:layout_width="wrap_content"
    	android:layout_height="wrap_content"
    	android:text="One"
    />
</LinearLayout>

Many times, layouts will be defined by nesting layouts such as in this LinearLayout tutorial.
AbsoluteLayout
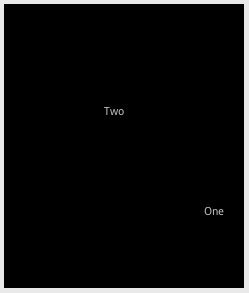
Using this layout we have to define the exact position of it's children.
<?xml version="1.0" encoding="utf-8"?>
<AbsoluteLayout
  xmlns:android="http://schemas.android.com/apk/res/android"
  android:layout_width="fill_parent"
  android:layout_height="fill_parent">
	<TextView
    	android:layout_width="wrap_content"
    	android:layout_height="wrap_content"
    	android:text="Two"
    	android:layout_x="100px"
    	android:layout_y="100px"
    />
	<TextView
    	android:layout_width="wrap_content"
    	android:layout_height="wrap_content"
    	android:text="One"
    	android:layout_x="200px"
    	android:layout_y="200px"
    />
</AbsoluteLayout>

TableLayout
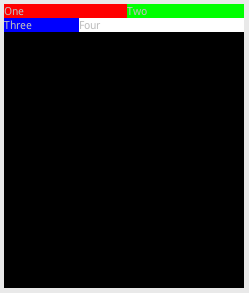
This is something like an HTML table. It has TableRow elements defining each row. Each element inside the TableRow is in a different column.
In the below example, pay attention layout_weight which defines the proportionate amount of space in each row that the element will take up. The numbers in each row should add up to 1.
<?xml version="1.0" encoding="utf-8"?>
<TableLayout
  xmlns:android="http://schemas.android.com/apk/res/android"
  android:layout_width="fill_parent"
  android:layout_height="fill_parent">
  <TableRow>
  	<TextView
    	android:layout_width="wrap_content"
    	android:layout_height="wrap_content"
    	android:text="One"
    	android:layout_weight="0.5"
    	android:background="#ff0000"
    />
	<TextView
    	android:layout_width="wrap_content"
    	android:layout_height="wrap_content"
    	android:text="Two"
    	android:layout_weight="0.5"
    	android:background="#00ff00"
    />
  </TableRow>
  <TableRow>
	<TextView
    	android:layout_width="wrap_content"
    	android:layout_height="wrap_content"
    	android:text="Three"
    	android:layout_weight="0.25"
    	android:background="#0000ff"
    />
	<TextView
    	android:layout_width="wrap_content"
    	android:layout_height="wrap_content"
    	android:text="Four"
    	android:layout_weight="0.75"
    	android:background="#ffffff"
    />
  </TableRow>
 </TableLayout>

RelativeLayout
In this layout, each element's position is relative to the other's position.
You can use the attributes listed here to define the relationships.
FrameLayout
In this layout, every element starts at the top left corner. Usually you would use sub ViewGroup inside.
Views in Layouts
layout_weight
Various attributes work on Views within Layouts. We looked at layout_weight in the TableLayout example.
gravity
There is also "gravity" which applies to the contents of the view (for instance, should the text in a TextView be centered, use "gravity" to do that.
<?xml version="1.0" encoding="utf-8"?>
<LinearLayout
  xmlns:android="http://schemas.android.com/apk/res/android"
  android:layout_width="fill_parent"
  android:layout_height="fill_parent"
  android:id="@+id/SplashLinearLayout"
  android:gravity="center"
  >
  <TextView android:id="@+id/SplashTextView" android:text="Tic Tac Toe" android:gravity="center" android:layout_height="wrap_content" android:layout_width="fill_parent"></TextView>
</LinearLayout>
gravity can be overriden by an element that implements it's own "layout_gravity".
<?xml version="1.0" encoding="utf-8"?>
<LinearLayout
  xmlns:android="http://schemas.android.com/apk/res/android"
  android:layout_width="fill_parent"
  android:layout_height="fill_parent"
  android:id="@+id/SplashLinearLayout"
  gravity="center"
  >
  <TextView android:id="@+id/SplashTextView" android:text="Tic Tac Toe" android:gravity="center" android:layout_height="wrap_content" android:layout_width="fill_parent" android:layout_gravity="bottom"></TextView>
</LinearLayout>
layout_width and layout_height
Both the width and height of each element can be specified to be:
"wrap_content" which means that it will be just big enough to fit it's content
"fill_parent" which means that it will be the same size as it's parent's width or height
specific pixels using "100px"
from the docs: "May be a dimension value, which is a floating point number appended with a unit such as "14.5sp". Available units are: px (pixels), dp (density-independent pixels), sp (scaled pixels based on preferred font size), in (inches), mm (millimeters)."
Menus
package com.mobvcasting.layoutexamples;

import android.app.Activity;
import android.content.Intent;
import android.os.Bundle;
import android.view.Menu;
import android.view.MenuItem;

public class LayoutExamples extends Activity {

	public static final int LINEARLAYOUT = 0;
	public static final int ABSOLUTELAYOUT = 1;
	public static final int TABLELAYOUT = 2;

    @Override
    public void onCreate(Bundle savedInstanceState) {
        super.onCreate(savedInstanceState);
        setContentView(R.layout.linearlayout);
    }

	@Override
    public boolean onCreateOptionsMenu(Menu menu) {
    	MenuItem panicMenuItem = menu.add(Menu.NONE, LINEARLAYOUT, Menu.NONE, "Linear Layout");
        MenuItem preferencesMenuItem = menu.add(Menu.NONE, ABSOLUTELAYOUT, Menu.NONE, "Absolute Layout");
        MenuItem saveMenuItem = menu.add(Menu.NONE, TABLELAYOUT, Menu.NONE, "Table Layout");
        return true;
    }

	@Override
    public boolean onOptionsItemSelected(MenuItem item) {
    	switch (item.getItemId()) {
        	case LINEARLAYOUT:
                setContentView(R.layout.linearlayout);
        		return true;
        	case ABSOLUTELAYOUT:
                setContentView(R.layout.absolutelayout);
        		return true;
        	case TABLELAYOUT:
                setContentView(R.layout.tablelayout);
        		return true;
    		default:
    			return false;
    	}
    }
}


