NIME 2024
- Instructor: David Rios | office hours link
- Meetings: Tuesdays, 9:30am – 12:00pm. Room 411.
- Design Lab and Coding Lab (for drop-in help)
- Class Examples Folder
Fill out Rehearsal schedule Spreadsheet
SHOW Info:
Spotify Collaborative Playlist For the Show
ITP Residents:
Office Hours || Bianca Gan || Pcomp, python, js, html/css, fabrication, audio things (signal flow, recording, mixing, live sound, sound editing, dante, etc.), protools, some logic pro
Office Hours || Dave Stein || Ableton, LiveCoding, Some Max MSP, Arduino, Tone.JS, P5.Sound, Music Theory, OSC, Midi, Sockets, Fabrication, Vital / Serum Software Synths, Spatial Sound, TouchDesigner/Visuals
Office Hours || Gracy Whelihan || Pcomp, coding, sensors, networking (arduino), project development
Office Hours || Isaiah Bayas || JavaScript, Arduino, Full-stack development, C#, Python, HTML, CSS, Technical Design, Debugging, APIs, Musical Interfaces, Music Production, Ableton, Music Composition
Office Hours || Maya Williams || Fabrication, Project Development, Performance
Office Hours || Suraj Barthy || Pcomp, testing, prototyping, fabrication, concept dev for performance, music, sockets, MQTT ||
Syllabus Spring 2024
In this course students design and build digital musical instruments and ultimately create a live performance using them.
Over the semester, we look at examples of current work by creators of musical interfaces, and discuss a wide range of issues facing technology-enabled sound performance, such as affordances, mapping, links to acoustic instruments, site specificity, gestuality. Readings and case studies provide background for class discussions on the theory and practice of designing musical controllers and the process of integrating them in a musical performance, with attention to the idiosyncrasies that emerge from the figure of the inventor / composer / performer.
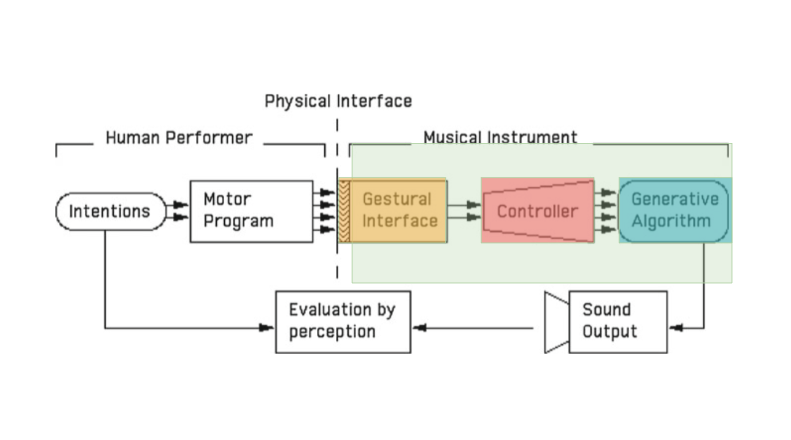
Students design and prototype a musical instrument – a complete system encompassing musical controller, algorithm for mapping input to sound, and the sound output itself. A technical framework for prototyping performance controllers is made available. As they prepare their prototypes for a final live concert where they (or guest musicians) will perform with their instruments, students focus on musical composition and improvisation techniques.
Prerequisites: ITPG-GT.2233 (Introduction to Computational Media) and ITPG-GT.2301 (Physical Computing).
01/23. Session 01. Introductions. A brief history of musical expression. NIMEs.
01/30. Session 02. Instrument 1 performance. Inspiration NIMEs. Conceptual + Technical Framework.
02/06. Session 03. Instrument 2 demo + technical discussion. MIDI vs OSC.
02/13. Session 04. Instrument 2/3 demo. MIDI continued. Max Intro. Elements of sound. Virtual Audio Devices.
02/20. Session 05. Prep midterm Performances. Percussive and pitched sounds. Sampling and synthesis.
02/27. Session 06. First Garage performances, Group A.
03/05. Session 07. First Garage performances, Group B.
03/12. Session 08. Concept presentations
03/19. SPRING BREAK
03/26. Session 09. NIME principles, process, and evaluation criteria.
04/02. Session 10. Updates, Share / Criteria, Sound/music space resources
04/09. Session 11. Rehearsal (Garage).
04/16. Session 12. Rehearsal (Garage).
04/23. Session 13. Dress Rehearsal (Garage).
04/28. NIME SHOW at The Garage at 370 Jay St Garage, 6pm.
* Please keep Saturday and Sunday afternoons open for sound+light check, set up and tear down.
04/30. Session 14. Show review.
- Archive: Previous editions
Sessions
This section will be updated weekly with class notes, assignment details and resources.
01/23. Session 1.
- Introductions
- Slides
- Agreement
- Syllabus overview
- A very brief history / overview of musical expression
- What is NIME. Acoustic vs Digital Instruments
- Activity: one gesture => one sound
Assignments
- Create a musical instrument and come ready to perform it for 30s – 1min.
- Read:
- Music as mirror of mind, by Laurie Spiegel
- Theremin in the Press, by Jaime Oliver
- If you are not familiar with Ableton Live, borrow a production laptop from the ER and do these tutorials under Help/ Help View:
- A Tour of Live
- Recording Audio
- Creating Beats
- Playing Software Instruments
- Email David a link to your blog and a link to a piece of music / instrument you enjoy or are enjoying right now. Please put NIME in the subject line
01/30. Session 2.
- First Instrument Performances
- Slides
- Discussion: what is an instrument?
- Inspiration NIMEs
- Conceptual framework (see image under Resources)
- Technical framework
- Analysis of student instruments
- Demo: Sensors => Arduino (controller) ==MIDI==> musical parameters in Ableton
Assignment. Instrument 2: sensors > MIDI > Ableton
Create an instrument with the following components:
1. A gestural interface with at least two interface controls: one with on/off states (like a push button), one with a range of values (like a potentiometer). Your interface can either be physical (sensors connected to Arduino), or digital (for example, skeleton tracking connected to p5).
2. A controller that reads the control values, maps / thresholds / smooths them if needed, and sends out MIDI messages (note on, note off, CC). The controller can be an Arduino sketch or a p5.js sketch.
3. A sound generator (Ableton Live) that receives the MIDI messages, and plays back, synthesizes, or modulates sounds in response.
Be intentional in picking your controls: consider making your own switches out of any conductive material (rather than a standard push button); consider using sensors like flex, stretch, vibration, accelerometer, gyroscope (rather than a standard potentiometer). What gestures and form factors might each control afford?
Resources
- On the question of what is a musical instrument:
- Instrumentality. On the Construction of Instrumental Identity, Sarah-Indriyati Hardjowirogo
- Sonic Writing by Thor Magnusson, chapter 1: Instrumentality
- Making music with Gestures article
- Pcomp:
- Connectivity:
- Arduino => MIDI code examples from class
- p5.js =>
- WebMidi.js – WebMIDI Library API
- MIDI starter example by David
- Visualizer
- WebMIDI API (Different from WebMidi.js equally awesome)
- MIDI starter example by Yonatan; more Web MIDI API examples
- To allow for inter-application communication, you will need to set up a virtual MIDI Bus. Here are instructions, including Mac and Windows
- WebMidi.js – WebMIDI Library API
- Troubleshooting:
- See if MIDI messages are being sent, and their content:
- Mac: MIDI Monitor app
- Windows: Midi View
- See if MIDI messages are being sent, and their content:
- Ableton Videos
- NIME framework from class:
02/06. Session 3.
- Deeper in to Midi and
- Sensors
- Slides
- Feedback
- Class Recording
- Instrument 2 workshop: troubleshooting, sensors, mapping to instrument parameters,
- Time permitting: alternative connection methods like Firmata + the Arduino device in the Live Connection Kit.
- Communication protocols: limitations of MIDI; OSC as an alternative.
Assignment: Instrument 2 again (or a 3rd)
- Choose one of the following prompts:
- Iterate on Instrument 2, refining the components you paid less attention to this week. For example:
- Focus on the controller: Do you need to smooth your sensor’s input? Average it? If you are using thresholds, what are they? Do they need calibrating?
- Re – Focus on the sound generation:
- What ranges do the parameters you are controlling currently vary within? Try different ranges. Try inverting them. Try controlling different parameters.
- Try different instrument presets, find two presets that contrast with each other, interpolate between them.
- Using the same interface, try controlling wildly different instruments.
- Create a new instrument, with a different interface.
- Test a new sensor or gesture
- Take an old idea and re-focus on either sound or fabrication
- Iterate on Instrument 2, refining the components you paid less attention to this week. For example:
In either case, how can you make your interface feel more like an instrument
- Gesture? Sound? Feedback?
Resources
- Arduino Resources
- State Change
- Averaging (Value Smoothing)
- Noise Reduction
- Encoders
- Introduction to OSC
- Most creative coding frameworks have OSC libraries:
- Arduino and Teensy: CNMAT library
- p5.js: p5js-osc
- Max/MSP: built-in UDP objects (udpsend, udpreceive – see help files); CNMAT externals
- To control Ableton Live via OSC, you will need an intermediary between the system sending OSC messages and Live.
- If the sender is your own sketch/patch/app, you can:
- Make your own Connection device using Max for Live. In this case, the OSC Monitor included in the Live Connection Kit can be a useful troubleshooting tool.
- Other options include TouchDesigner
- Make an intermediary app using any of the libraries above. The app receives the OSC messages from the controller, and converts them to MIDI messages that are sent to Live and mapped using MIDI Learn.
- If the sender is a standard hardware/software controller like LeapMotion or TouchOSC, you can use the equivalent Live Connection Kit devices to receive their messages, and the process will be very similar to using the MIDI Learn feature you used last week.
- A standard hardware/software controller like TouchOSC or LeapMotion, which the Live Connection Kit has devices for. You could also follow their protocol specs as you construct the messages in your own device.
- Note: the Connection Kit also has an OSC Send device which receives MIDI notes and sends OSC messages. This means you can send OSC messages OUT of Live and into other systems (for example, your own sketch/patch/app).
- If the sender is your own sketch/patch/app, you can:
- Also see:
- Steps to connect Arduino Nano 33 IoT to Ableton via OSC through WiFi, by Yonatan
- WiFi 101 examples by Tom Igoe, including a one key improviser
02/13. Session 4.
- Instrument 2/3 demos
- Audio interfaces
- MIDI to Arduino
- Percussive and pitched instruments
- Elements of Sound: pitch, volume, timbre
- Timbre: Sampling and Synthesis. Technique: Additive Synthesis.
Resources
- Sampling: free sample sources
- Radio Aporee – a corpus of high quality sounds from around the world, navigable in a number of ways, including a map
- Freesound – a collaborative database of sounds
- Macaulay Library – a wildlife media archive
- Philharmonia – a collection of sound samples recorded by the London Philharmonic Orchestra
- Ableton Sample packs – a variety of free sample packs from Ableton
- Spitfire Audio Labs – a series of free software instruments to use with any DAW
- Intro to Synthesis Max/MSP patches from class
Assignment: First Garage Performance
Pick one of the instrument experiments you’ve done so far. Either next class or the week after, you will do a mock performance with it on the Performance Garage stage, for the rest of the class. Time is tight, so please arrive 10 minutes early if you can. To prepare:
- Do a couple of improvisation sessions to explore the expressive possibilities of your instrument. What kinds of gestures does it afford? What different sound spaces can you get into?
- Plan for a 3 – 5 minute performance and rehearse it. Where do you start? Where does that lead? How do you end? Is there enough to explore in the instrument to sustain your interest for that long? Keep in mind: if you are engaged in playing the instrument, chances are the audience will be, too.
- Consider the audience’s point of view. Will they be able to understand what you are doing, and how it affects the music? Do you need a detail camera? Anything else?
The purpose of this early performance is for everybody to get a chance to:
- Break the ice and perform on stage.
- Get acquainted with the Garage space and its equipment
- Get a sense of what the flow of the final performance will be
- To do the above ahead of conceptualizing the instrument+performance you will work on during the second half of the semester.
We will have a setup ready for you to connect to the following, from the stage:
- Stereo audio. Connect your audio output via an 1/8” audio cable (we’ll have an aux cable ready, like in class), or via XLR / 1/4” cables, which you’ll bring. These will go to a Scarlett audio interface on stage.
- Projector and large screen (behind the stage). Connect your USB-C or HDMI video output (we’ll have an HDMI cable ready, with an USB-C dongle)
- Detail camera. If it makes sense for your project, you can project a closer view of your instrument using a detail camera mounted on the stage table. You can connect the camera:
- directly to the projector, or
- get the camera stream into your computer via USB-C or HDMI ports, and choose how to project it (side-by-side with your p5 sketch? your Max patch? your own video content? or, processed in some way?
While you are not performing, you will be writing notes to your peers, with this feedback sheet as a guide.
02/20. Session 5. Garage Intro. Instrument 2/3
- Perform 3rd instrument iteration in the garage
- Performance Schedule:
- Group A:
- Andre
- Andy
- Chienn
- Parth
- Sharell
- Yuxuan
- Group B:
- Haonan
- Lita
- Mica
- Nima
- Olive
- Sam
- Group A:
02/27. Session 6. First Garage Performances, Group A
- Performances:
- Andre
- Andy
- Chienn
- Parth
- Sharell
- Yuxuan
- Feedback Doc
- More NIME inspiration:
- augmented instruments
- participatory instruments
- tangible scores
- analog electronics
- Garage Safety Training
- Garage Safety Training – document containing the training in writing
- Garage Technical Info – document that includes how to use gear in the room, and the inventory list at the bottom.
- Cable Wrapping Tutorial Video
Assignment: Start defining your NIME project
- Review the work we have done so far: your instrument explorations, your demos and performances (including the last one, in the Garage), the feedback from the class; the NIME conceptual framework, the inspiration projects, our discussions on the elements of sound and technical implementation. Reflect:
- What has caught your interest and imagination? This may be an instrument’s sound, its form, material or the gestures involved, the affect or mood of a performance, a theoretical concept, a sound generating or manipulating technique, a possibility that is opened up by technology, anything else.
- What was engaging, effective, intriguing in your experiments?
- What would you like to develop or explore further?
2. Start defining the concept for your final – the instrument you will develop through the rest of the semester, and perform with at the end. Remember: collaborations are encouraged.
Prepare your concept presentation / project proposal
Here are some template slides with guidelines on what to include in your presentation
In Session 8 (in two weeks), you will present your concept
03/05. Session 7. First Garage Performances, Group B
- Feedback Doc
- Performances:
- Haonan
- Lita
- Mica
- Nima
- Olive
- Sam
Assignment: Final NIME project Proposal
- Review the work we have done so far: your instrument explorations, your demos and performances (including the last one, in the Garage), the feedback from the class; the NIME conceptual framework, the inspiration projects, our discussions on the elements of sound and technical implementation. Reflect:
- What has caught your interest and imagination? This may be an instrument’s sound, its form, material or the gestures involved, the affect or mood of a performance, a theoretical concept, a sound generating or manipulating technique, a possibility that is opened up by technology, anything else.
- What was engaging, effective, intriguing in your experiments?
- What would you like to develop or explore further?
2. Start defining the concept for your final – the instrument you will develop through the rest of the semester, and perform with at the end. Remember: collaborations are encouraged.
Concept Guides
Review Previous Tech Rider
Current Tech Rider
Prepare your concept presentation / project proposal
03/12 Session 8. Concept presentations
- Link to feedback doc
- While not presenting, please give your classmates feedback and questions
03/26 Session 9. NIME Principles, Process, Evaluation Criteria.
- Show Logistics: Promotion
- Poster Design:
- Poster design: Help create a promo design for the show / class (we will try to use as many as we can)
- Eventbrite banner 2160 x 1080 pixels.
- Web flyer Spec: 1920 x 1080 , 300dpi
- Social Spec: 1080x 1920 (horizontal, stories), 1080×1080 (post)
- Print Spec: 1920 x 1080, 300dpi
- Add your work to this Shared Folder (sign in to NYU)
- Include your name in the file name. Please include your source files as well as exported files. Eg: ” NAME_NIME_Poster.ai “, “NAME_NIME_Poster.png“
- Submit BOTH source files (eg .ai files) and exported Files (eg .png , .jpg, .gif)
- Show Basic Info:
- NIME or New Interfaces for Musical Expression
- Sunday April 28
- Doors: 5:30p
- Show: 6:00p
- NYU 370 Garage
- @ Jay St & Willoughby Ave, Brooklyn
- Aesthetic and Design considerations: NIME performance challenges.Approaches for making mapping transparent: visual feedback, interaction metaphor, simple and direct interfaces.
- NIME principles and process
- Activity: NIME evaluation
- Personal criteria => guiding questions for peer critique
- From personal to collective success criteria – worksheet
Resources
- “Principles for Designing Computer Music Controllers” P. Cook, NIME-01
- Revised: “Principles for Controlling Computer Music Designers” P. Cook, Keynote talk, NIME-07
- “How to Build and Design New Musical Interfaces”, INTERACT 2015 , workshop, Sidney Fels, Michael Lyons https://people.ece.ubc.ca/ssfels/InteractNIME2015.pdf
- “What does ‘Evaluation’ mean for the NIME community?” J. Barbosa, J. Malloch, M. Wanderley, NIME-15
- “Catalog of Attributes” Making Music: 74 Creative Strategies for Electronic Music Producers, D. DeSantis (See other Chapters if interested or stuck)
Assignments
- Refine your Personal criteria / guiding questions for peer critique
- Make a plan for this month (as a guide, you can use this template), and share it in this folder.
- Fill out the Tech Rider (copy the six example slides and add to the doc)
- Continue advancing your project
04/02. Session 10. Updates, Share / User Test
- Share your work
- Can set up in class room or on the floor / staging space
- Feedback, Sharing, Demoing
- Group of 6 can set up at a time to demo
- Other 6 will observe / answer questions / try out instrument
- Switch and repeat
User Testing structure
- Perform or Demo first, with minimal explanation
- If Appropriate allow the tester to play
- Share questions with user tester
- Conversation / further demo or testing
- Take notes
Extras:
- Resources for refining sound/music spaces – note that there are additional comments in the presenter view.
Assignments
- Follow your own plan, and advance your project.
- Recommended: as you refine your mapping choices, read the paper under Resources. It discusses mapping beyond one-to-one (one-to many, layers), and an interesting experiment where it was found that a challenging mapping choice kept performers engaged for longer than the easier-to-learn alternative.
Resources
04.09 Session 11. Garage Rehearsal
Please come 10 minutes early, and get your instrument and any equipment ready to plug in before 9:30. This will ensure everyone gets a chance to rehearse – time will be tight!
- Show production updates: functions, posters, rehearsal logistics, technical riders
| Performer | Helper |
| Parth | Andre |
| Haonan | Sharell |
| Andy | Parth |
| Yuxuan | Haonan |
| Sam | Andy |
| Olive | Yuxuan |
| Chienn | Sam |
| Nima | Olive |
| Mica | Chienn |
| Lita | Nima |
| Andre | Mica |
| Sharell | Lita |
Assignments
- Get your instrument ready for rehearsal.
- Rehearse, and time yourself. You have 10 minutes in total, including:
- setup (i.e. 3 mins)
- performance (i.e. 5 mins)
- teardown (i.e. 2 mins)
- Submit a first version of your Technical Rider (you can update this later)
- Review/submit your success criteria/feedback questions. After you perform, we will read the top three questions under “audience” to the group, and they write their responses on printed feedback sheets (make sure to bring a pen).
- Recommended: sign up for extra rehearsal time in the Garage the week before the performances. Please do not sign up for more than one rehearsal slot this week. We will do another round of sign-ups after class next week. An audio engineer will at the space during these times, so you can connect to the audio system.
- Note: You can also sign up for time in the Garage directly: find an open spot on the calendar and make a request using this form. This is managed by the 370 Jay St staff –approval is not guaranteed, and may take a few days. You will likely need to bring your own speakers – you can request audio and lighting staff to run the house systems, but they may not be available.
04/16. Session 12. Rehearsal
Please come 10 minutes early, and get your instrument and any equipment ready to plug in before 9:30. This will ensure everyone gets a chance to rehearse – time will be tight!
Here is the plan:
- We will meet at the Garage at noon, and start the rehearsal at 12:10 sharp.
- The rehearsal order is:
| Performer | Helper |
| Parth | Andre |
| Haonan | Sharell |
| Andy | Parth |
| Yuxuan | Haonan |
| Sam | Andy |
| Olive | Yuxuan |
| Chienn | Sam |
| Nima | Olive |
| Mica | Chienn |
| Lita | Nima |
| Andre | Mica |
| Sharell | Lita |
- We will keep track of the duration of your setup, performance, and teardown – if you ran over, we will let you know so you can adjust for the dress rehearsal.
- Keep track of who is performing:
- When you are the second in line to perform, go backstage and get your instrument ready. For example, if you’re performer #5, you should go backstage when #3 starts moving towards the stage.
Commit to your setup:
- Audio
- Stereo (most of you). Connect your audio output via an 1/8” audio cable (we’ll have an aux cable ready, like in class), or via XLR / 1/4” cables,
- 4 channel (for Dave!). We will connect the 4 audio outputs on your interface to the wall panel via XLR cables. The distance from the edge of the stage (downstage) to the wall plate is approx. 11 feet.
- Projector and large screen (behind the stage). Connect your USB-C or HDMI video output (we’ll have an HDMI cable ready, with an USB-C dongle)
- Physical Setup:
- Do you need a table to move equipment or roll out as part of your set (will it be covered or shown as is?). Do you want no table.
- Placement of instruments / computers / focusrite / cables / camera
- Are you standing or sitting
- Detail camera.
- Mounted to your setup
- cellphone
- other?
Assignments
- Finish your instrument. After dress rehearsal, you should only do minor tweaks, not add new functions or make significant changes.
- Rehearse your performance as many times as you can. Make sure it is under 5 minutes.
- Practice setting up and tearing down your project, too, with your assigned stage helper. Ideally, do this in a space separate from where you’re working, and keep in mind the distances from your project to the stage mixer, and so on. Make sure setup + teardown don’t take over 5 minutes, combined.
- Submit:
- Your performance/instrument title and description in the technical rider.
- The other parts of the technical rider.
04/23. Session 13. Dress Rehearsal
Please have your instrument to our Green Room, ready to plug in (room 233 on the 2nd floor), before 9:30. This will ensure everyone gets a chance to rehearse – time will be tight!
The schedule for the Dress Rehearsal is here. Please keep in mind: if you are not ready by your slot time, you might not be able to rehearse today.
The assignments are the same as last week – please re-read them to make sure you are not missing anything!
4/28: NIME SHOW
- NIME or New Interfaces for Musical Expression
- Sunday April 28
- Doors: 5:30p
- Show: 6:00p
- NYU 370 Garage
- @ Jay St & Willoughby Ave, Brooklyn
- Sunday April 28
SHOW LINK AND QR CODE:
- Please review our Production sheets which include the schedule for each day, production team roles and contacts, and more.
04/30 Session 14. Show Review
- Collective show review
- After NIME: conferences, grants and residencies, product design / creative tech. Slides
- Show documentation folder
Policies
Evaluation
Grades will be determined according to the following breakdown:
- Regular Assignments 40%
- Participation and Attendance 30%
- Final Project 30%
Please see ITP’s statement on Pass/Fail which states that a “Pass” is equivalent to an “A” or a “B” while anything less would be considered a “Fail”.
We will have weekly assignments that are relevant to material from the previous class. These assignments are required and you should be prepared to show/talk about them in class. It is expected that everyone in the class will create and maintain a blog for their assignments.
Attendance is mandatory. Please inform your teacher via email if you are going to miss a class. Two unexcused absences is cause for failing the class. (An unexcused lateness of 10 minutes or more is equivalent to 1/2 an absence.)
This class will be participatory, you are expected to participate in discussions and give feedback to other students both in class and participate with their projects. This (along with attendance) is 30% of your grade.
Class will culminate with a final performance of student projects. You are expected to participate in the final performance of your NIME, as well as previous rehearsals throughout the semester. This will comprise 30% of your grade.
Statement of Academic Integrity
Plagiarism is presenting someone else’s work as though it were your own. More specifically, plagiarism is to present as your own: A sequence of words quoted without quotation marks from another writer or a paraphrased passage from another writer’s work or facts, ideas or images composed by someone else.
Use of AI Tools and AI assistance
This course does not explicitly cover how to use AI text, image, sound, or code generation tools. You are strongly discouraged from using AI tools until you fully understand the fundamentals of the frameworks you are using and the AI helper you are using. AI tools can be extremely helpful and powerful in the right context, such as:
- Tutors
- Debugging helpers
- Inspiration or starting points
- Complex Algorithmic generation tools
Submitting uncredited code from an AI assistant or having AI generate code or ideas for you is plagiarism and subject to the same scrutiny as outlined above.
If you use AI tools you must cite your tool and complete prompt / chat history as well as discuss usage with your professor.
Statement of Principle
The core of the educational experience at the Tisch School of the Arts is the creation of original academic and artistic work by students for the critical review of faculty members. It is therefore of the utmost importance that students at all times provide their instructors with an accurate sense of their current abilities and knowledge in order to receive appropriate constructive criticism and advice. Any attempt to evade that essential, transparent transaction between instructor and student through plagiarism or cheating is educationally self-defeating and a grave violation of Tisch School of the Arts community standards. For all the details on plagiarism, please refer to the Tisch School of the Arts, Policies and Procedures Handbook, which can be found online at: https://tisch.nyu.edu/student-affairs/important-resources/academic-integrity-policy
Statement on Accessibility
Please feel free to make suggestions to your instructor about ways in which this class could become more accessible to you. Academic accommodations are available for students with documented disabilities. Please contact the Moses Center for Students with Disabilities at 212 998-4980 for further information.
Statement on Counseling and Wellness
Your health and safety are a priority at NYU. If you experience any health or mental health issues during this course, we encourage you to utilize the support services of the 24/7 NYU Wellness Exchange 212-443-9999. Also, all students who may require an academic accommodation due to a qualified disability, physical or mental, please register with the Moses Center 212-998-4980. Please let your instructor know if you need help connecting to these resources.
Statement on use of Electronic Devices
Laptops will be an essential part of the course and may be used in class during workshops and for taking notes in lecture. Laptops must be closed during class discussions and student presentations. Phone use in class is strictly prohibited unless directly related to a presentation of your own work or if you are asked to do so as part of the curriculum.