Sometimes you want to run a website with static content (aka plain old HTML pages), but you also want to use a dynamic programming environment like node.js, node-red, or Flask. This tutorial shows you how to do run a website that combines a static web server program with dynamic scripting services. In order to get the most out of this you should:
- Know what a web server is
- Have set up a virtual host or a real host
- Know what a scripting language is and how to program in one
This tutorial was written using a virtual private server on Digital Ocean, the web server nginx, the TLS certificate registrar LetsEncrypt, and the web services tools node.js and node-red.
Websites are generally organized using a heirarchical structure based on the URL paths. For example, you might set up a web site like so:
- www.mysite.com/ – the main site
- www.mysite.com/about – all content related to who runs the site
- www.mysite.com/projects – all content related to your projects
- www.mysite.com/projects/teddybear – a project about your teddy bear
- www.mysite.com/blog – a blog that you’re running
- www.mysite.com/garden – data from sensors in your garden
This style of organization is related to Representational State Transfer (REST) and often referred to as a RESTful style. For more on REST, check out this page.
One advantage of a RESTful approach is that it means you can divide the task of responding to HTTP requests to your host among different programs. The main server program can respond to everything, and pass some requests on to other programs. Your main server program can handle things that all the sections need, like making sure requests are encrypted using transit-level security (TLS), or password authentication while the other programs concentrate on what they do well.
It’s possible to combine a static web server program like nginx or apache with scripting tools at the same time. In the early days of the web, this was known as a common gateway interface (CGI) and your scripting languages (usually Perl or PHP in those days) were called CGI scripts. Nowadays you hear the terms web services or microservices used to refer parts of a website run by scripting tools, and languages like node.js, a web services framework written in JavaScript or Flask, written in Python, are the popular scripting tools of the day.
Setting up the nginx Web Server
To get started with this approach, you need to set up a web server program. nginx is a good one to start with, and Digital Ocean has a good tutorial to get you started. Set up nginx as a web server on your host.
It’s a good idea to register a domain name and set up a TLS certificate for it as well, so that you can serve pages using HTTPS. Digital Ocean has a good tutorial on this too.
Once you’ve done that, open a browser and go to the URL of your site. You should get something like this:
Welcome to nginx!
If you see this page, the nginx web server is successfully installed and working. Further configuration is required.
For online documentation and support please refer to nginx.org.
Commercial support is available at nginx.com.
Thank you for using nginx.
That’s a simple HTML page that you can find on your host in the directory /var/www/html/. This is nginx’s default directory for static pages, also known as the root of the server. You’ll probably need to use sudo to change this directory, but if you add html pages to it, then visit them in your browser, you’ll see them there.
nginx Configuration File
The location of your server’s static files, and any other locations you want to set up, are determined by an nginx configuration file that can be found in the directory /etc/nginx/sites-available/. The default file is called default. Usually, you make a copy of this file and edit the copy to define a specific server block. Digital Ocean’s nginx setup guide details this well. Define a configuration file specific to your site by creating a file in the sites-available directory with a unique name. For example, if my domain is called yourserver.com. I might make the config file called yourserver like so:
$ sudo nano /etc/nginx/sites-available/yourserver
Add in a block of code like so:
server {
        root /var/www/html;

        # Add index.php to the list if you are using PHP
        index index.html index.htm index.nginx-debian.html;

        server_name yourserver.com;

        location / {
                # First attempt to serve request as file, then
                # as directory, then fall back to displaying a 404.
                try_files $uri $uri/ =404;
        }
}
This block determines how nginx serves requests. The root line tells it where to find any HTML pages for the root of the site. the index line lists the file name variations that it’ll look for in any directory as the main index of the directory. The server_name lists your server’s domain name. And the location block tells it what to do for a given location. The location block shown above tells it to look for any static files that match a given URI (Uniform Resource Indicator), and if it doesn’t find any, return a 404 error.
You’ll need to make a pointer from the sites-available directory to the sites-enabled directory as well, like so:
$ sudo ln -s /etc/nginx/sites-available/yourserver /etc/nginx/sites-enabled/.
After these changes to the nginx configuration, you need to restart nginx like so:
$ sudo service nginx restart
Location Blocks
Location blocks are used in the nginx config to create special services. For example, if you want to serve static files from a directory other than the main root of the server, you can redirect like so:
location /projects {
         alias /home/username/html;
        }
This will redirect all requests beginning with /projects to the directory /home/username/html. If you do this, you should be careful about the permissions on the directory from which you serve content. Don’t give write or execute access to other. For this and other things to avoid, see this page on the nginx user guide.
If you want to serve some requests from a node script, and that node script is listening on port 8080, you could set up a location block to redirect the request like so:
location /garden {
         proxy_pass http://localhost:8080;
        }
This will pass all requests that begin with /garden to port 8080 on the same host. If your script is listening on that port, it will get all those requests. The advantage to this is that you don’t have to set up HTTPS in your scripting language. nginx handles the HTTP requests and passes them by proxy to your script on port 8080.
If you are setting up proxy passing to get HTTPS from nginx like this, it’s also a good idea to change your firewall rules to only allow localhost access to the port that your scripting tool is running on. Using the example above which is using port 8080, you could change the firewall like so:
Get the current firewall status, with line numbers
$ sudo ufw status numbered
Status: active

     To                         Action      From
     --                         ------      ----
[ 1] 22/tcp                     ALLOW IN    Anywhere
[ 2] 80/tcp                     ALLOW IN    Anywhere
[ 3] 443/tcp                    ALLOW IN    Anywhere
[ 4] Nginx Full                 ALLOW IN    Anywhere
[ 5] 8080/tcp                   ALLOW IN    Anywhere
[ 6] 22/tcp (v6)                ALLOW IN    Anywhere (v6)
[ 7] 80/tcp (v6)                ALLOW IN    Anywhere (v6)
[ 8] 443/tcp (v6)               ALLOW IN    Anywhere (v6)
[ 9] Nginx Full (v6)            ALLOW IN    Anywhere (v6)
[10] 80080/tcp (v6)             ALLOW IN    Anywhere (v6)
Delete the rules that open port 8080 (the rules will get renumbered each time you delete one, so make sure to re-list after each deletion):
$ sudo ufw delete 10
$ sudo ufw delete 5
Add a rule that only opens it for localhost (127.0.0.1):
$ sudo ufw allow from 127.0.0.1 to 127.0.0.1 port 8080 proto tcp
Reload the firewall:
$ sudo ufw reload
Once you’ve done this, you’ll be able to access port 8080 from the command line, and nginx will be able to access it, but no one can access it from another host. You won’t be able to access it from the browser on your personal computer, for example. This ensures that all HTTP communication with other hosts remains encrypted.
A node.js Template for Proxy Passing
Assuming you’ve set up the location block as shown above, with the path /garden, you’ll need to match the paths to this in any node.js scripts you write. Here’s a minimal example of what that would look like:
var express = require('express');         // include express.js
var server = express();			  // a local instance of it
var bodyParser = require('body-parser');  // include body-parser
var proxyLocation = '/garden';            // the proxy location from nginx

// this runs after the server successfully starts:
function serverStart() {
  var port = this.address().port;
  console.log('Server listening on port ' + port);
}


function handleGet(request, response) {
  // send the response:
  response.send("hello, you sent me a GET request");
  response.end();
}

function handlePost(request, response) {
  console.log('Got a POST request');
  response.send("hello, you sent me a POST request");
  response.end();

}

// this is the callback function for when the client
// requests the date (a dynamic route):
function handleDate(request, response) {
  console.log('You sent a GET request for the date');
  // send the response:
  var now = new Date();
  response.send("Date: " + now + "\n");
  response.end();
}

// start the server:
server.listen(8080, serverStart);
server.get(proxyLocation, handleGet);    // GET request listener
server.get(proxyLocation + '/data', handleGet);    // GET request listener
server.get(proxyLocation + '/date', handleDate);   // GET request listener
server.post(proxyLocation + '/data', handlePost);  // POST request listener
Diagramming the Flow of Requests
So far, you’ve seen how to use multiple programs to make a host respond to incoming requests:
- nginx, to respond to HTTP and HTTPS requests and serve static HTML files in response;
- node.js and express.js, to respond to HTTP requests dynamically, by running functions;
- ufw, to manage the ports that requests come in on.
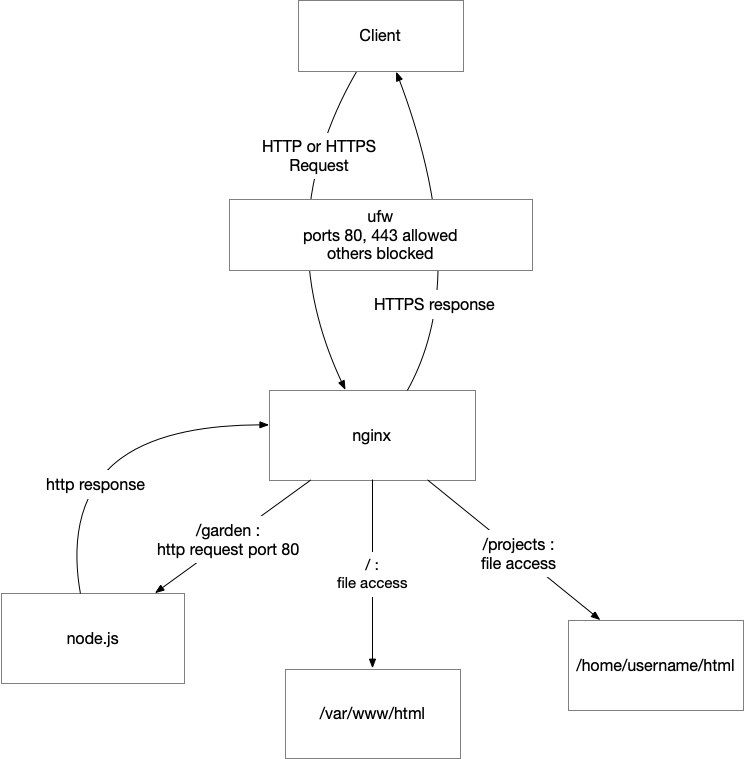
Keeping track of which program is doing what, so it’s helpful to put together a diagram of what the programs on your host are doing. Figure 1 shows the system described here:
- A client on a remote host can make HTTP or HTTPS requests.
- The firewall will block all but ports 80 and 443.
- The server program nginx will take all incoming HTTP or HTTP requests to the root (/), look in the directory
/var/www/htmlfor a file with the same name and send it back to the client via HTTPS. - For all incoming requests beginning with
/projectsnginx will look for static files in/home/username/html. - For all requests beginning with
/gardennginx will make a localhost HTTP request to port 8080. node.js, listening on that port, will respond, and then nginx will take the response and send it to the client via HTTPS.
Conclusion
This tutorial has only shown how to use nginx to re-route access to a separate static directory for HTML/CSS/JavaScript files, and to a scripting tool like node, node-red, or Flask. There is much more that nginx can do when you start to build more complex services. For more information, read through the nginx getting started guide and the nginx documentation.
This page is adapted from and expands on Don Coleman’s connected devices server project example.