Introduction
When you’re working on a p5.js sketch in the web editor, or building any web app with JavaScript and HTML, from time to time you may run into a type of error related to Cross-Origin Resource Sharing (often abbreviated as CORS). It usually looks something like Figure 1:

This page will explain what CORS is, why is it needed, and provide some hands-on tips on fixing common CORS errors, along with a simple example to configure your project to support CORS.
To get the most out of these notes, you should know what HTTP is and how HTTP requests work and what HTTP headers are, and have a basic understanding of how the client-server model works on the web.
What is CORS and Why is It Needed
The following quote from Mozilla [1] gives a concise definition of CORS:
Cross-Origin Resource Sharing is a mechanism that uses additional HTTP headers to tell browsers to give a web application running at one origin, access to selected resources from a different origin. A web application executes a cross-origin HTTP request when it requests a resource that has a different origin (domain, protocol, or port) from its own.
To better understand what cross-origin is, you first need to know about the same-origin policy [2]. This is a security mechanism that restricts how a document or script loaded from one origin can interact with a resource from another origin.
For two URLs to be considered as same-origin, they should have the same scheme (protocol, e.g. http://, https://, ws://), host (web domain, e.g. www.example.com), and port (e.g. usually port 80 for http, 443 for https). So under the same-origin policy, if you’re on http://www.example.com/index.html, you can load an image from http://www.example.com/imageA.jpg, but you can’t load an image from http://www.somewhereelse.com/imageB.jpg.
CORS, in contrast, allows your application to access resources hosted on an origin other than the one you’re browsing. You can check more examples of same origin and different origins here.
You don’t have to fully understand how CORS works if you just want a quick fix to a CORS error, which can be found in the section below. But if you’re developing a web application that requires resources from another website, like images or script libraries (which is often the case), it is highly recommended that you know about the mechanism behind CORS, so you can use it to your advantage. CORS also helps fight malicious behaviors like cross-site request forgery attacks, which you can read more about here.
How CORS Works
The CORS standard manages cross-origin requests by adding new HTTP headers to a server’s HTTP response. These are additions to the the standard list of headers defined by the HTTP standard. The most import one of these headers is the Access-Control-Allow-Origin header. It states how the server’s resources can be shared with external domains, or not.
Figure 2, from javascript.info illustrates how it works at a high level. (fetch() is a method in JavaScript to send a network request and get information from the server)
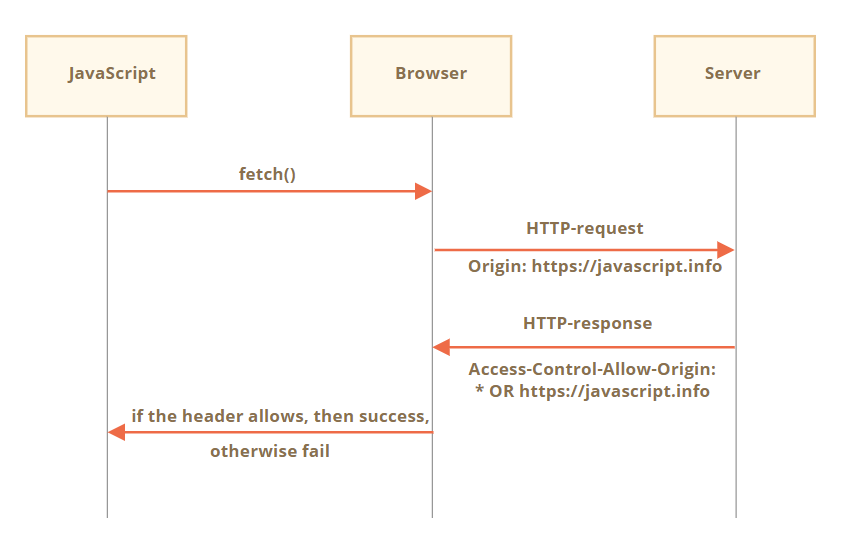
The Access-Control-Allow-Origin header allows servers to specify how their resources are shared with external domains. When you make a GET request to access a resource on a given server, that server will respond with a value for the Access-Control-Allow-Origin header. Many servers will respond with the value *, meaning that the server will share the requested resources with any domain on the Internet. Other times, the value of this header may be set to a particular domain (or list of domains), meaning that the server will share its resources only with that specific domain (or list of domains). [4] These GET requests are usually considered as “simple” requests.
Preflight Requests
With CORS policy in place, a server can not only specify who can access its assets, but also how the assets can be accessed. That means it may not only allow you to read assets (e.g. sending GET requests), but also modify or delete assets (e.g. sending PUT or DELETE requests). Theses are “non-simple” requests. In this case, you’ll need to send a type of request called “preflight” request first.
Preflight requests use the OPTIONS method. The preflight request is sent before the original request, hence the term “preflight.” The purpose of the preflight request is to determine whether or not the original request is safe (for example, a DELETE request). The server will respond to the preflight request and indicate whether or not the original request is safe. If the server specifies that the original request is safe, it will allow the original request. Otherwise, it will block the original request.
Figure 3 from CodeAcademy illustrates how preflight requests works at a high level.

You can learn more about other CORS headers here, and a more in-depth explanation of simple and preflight requests in this article.
Common CORS Error and How to Fix It
One common CORS error is that the server answering your requests does not support CORS. It this case, you’ll get an error saying that “No Access-Control-Allow-Origin header is present”.
In this section, we’ll try to access an example API (created by David Katz) that does not support CORS, and introduce three ways to fix this CORS error according to this article. To understand these examples, you’ll need to have some basic knowledge of how HTML & JavaScript works.
The URL of the API is https://joke-api-strict-cors.appspot.com/jokes/random, and it’ll return a random joke in JSON format. Figure 4 is an example p5.js sketch that attempts to access the API using the loadJSON() function.
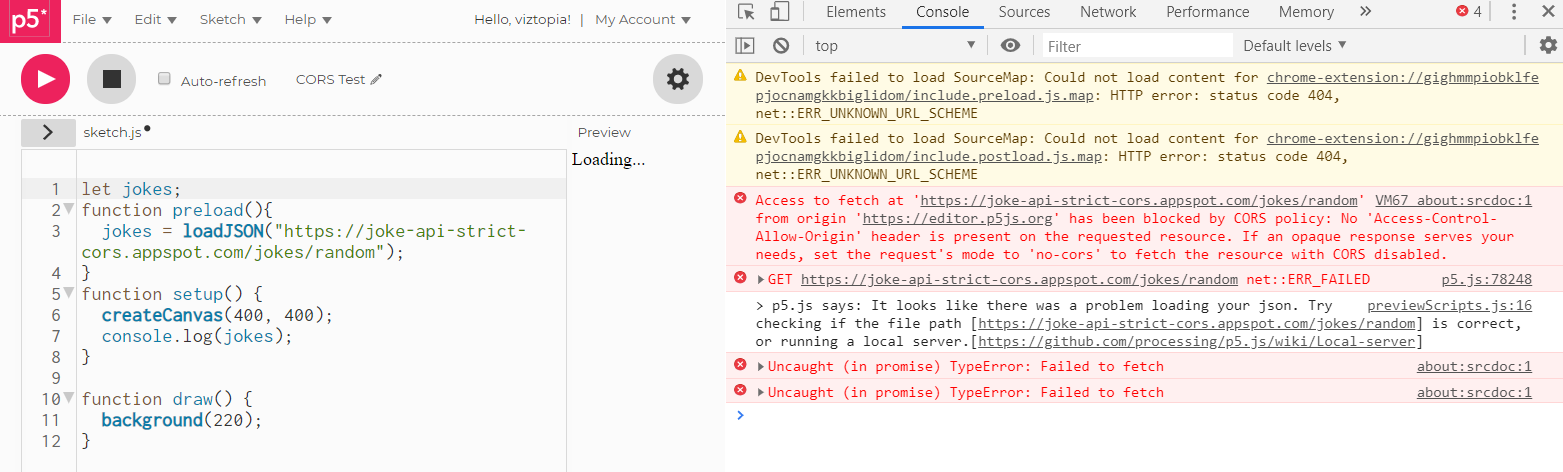
The request failed because the API’s response does not return the Access-Control-Allow-Origin header. There are a couple of ways to fix this:
- Install the Access-Control-Allow-Origin plugin
- Send your request to a proxy
- Build your own proxy
Install the Access-Control-Allow-Origin plugin
If you just need to fix the error on your computer and you’re using Chrome, the simplest way is to use the Moesif Orign & CORS Changer extension in your browser. For every request, this extension will add an Access-Control-Allow-Origin:* header to the response. It tricks the browser, and overrides the CORS header that the server has in place with the open wildcard value.
Once you have the extension installed, click on its icon in the toolbar, and switch it on, as shown in Figure 5.
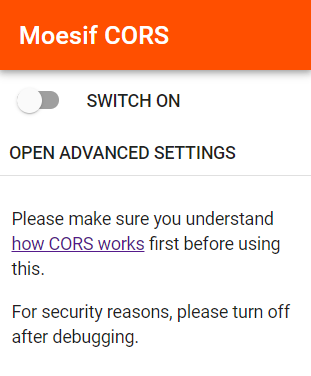
Now try to access the API again, and the error should be gone.
This approach works well if you’re developing your project on a local machine and trying to access resources hosted on a server that does not support CORS. But it’s not ideal for production, as it would require your users to install the extension.
Send your request to a proxy
The second way is to use the cors-anywhere proxy to add CORS headers to the responses. A proxy acts as an intermediary between a client and server. In this case, the cors-anywhere proxy server operates in between the frontend web app making the request, and the server that responds with data. Similar to the Access-Control-Allow-Origin plugin, it works by adding the more open Access-Control-Allow-Origin: * header to the response.
To use this proxy, you simply need to prefix your request URL with “https://cors-anywhere.herokuapp.com/“. So instead of accessing “https://joke-api-strict-cors.appspot.com/jokes/random”, you can send your request to “https://cors-anywhere.herokuapp.com/https://joke-api-strict-cors.appspot.com/jokes/random“ instead. Figure 5 shows a p5.js sketch using this approach.
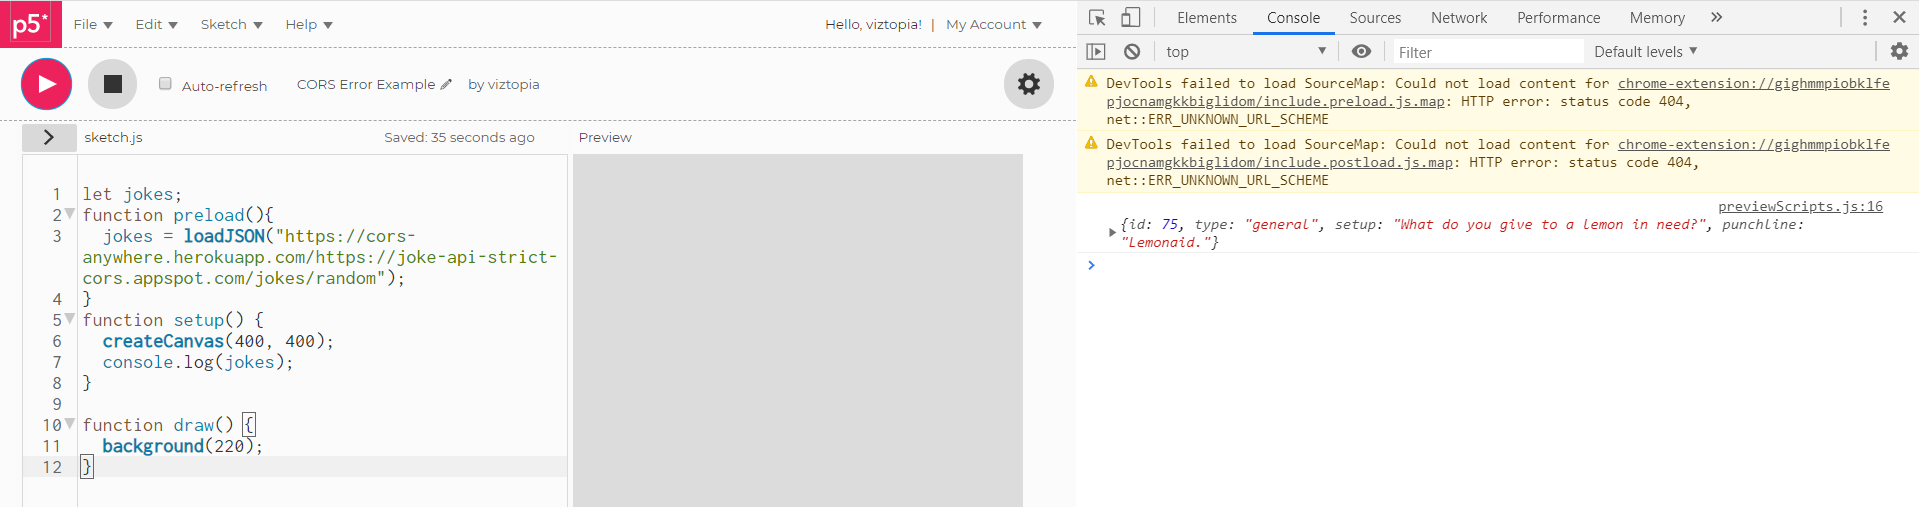
This approach works for both development and production. However, since it usually takes a while for the cors-anywhere server to respond, you application will appear a bit sluggish.
Build your own proxy using Express and Request in Node.js
A third approach is to build your own CORS proxy server, as shown in the example below. To use this example, you’ll need to have Node.js installed in your computer, and have some basic knowledge of using express, request in Node.js and the Terminal (on MAC/Linux) or the Command tool (on Windows). Node.js is a JavaScript runtime environment that executes JavaScript code outside of a web browser on personal computers and servers. You can learn more about Node.js in the Node.js section of this tutorial.
Once you have Node.js installed, you can download and use the example in this repository:
To run this example, open terminal, cd to the proxy folder, and install the dependency by entering:
npm install
Run the server by typing the following command:
node server.js
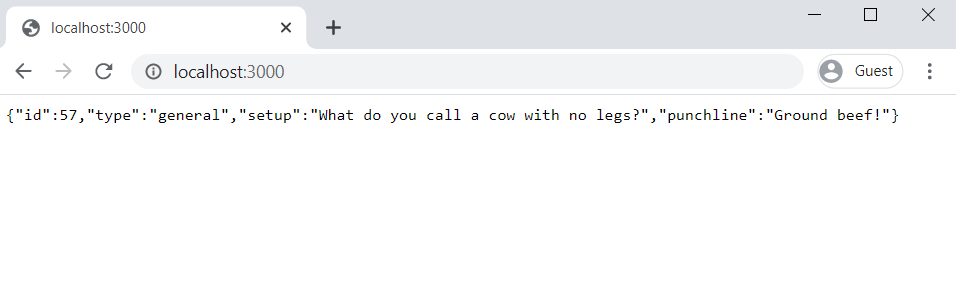
You should see a message saying “CORS proxy listening on port 3000” in your terminal. It means that the proxy server is up and running on port 3000 of your local computer. Now if you open http://localhost:3000 in your browser, you should be able to see a random joke in JSON format retrieved from the https://joke-api-strict-cors.appspot.com/jokes/random API endpoint. Figure 6 shows what this would look like.
You can open the server.js file in a plain text editor to check to code.
const express = require('express'); //include the express module
const request = require('request'); //include the request module

const app = express();

app.use((req, res, next) => {
   res.header('Access-Control-Allow-Origin', '*'); //use res.header() to add the Access-Control-Allow-Origin: * header to all responses
   next();
});

app.get('/', (req, res) => {
   request(
      { url: 'https://joke-api-strict-cors.appspot.com/jokes/random' }, //here you specify the url to the resource (an image, API, etc.) that does not support CORS
      (error, response, body) => {
      if (error || response.statusCode !== 200) {
         return res.status(500).json({ type: 'error', message: err.message });
      }

      res.json(JSON.parse(body));
   }
)
});

const PORT = 3000;
app.listen(PORT, () => console.log(`CORS proxy listening on port ${PORT}`));
This example uses express and request to make a proxy server:
- The res.header() method is used to add headers to the responses. So res.header(‘Access-Control-Allow-Origin’, ‘*’); will add an Access-Control-Allow-Origin:* header to all the responses going through this proxy server.
- For every GET request to the path “/”, a request will be sent to the specified URL. In this case, it’s “https://joke-api-strict-cors.appspot.com/jokes/random“. The result will be turned into a JSON object by using res.json(JSON.parse(body));
- So, whenever a user access http://localhost:3000/, a request will be sent to the joke API to get a random joke. The joke will then be cast into a JSON object and returned along with the response. At the same time, an Access-Control-Allow-Origin:* header will be added to the response, thereby adds CORS support to the given API.
How to Implement CORS For Your Project
If you want to implement your own CORS policy for your server, you can do so by using the core library in Node.js to customize which origins are allowed to access your data. Similar to the build your own proxy example above, to use this example, you’ll need to have Node.js installed in your computer, and have some basic knowledge of using express in Node.js and the Terminal (on MAC/Linux) or the Command tool (on Windows).
Once you have Node.js installed, you can download and use the example in this repository:
To run this example, open terminal, cd to the implement-cors folder, and install the dependency by entering:
npm install
Run the server by typing the following command:
node server.js
You should see a message saying “CORS-enabled server is listening on port 3000” in your terminal. It is a web server listening on port 3000 for the ‘/hi’ endpoint, with CORS policy allowing access to endpoint only from origin “http://localhost:8081”.
You can open the code in a plain text editor to check the code:
const express = require('express'); //include the express module
const cors = require('cors'); //include the cors module
const app = express();

var corsOptions = { // define a CORS Options object
   origin: 'http://localhost:8081', // specify what origins are allowed to access the server
   optionsSuccessStatus: 200
}

app.use(cors(corsOptions));

app.get('/hi', (req, res) => {
   res.json({ msg: "Hi, you accessed this server from http://localhost:8081!" }); // send a simple response json when a request is made to "/hi"
});

const PORT = 3000;
app.listen(PORT, () => console.log('CORS-enabled server is listening on port 3000'));
What it does is:
- Include the cors library by using cors = require(‘cors’);
- Define a CORS Options object with an origin value. origin: ‘http://localhost:8081’ means the server will return an Access-Control-Allow-Origin header with a value of http://localhost:8081
- The ask the express app to use the cors module by app.use(cors(corsOptions));
- Finally, define the response’s content for requests to the /hi endpoint.
Now, you can try to serve up the entire implement-cors/public folder using an HTTP server on any port other than 8081, and open localhost:[port of the HTTP server] in your browser. You should be able to see a CORS error like Figure 7:

You can open the sketch.js file in a plain text editor to check the code:
let res;
function preload() {
   let url = 'http://localhost:3000/hi';
   httpGet(url, 'json', false, function (response) { //use the httpGet() function in p5 to make a CORS request
      res = response;
   });
}

function setup() {
   createCanvas(400, 400);
}

function draw() {
   if (!res) {
      return; // Wait until the earthquake data has loaded before drawing.
   }
   background(200);
   textAlign(CENTER);
   text(res.msg, 0, height / 2, width, 30);
   noLoop();
}
It uses the httpGet() function in p5.js to send a GET request to http://localhost:3000/hi, and prints the response’s message to the canvas.
And when you serve the implement-cors/public folder using port 8081 instead, you should be able to see the success message printed on the canvas, as shown in Figure 8.

Conclusion
CORS is a security mechanism that allows servers to control who can access its assets and how the assets can be accessed. For further readings, see the references below.