Introduction
You can write programs that handle serial communication in many different languages. This page introduces how to do it using node.js. Node is a JavaScript environment that allows user to write web server programs. Below, you’ll use it to connect a microcontroller to a web browser using the node.js programming environment, HTML, and JavaScript.
To get the most out of this tutorial, you should know what a microcontroller is and how to program a microcontroller. You should also understand asynchronous serial communication between microcontrollers and personal computers. You should also understand the basics of command line interfaces.
You will struggle with this tutorial if you aren’t familiar with JavaScript. For more on JavaScript, see Douglas Crockford’s JavaScript: The Good Parts, Manuel Kiessling’s the Node Beginner Book, or Shelley Powers’ Learning Node.
The current version of this tutorial works with version 6.x.x of the node-serialport library.
This node.js introductory video will help in understanding this lab. The code in the video is different than this lab, but the basic concepts are similar. This lab simplifies the process a bit.
Node.js
The JavaScript programming language is mainly used to add interactivity to web pages. All modern browsers include a JavaScript interpreter, which allows the browser to run JavaScript code that’s embedded in a web page. Google’s JavaScript engine is called v8, and it’s available under an open source license. Node.js wraps the v8 engine up in an application programming interface that can run on personal computers and servers. On your personal computer, you run it through the command line interface.
Node was originally designed as a tool for writing server programs, but it can do much more. It has a library management system called node package manager or npm that allows you to extend its functionality in many directions. There is also an online registry of node libraries, npmjs.org. You can download libraries from this registry directly using npm. Below you’ll see npm used to add both serial communication functionality and a simple server programming library to node.
To get started, download the node.js installer and install it on your computer. Then open your command line terminal. On OSX, open the Terminal app, which can be found in the Applications/Utilities directory. On Windows, go to the start menu and type cmd then press enter to open a window to the command line.
If you’ve never used a command line interface, check out this tutorial on the Unix/Linux command line interface. From here on out, you’ll see the command prompt indicated like this:
yourname@yourcomputer ~ $
Any commands you need to type will follow the $ symbol. The actual command prompt will vary depending on your operating system. On Windows, it’s typically this: >. On most Unix and Linux systems, including OSX, it’s $ or %.
When you’ve installed node.js, type this command at the command prompt to get the version of node that you’re running:
$ node -v
If you installed it correctly, you’ll get a version number like 12.18.0. The node installer should also install the node package manager (npm). You can check that in the same way:
$ npm -v
Once node and npm are in place, you’re ready to create a new project.
Related video: Install the serialport Node module
Hello from Node.js
There’s a library for node.js that allows you to communicate over your computer’s serial ports called serialport. If your computer’s connected to the internet, you can download install it automatically using npm. Create a new directory for your project:
$ mkdir nodeSerialExample
Then change directories to that directory:
$ cd nodeSerialExample
Now make a new text file in that directory with the name index.js.
This will be your main program file. Add the following text to the file:
console.log("Hello, and welcome to node.");
Save the file, then run it by typing the following on the command line:
$ node index.js
Your program should print out:
Hello, and welcome to node.
The program will finish and return to the command line when it’s done. Seeing that script running is indication that node.js is fully working on your machine.
You can also pass information into your node program using the process arguments on the command line. Change your program like so:
var name = process.argv[2];
console.log("Hello, and welcome to node," + name);
Run this as you did before, but add your name after the name of your program when you invoke it, like so:
$ node index.js Tom
You’ll get the following:
Hello, and welcome to node, Tom
The command line arguments are passed to your program as an array. The name was the third word you typed, or array element 2 (counting “node” as element 0 and “index.js” as element 1). This is a useful technique, and you’ll see it later to pass the program your serial port’s name.
The Node Serialport Library
You’ll also need the node serialport library, which you can install from the npm registry like so:
$ npm install serialport
This command will make a new subdirectory called node_modules, and in that directory it will install all the necessary assets for the serialport library. You’ll see a lot of text go by, and hopefully no errors. If you get errors, consult npmjs.org and the github wiki for serialport. Now you’re ready to use the serialport library.
The first thing you’ll want is a list of the serial ports. Replace the text of your program file with the following:
let serialport = require('serialport');

// list serial ports:
serialport.list().then (
  ports => ports.forEach(port =>console.log(port.path)),
  err => console.log(err)
)
Note: What’s With This Crazy Syntax?
If you’re new to JavaScript, this syntax may be confusing. Node.js examples tend to use anonymous functions frequently. JavaScript can pass functions as variables (and vice versa). This is also using the JavaScript ES6 arrow function notation. That’s what’s going on here.
Stoyan Stefanov’s JavaScript Patterns is useful for understanding the various patterns of JavaScript coding.
When you run this script, you’ll get a list of your serial ports like so:
$ node ListPorts.js
/dev/cu.Bluetooth-Incoming-Port
/dev/cu.Bluetooth-Modem
/dev/cu.usbmodem1411
If you’ve got an Arduino plugged in via USB, you should see the name of your board’s port there as well. In the example above, which was run on OSX, the Arduino’s port is /dev/cu.usbmodem1411.
The process of using the serialport library will be the same every time:
- initialize the serialport library
- open the serial port
- set up the callback functions and let them do the rest
Which are all explained below.
Opening the Serial Port
To open a serial port in node, you include the library at the beginning of your script, and make a local instance of the library in a variable. Make a new script or replace index.js with the following:
let serialport = require('serialport');// include the library
// get port name from the command line:
let portName = process.argv[2];
Then you open the port using new() like so:
let myPort = new SerialPort(portName, 9600);
Note the serial parameters, which are passed to the new() function after the port name, as a list. The only one used here is the baud rate, set to 9600 bits per second.
If you want to read serial data as ASCII-encoded text, line by line, you also need to create a parser to tell the serial library how to interpret data when it comes in. It should read all the incoming data as a line of text, and generate a new data event when it sees a newline (“\n”). The parser is doing the same thing as Processing’s Serial.bufferUntil() function does. You do it like so:
let Readline = SerialPort.parsers.Readline; // make instance of Readline parser
let parser = new Readline(); // make a new parser to read ASCII lines
myPort.pipe(parser); // pipe the serial stream to the parser
You can find the full program so far at this link.
The Program Won’t Stop!
When you run this program now, it won’t automatically stop and return to the command line. To stop it, you’ll need to type control-C in the terminal window to stop it. The new instance of Serialport created a software object that listens for events from the serial port. Any node.js script that creates an event listener like this will run until you explicitly stop it. Both the serialport library and the http library, which you’ll use below, generate event listeners and will need to be explicitly stopped using control-C.
Serialport Library Events
The serialport library, like most node.js libraries, is event-based. This means that when the program is running, the operating system and the user’s actions will generate events and the program will provide functions to deal with those events called callback functions.
The main events that the serial library will deal with are when a serial port opens, when it closes, when new data arrives, and when there’s an error. The data event in particular performs the same function as Processing’s serialEvent() function. Once you’ve made an instance of the serialport library using the new() function as shown above, you define what functions will get called when each event occurs by using serialport.on() like so:
myPort.on('open', showPortOpen);
parser.on('data', readSerialData);
myPort.on('close', showPortClose);
myPort.on('error', showError);
The functions that are called by the event are the callback functions. In the example above, when the serial port is opened, the showPortOpen function will get called. When new data arrives, the sendSerialData function will get called, and so forth. If the event generates any parameters (for example a new data event will have the data as a parameter), those parameters will get passed to the callback function.
In the example above, you’re listening for the open, close, and error events using functions from the serial port object (e.g. myPort.on('open', showPortOpen);), but you;’re listening for the data event using a function from the parser object (parser.on('data',readSerialData);). You can listen with the serial port object too (e.g.myPort.on('data',readSerialData);), but the port object listener function generates a data event once every byte, while the parser object lets you generate a data event once every newline instead.
Write the callback functions for these events like so:
function showPortOpen() {
  console.log('port open. Data rate: ' + myPort.baudRate);
}

function readSerialData(data) {
  console.log(data);
}

function showPortClose() {
  console.log('port closed.');
}

function showError(error) {
  console.log('Serial port error: ' + error);
}
Now you’ve got enough of a program to see some results. Upload a simple serial output sketch to your Arduino such as the AnalogReadSerial example or the sketch shown in the Analog Input Lab, you’ll be able to see its output from this script. Save the script. Then invoke it as follows, replacing portname with the name of your serial port:$ node index.js portname
For example, on OSX, if you haven an Arduino attached to the serial port called /dev/cu.usbmodem1411, then you’d type:
$ node index.js /dev/cu.usbmodem1411
When the port opens, you’ll see the message from the showPortOpen() function, then the output from the Arduino. Here’s the output from the node script:
port open. Data rate: 9600

266
276
261
To send serial output from node.js to the Arduino, use the serialport write() function like so:
myPort.write("Hello");
That’s all it takes to read and write serial data from node.js to a microcontroller. Node.js is designed for writing web server applications, however, so in the following steps you’ll see how to connect a serial port to your web browser using more of node.js.
Connecting from the Browser to the Node Program
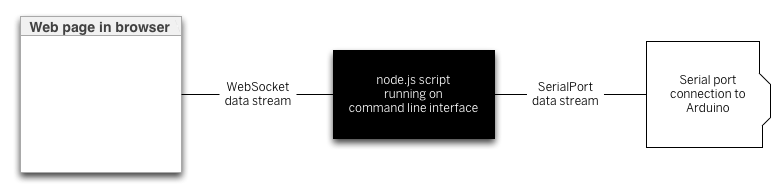
In order to connect your node.js program to a web page, your program needs to listen for messages from the web browser, and the web pages need to connect to the program. To do this, you’ll use a connection called a webSocket. WebSockets are connections between web clients and servers that function a bit like serial ports. Both serial connections and webSocket connections are data streams, in which the first byte sent into the stream on one end is the first byte read out on the other end. Data streams are common programming structures and you’ll see them used in lots of places. They connect programs to files on your computer, or client programs to server programs, or desktop programs to serial or network ports. The diagram below(Figure 1) shows how the browser connects to your node.js program and how the node.js program connects to the serial port.
There’s a node.js library your script will need to listen for webSocket connections that you should install using the node package manager like so:
$ npm install ws
Once it’s successfully installed, include it with your previous script by adding the following at the beginning of the script, right after you included the serialport library:
let WebSocketServer = require('ws').Server;
Following that, you need to use new() to make a new instance of the webSocket servver, and then configure a few parameters, and finally start the server:
const SERVER_PORT = 8081;               // port number for the webSocket server
let wss = new WebSocketServer({port: SERVER_PORT}); // the webSocket server
let connections = new Array;          // list of connections to the server
The server will operate on port 8081, so when you write a client-side JavaScript program, you’ll connect to that port number. Your browser will be a client of the node.js script, and the script will be running as a server. Just as there are serialport event listener functions, there will be webSocket event listener functions too. You’ll need to listen for a webSocket connection event, and once connected, you’ll need to listen for incoming messages, and for the webSocket to close.
There can be multiple webSocket clients at any one time, so the server maintains an array to keep track of all the clients. That array is called connections, and every time a new client connects, the client is added to the array using the .push() function. When a client closes, it’s removed from the array using the .slice() function.
Here are the webSocket event listeners:
wss.on('connection', handleConnection);

function handleConnection(client) {
  console.log("New Connection"); // you have a new client
  connections.push(client); // add this client to the connections array

  client.on('message', sendToSerial); // when a client sends a message,

  client.on('close', function() { // when a client closes its connection
    console.log("connection closed"); // print it out
    let position = connections.indexOf(client); // get the client's position in the array
    connections.splice(position, 1); // and delete it from the array
  });
}
You’ll also need to modify the serialport data event listener to send data to the webSocket, and vice versa. Here’s a function to send webSocket data to the serial port. Put this after the serial event listeners above:
function sendToSerial(data) {
  console.log("sending to serial: " + data);
  myPort.write(data);
}
To parallel that, here’s a function to send serial data to the webSocket clients. Put this after the webSocket event listeners:
// This function broadcasts messages to all webSocket clients
function broadcast(data) {
  for (myConnection in connections) {   // iterate over the array of connections
    connections[myConnection].send(data); // send the data to each connection
  }
}
Finally, you need to add the highlighted lines below to the readSerialData() function. This will send the latest data to all available webSocket clients:
function readSerialData(data) {
  console.log(data);
  // if there are webSocket connections, send the serial data
  // to all of them:
  if (connections.length > 0) {
    broadcast(data);
  }
}
Now you’ve got a complete script for connecting serial data to a webSocket server, and serving that to a client through a browser. Next you need a web page with its own embedded JavaScript to connect to his script.
Using the Data in HTML
The real value in connecting the serial port to a server is to generate dynamic HTML from the sensor data. You can do this by making an HTML page that includes some JavaScript to request data from the server, and serving that HTML page from a directory called public in your project directory. First, create the directory and change directory into it:
$ mkdir public
$ cd publicThen create a new document, index.html, in this directory. Don’t enter any elements, just the bare skeleton of a page:
<!DOCTYPE html>
<html>
<head>
  <meta charset='utf-8'>
  <title>Hello</title>
</head>
<body>

</body>
</html>
Including P5.js
If you’re used to Processing, then P5.js is a really good way to get started with JavaScript in the browser. It gives you the same structure as Processing, but in JavaScript. To use it, you’ll need to include P5.js using script tags in the head of your HTML.
First, you need to include p5.js in the document head. You can either download P5.js and its libraries directly, or you can include them from p5.js’s content delivery site, as shown in the HTML below.
Create a file called sketch.js in the same directory as your HTML file. This is where you’ll write your JavaScript, using the p5.js library.
p5.js uses setup() and draw() methods, just like Processing, and similar to Arduino. You’re going to use it to create an HTML text div element in the document, and when you receive serial data, you’ll use it to set the text and the position of the text element. Start with the setup() and draw() and global variables for the text element and a webSocket connection like so (from here on out, the rest of the HTML will be omitted for brevity. Everything you see below will be done in the sketch.js file. Here’s the final HTML:
<!DOCTYPE html>
<html>

<head>
  <script type="text/javascript" src="https://cdnjs.cloudflare.com/ajax/libs/p5.js/1.0.0/p5.min.js"></script>
  <script type="text/javascript" src="sketch.js"></script>
</head>

<body>
</body>

</html>
Start the sketch.js file by making webSocket that will listen on port 8081. Then add the p5.js setup() and draw() functions:
let text;		// variable for the text div you'll create
let socket = new WebSocket("ws://localhost:8081");

function setup() {
}

function draw() {
}
In the setup() function, add listeners for the webSocket, and create the text div and position it. You’ll write the listener functions a bit later:
function setup() {
  // The socket connection needs two event listeners:
  socket.onopen = openSocket;
  socket.onmessage = showData;

  // make a new div and position it at 10, 10:
  text = createDiv("Sensor reading:");
  text.position(10,10);
}

function draw() {
}
Next, write the openSocket() listener and showData functions which are the callback functions for the webSocket’s event listeners:
function openSocket() {
  text.html("Socket open");
  socket.send("Hello server");
}

function showData(result) {
  // result is a JSON string. Parse it:
  let input = JSON.parse(result.data);
  // when the server returns, show the result in the div:
  text.html("Sensor reading:" + input);
  xPos = int(input);        // convert result to an integer
  text.position(xPos, 10);        // position the text
}
This last function changes the text inside the div. It also moves the div’s horizontal position. Whenever new data arrives from the server, this function will be called automatically, so there’s no need for a draw() function. Save this file in the public directory, then restart the server and open the file in your browser. You should see the text moving across the screen left to right, depending on the sensor, as in the video below. When the sensor value is high, its text representation will be to the right in the browser. When it’s low, it will be to the right in the browser:
browser-animation from ITP_NYU on Vimeo.
There is no soundtrack to this video.
Once you’ve got a server program serving data from a serial device to a browser, you have potential to make all kinds dynamic interfaces that combine HTML and physical interfaces. Notice that the server program doesn’t actually parse the serial data; it just treats it as a string, and passes that string on to the client. The client does any parsing work; in this case, converting the numeric string to an integer. This means you can keep the server very simple, so you only need to make sure the two endpoints (the microcontroller and the web client) are speaking the same protocol. JavaScript has many functions for manipulating strings, particularly comma-separated values. So consider sending your data from Arduino as comma-separated values.
Note: Check your data types
When p5.js returns the result of a request, it returns the string as an array with one element. If you’re planning on manipulating that string with functions like parseInt(), split() and other string handling functions, make sure to get the string out of the array first. For example, if you’ve sent over the string:
"234, 124, 134"
and you want to split it, here’s how you’d do it:
function showData(result) {
  var resultString = JSON.parse(result.data);
  text.html("Sensor reading:" + resultString);
  // split it:
  var numbers = split(resultString, ",");
  // use the numbers:
  text.position(int(numbers[0]), int(numbers[1]));
  text.style("font-size", int(numbers[2]) + "%");
}
Adding Handshaking (aka Call-and-Response)
Because the wsServer.js script passes through messages through without parsing, you can add handshaking to this application by modifying only the Arduino program and the P5.js script. When you add handshaking the Arduino will only send new data when it receives a byte of data in the serial port. It allows you to control the flow of data better.
To implement handshaking, make the following change in the Arduino sketch. Wrap the contents of the loop() in the Arduino sketch in an if statement like so:
void loop() {
  if (Serial.available()) {
    char input = Serial.read();
    // read the input on analog pin 0:
    int sensorValue = analogRead(A0);
    // print out the value you read:
    Serial.println(sensorValue);
    delay(1); // delay in between reads for stability
  }
}
Then add the following line to the end of the showData() function in your p5.js sketch:
function showData(result) {
  // result is a JSON string. Parse it:
  let input = JSON.parse(result.data);
  // when the server returns, show the result in the div:
  text.html("Sensor reading:" + input);
  xPos = int(input);        // convert result to an integer
  text.position(xPos, 10);        // position the text
  socket.send('a');        // send a byte to get the Arduino to send new data
}
You won’t need to change the wsServer.js script at all. Just restart it after you upload to the Arduino, and reload the page in the browser. When the client connects to the server, it will send the “Hello” message, which will be sent from the server to the Arduino, and that will trigger the Arduino to start sending data.
For more info:
A more complete set of code for this lab can be found on gitHub.