Introduction
From time to time, you might run into a situation where you want to build a web project that requires continuous communication between multiple parties on the web – for instance, a chat room, a multi-player shooter game, or even, a live performance. These are cases where WebSockets may be useful. This page introduces WebSockets, a technology that allows you to build continuous communications between a web client and a server for this purpose, along with a few hands-on examples to try out.
To get the most out of these notes,To get the most out of these notes, you should know what HTTP is and how HTTP requests work, and have a basic understanding of how the client-server model works on the web.
What are WebSockets?
The usual way that a web client communicates with a server is done by sending requests and getting responses back from the server using the Hypertext Transport Protocol, HTTP. A client sends a request to a server asking for some information, and the server makes a response to that client with the corresponding information.
Normally a web request does not include a continuous connection — a request is sent, then the connection closes. This has made continuous communication a bit difficult and tedious, since the client will need to reconnect every time they want to send or receive a message. It’s also limited by the fact that the server doesn’t initiate communication, it only waits for the client to make a request.
There are some exceptions to this, such as AJAX and Long-Polling. AJAX, or Aysnchronous JavaScript and XML, is a technique for dynamically altering an HTML page after the page has been requested and loaded and without leaving the page. In AJAX, a script that loads with the HTML page makes continued requests to the server, and modifies the HTML page after its initial load. Long-Polling is a technique where a client makes a request to a server and leaves the request open so that the server can continue to send new information to the client. However, since both of these methods are built around the request/response paradigm of HTTP, they’re not well suited for low latency applications.
To address this issue, the W3C, the body responsible for web standards, introduced the WebSocket — a computer communications protocol providing full-duplex communication channels over a single TCP connection. [1] Using this protocol, a web client can establish a persistent connection between the client and the server — called a socket — so that both parties can send data at any time, as long as the socket is open. [2]
WebSockets allow a server to initiate dialogue from its side, requesting information from or pushing information to the client whenever needed. If multiple clients connect simultaneously, the server can also broadcast information to all currently connected clients and pass along messages sent from one client to another. WebSockets still require the client to initiate contact with the server, but once the socket is established, communication can move in both directions.
Websockets are also cross-platform [3], cross-origin by nature[4], and they can traverse firewalls and proxies [5].
How do WebSockets Work – The WebSocket Protocol
If you just want to use WebSocket, you can skip this section and go to the example below that shows you how to establish a WebSocket connection. If you’re interested in what’s behind the scene, this is what happens:
A WebSocket is a thin wrapper around a normal TCP socket. Figure 1, from javascript.info [6] illustrates how WebSocket works.

After the initial handshake is done via HTTP, the communication then continues using the same TCP connection using WebSocket protocol. The TCP connection will be closed once both parties acknowledge that the WebSocket connection should be closed. WebSockets are encrypted using a public key generated by the client when the socket request is made.
Now let’s take a look at how WebSocket works in a bit more detail, referencing the Echo Test example on websocket.org. In this example, you have a WebSocket client in your browser, and you want to connect it to a WebSocket server hosted on echo.websocket.org, which echoes whatever messages sent to it.
To establish a WebSocket connection, your client will need to send a request to a URI using the WebSocket scheme – a URI that begins with ws:// (or wss:// for a secure WebSocket). The remainder of the URI would be the same as an HTTP URI. In this case, your requesting URI would be wss://echo.websocket.org.
Then the client will send an HTTP GET request to the specified URI as a WebSocket opening handshake with the following required headers:
-
Connection: Upgrade
– signal that we want to keep the connection alive, and use it for non-HTTP requests.
-
Upgrade: websocket
– signal that the client wants to establish a WebSocket connection.
-
Sec-WebSocket-Key
– a random browser-generated key for security.
-
Sec-WebSocket-Version
– WebSocket protocol version.
A complete list of HTTP headers that your client send might look something like this:
GET wss://echo.websocket.org HTTP/1.1
Host: echo.websocket.org
Origin: https://localhost
Connection: Upgrade
Upgrade: websocket
Sec-WebSocket-Key: Iv8io/9s+lYFgZWcXczP8Q==
Sec-WebSocket-Version: 13
If the server agrees to switch to WebSocket, it should send code 101 response:
HTTP/1.1 101 Switching Protocols
Upgrade: websocket
Connection: Upgrade
Sec-WebSocket-Accept: hsBlbuDTkk24srzEOTBUlZAlC2g=
After the client receives the server response, the HTTP connection is replaced by the WebSocket connection over the same underlying TCP/IP connection. You can learn more about how data is transmitted and the subprotocols in The WebSocket Protocol section of this How Do Websockets Work? article.
How To Create a WebSocket Client in the Browser
Let’s create a simple WebSocket client in the browser that talks to an echo server on websocket.org using plain JavaScript. This example assumes that you have some basic knowledge of how HTML & JavaScript works.
You can download the example code from this repository:
Open the websocket-client.html file in your browser, then open the JavaScript console (or the developer tool in your browser). You should be able to see something like Figure 2:
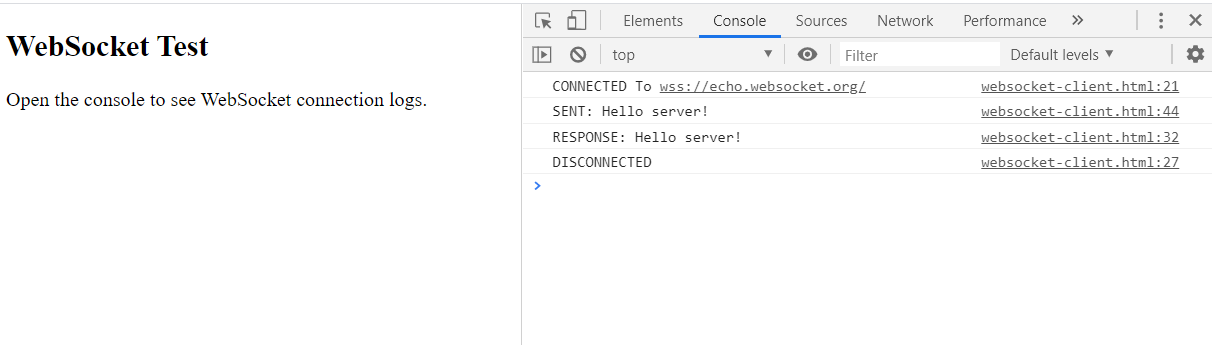
This is a simple HTML file that does the following:
- Create a WebSocket client
- Connect the client to a WebSocket server hosted on wss://echo.websocket.org
- Send a message “Hello server!”
- Get an echo response from the server
- Disconnect the client from the server
Now let’s open the HTML file with a plain text editor like VS Code or Atom and see how it actually works:
//create a websocket client and define event handlers
function init() {
   myWebsocket = new WebSocket(wsUri); //create a websocket client that connects to a target URI
   myWebsocket.onopen = openSocket;
   myWebsocket.onclose = closeSocket;
   myWebsocket.onmessage = handleMassage;
   myWebsocket.onerror = handleError;
}
At the top, you’ll see an init() function that will be run when the HTML page finishes loading. This function will create a WebSocket client. By using the syntax new WebSocket(wsUri), a WebSocket client instance called “myWebsocket” is created in your browser, and it’ll attempt to connect to any URI string provided (in this case, it is “wss://echo.websocket.org/”).
There are typically four event handlers that come with the WebSocket API and will be useful for us:
- onopen, a function that is called when the connection is ready to send and receive data
- onclose, a function that is called when the WebSocket connection’s readyState changes to CLOSED
- onmessage, a function that is called when a message is received from the server
- onerror, a function that is called when an error occurs on the WebSocket
You can define how to respond to each of these events by creating your own event handler functions. We’ll take a look at the two most important ones, onopen and onmessage.
//print connection status to console, and send a message to the server
function openSocket(evt) {
   console.log("CONNECTED To " + wsUri);
   doSend("Hello server!");
}
First, we assign a handler function called openSocket to onopen by myWebsocket.onopen = openSocket. By doing so, when the connection is successful and ready, the browser will call the openSocket function, and it’ll do two things: 1) print connection status to console, and 2) send a message to the server by calling the doSend() function.
//send a message to server, and print sent message to console
function doSend(message) {
   myWebsocket.send(message);
   console.log("SENT: " + message);
}
doSend() is a function that: uses the “myWebsocket” client to send a message to the server by using the WebSocket API’s .send() method,. It also prefixes the message with “SENT: ” and prints it to console. In this case, it’ll send “Hello server!” to the server and print “SENT: Hello server!” to the console.
The handleMessage() function, on the other hand, will be called whenever the client receives a message from the server. Since the server is an echo server, our client will receive the same message it sends out, “Hello server!”.
//print response message from server to console, and close the connection
function handleMassage(evt) {
   console.log('RESPONSE: ' + evt.data);
   myWebsocket.close();
}
When handleMessage() is called, it comes with a message event object that contains the received message. In this case, we get the event in a variable called evt, then we can access the message via evt.data. Then we ask the browser to do two things: first, print the message to the console, and second, close the WebSocket connection by calling myWebsocket.close().
//print disconnected message to console
function closeSocket(evt) {
   console.log("DISCONNECTED");
}
Once the connection is closed, the closeSocket() function will be called. It will print the message “DISCONNECTED” to the console.
Creating WebSocket Clients and Servers With ws.js and Socket.IO
There are different JavaScript libraries for creating WebSocket Clients and servers. The two most popular are ws.js, and Socket.io. Each has its own strengths and weaknesses., and each has different ways to implement a WebSocket client and server and determine how messages are communicated between server and client. In this section, you’ll see client and server examples using ws.js and Socket.io.
To use these examples, you’ll need to have Node.js installed in your computer, and have some basic knowledge of using the Terminal (on MAC/Linux) or the Command tool (on Windows). Node.js is a JavaScript runtime environment that executes JavaScript code outside of a web browser on personal computers and servers. You can learn more about Node.js in the Node.js section of this tutorial.
Once you have Node.js installed, you can download and use the examples in this repository:
ws.js
ws.js is a simple-to-use WebSocket server implementation on Node.js. It is very lightweight. ws.js uses the native WebSocket object in the browser to create a client, as you saw in the example above. Here we use ws.js to create an echo server in node.js, and reuse the client example above to connect to the server.
Server Example:
Open terminal, cd to the ws folder, and install the ws library dependency by entering:
npm install
Run the server by typing the following command:
node server.js
You should see a message saying “WebSocket server listening on port:8081” in your terminal. It means that the echo WebSocket server is up and running on port 8081 of your local computer, and ready to be connected by a client.
Open the server.js file in a plain text editor to check to code.
const WebSocket = require('ws'); // Include the ws.js module.
let myPort = 8081;
const wss = new WebSocket.Server({ port: myPort }); //create a WebSocket server

console.log("WebSocket server listening on port:" + myPort);

//whenever a client connects to the server, the handleConnection function will be called:
wss.on('connection', handleConnection);

function handleConnection(ws) {
   //when a message from the client is received, the handleMessage function will be called:
   ws.on('message', handleMessage);

   function handleMessage(message) {
      console.log('received: %s', message);
      //send the message back to the client:
      ws.send(message);
   }
}
Here’s how the script works:
- Include the ws.js module by calling require(‘ws’).
- Use it to create a WebSocket server via new WebSocket.Server({ port:[your port number]}).
- Define an event handler function handleConnection for the connection event of the server by wss.on(‘connection’, handleConnection). This means whenever a client connects to the server, the handleConnection function will be called.
- A socket object, ws, will be passed to the handleConnection function. We can then define an event handler function handMessage for its message event by ws.on(‘message’, handleMessage). In this case, when a message from the client is received, the handleMessage function will be called.
- Finally, define what should be to the received message. Here, we’ll bounce the message back to the client using the .send() method, hence ws.send(message).
Client Example:
With the server up and running, open the client.html file in your browser and then open console. You should see something like Figure 3:
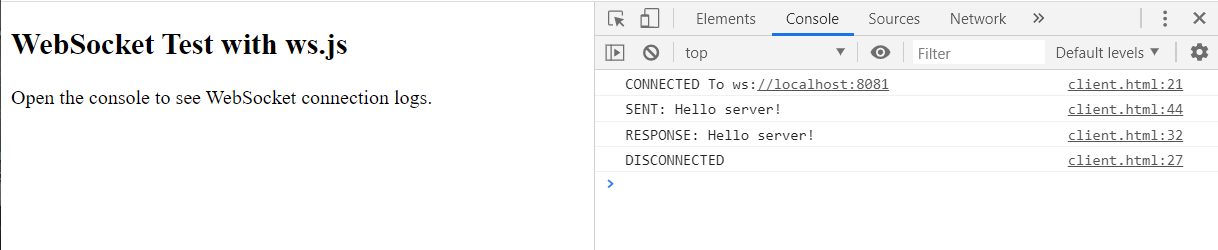
The client code is basically the same as the client code in the above section. The only difference is that instead of connecting to an echo server on echo.websocket.org, it is now connecting to the echo server running on our local computer with the URI “ws://localhost:8081”.
Socket.IO
Socket.IO is a library that simplifies the usage of WebSockets in more advanced situations like sending a message from server to reach on all clients, and it provides fail-overs to other protocols in the event that WebSockets are not supported on the browser or server. However, it comes with some overhead and it also requires a separate library on the client, as opposed to the example you saw in the previous section. [7]
Server Example:
1. Open terminal, cd to the socketio folder, and install the library dependency:
npm install
2. Run the server by entering:
node server.js
3. You should see a message saying “Socket.IO listening on port:8081” in your terminal. It means that the echo SocketIO server is up and running on port 8081 of your local computer, and readyim to be connected by a client.
4. You can open server.js in a plain text editor to check to code.
const server = require('http').createServer();
const io = require('socket.io')(server); //Attaches Socket.IO to a plain Node.JS HTTP server
let myPort = 8081;

io.on('connection', handleConnection); //define a handler for a connection event with a client.

function handleConnection(socket) {
   socket.emit('welcome'); //emit() means you're sending out an event.

   socket.on('client message', handleClientMessage); //attach handleClientMessage to a 'client message' event
   socket.on('end', handleEnd); //attach handleEnd an 'end' event

   function handleClientMessage(message) {
      console.log('received: %s', message);
      socket.emit('server message', message); //you can attach additional data in your emitted event by using
      //any number of additional parameters in .emit(), like .emit('ABC event', data1, ...).
   };

   function handleEnd() {
      console.log('end connection');
      socket.disconnect(0);
   };
}

server.listen(myPort); //ask the HTTP server to listen on port 8081
console.log("Socket.IO listening on port:" + myPort);
What it does is:
- Attaches Socket.IO to a plain Node.JS HTTP server listening on port 8081.
- The io.on(‘connectoin’, …) is similar to wss.on(‘connection’, …). It allows you to define a handler for a connection with a client. Here the handler is handleConnection.
- As opposed to ws.js, where the name of the events are predetermined (e.g. ‘message’), you’re free to define your own events using the .emit() and .on() pair.
- .emit() means you’re sending out an event. In this case, socket.emit(‘welcome’) means you’re sending an event with a name called ‘welcome’ to the connected client.
- .on() means you’re listening to an event. Here the server is listening to two types of events, ‘client message’ and ‘end’. Respective handlers are defined: handleClientMessage will echo a ‘server message’ event with whatever message it gets from the client, and handleEnd will disconnect the client.
- One benefit of using Socket.IO is that the names of the events can be arbitrary, like .emit(‘ABC event’). Also, you can attach additional data in your emitted event by using any number of additional parameters in .emit(), like .emit(‘ABC event’, data). The data can be strings, numbers, or objects.
Client Example:
Now open client.html in your browser and then open console. You should be able to see something like Figure 4:
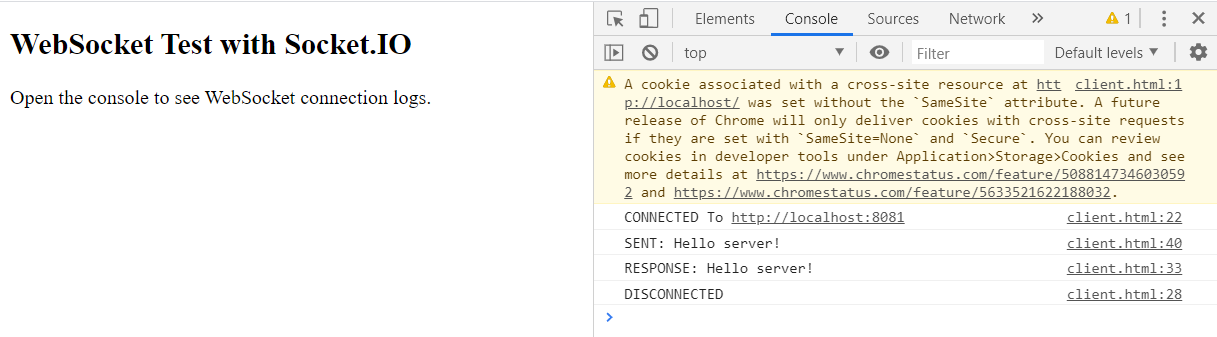
Open the code with a plain text editor. The way of creating a client with Socket.IO is similar to a Socket.IO server. The differences are:
//create a websocket client and define event handlers
function init() {
   myWebsocket = io(serverUri); //connecting to the server
   myWebsocket.on('welcome', handleWelcome);
   myWebsocket.on('server message', handleServerMassage);
   myWebsocket.on('disconnect', handleDisconnect); //when the server calls socket.disconnect(0), the client will receive a 'disconnect' event.
}
- You need to include a client library via a script tag in your HTML file. Here we’re using the hosted Socekt.IO client js file via
<script src=’http://localhost:8081/socket.io/socket.io.js’></script>.
- We’re connecting to the server via myWebsocket = io(serverUri).
- We’re defining the corresponding sets of .emit() and .on() events based on the ones defined on the server side. Here we’re listening to the ‘welcome’, ‘server message’, and ‘disconnect’ events emitted from the server, and attaching handlers for each of them.
- Note that when the server calls socket.disconnect(0), the client will receive a ‘disconnect’ event.
- The rest of the code follows a similar logic as the ws.js client.
Using WebSockets in Arduino
You can also use WebSockets on an Arduino board. A typical use case is to create a WebSocket client and send messages (e.g. sensor data) to a server hosted somewhere else.
The following example highlights how to create a WebSocket client on an Arduino board with WINC1500 module and send/receive messages via WiFi. It assumes that you have some basic knowledge of how to connect a WiFi-enabled Arduino to the Internet.
To create a client, you’ll need to include the SPI, WiFi101 (or WiFiNINA), ArduinoHttpClient libraries, and provide SSID and password info via the config.h file. Then you’ll create a WebSocket client with a WiFiClient object, a server address, and a port.
#include
//#include <WiFi101.h> // use this for MKR1000 boards
#include   <WiFiNINA.h> // use this for MKR1010 and Nano 33 IoT boards
#include <ArduinoHttpClient.h>
#include "config.h"     // includes char ssid[] and char pass[] for WiFi connect

const char serverAddress[] = "192.168.0.22"; // server address
int port = 8080; // port number
WiFiClient tcpSocket; // server socket

// make a websocket instance
WebSocketClient webSocket = WebSocketClient(tcpSocket, serverAddress, port);
To connect to a server, enter “c” via Serial to connect to the server, and it’ll attempt to connect to the server by calling webSocket.begin() through the connectToServer() function. If the WebSocket is connected, you can send message via Serial by using webSocket.beginMessage(), websocket.print(), and webSocket.endMessage().
if (Serial.available()) {
   String input = Serial.readString();
   if (input == "c") {
      connectToServer();
   } else if (input == "x") {
      webSocket.stop();
   } else {
      if (webSocket.connected()) {              // and the webSocket's connected,
         webSocket.beginMessage(TYPE_TEXT);   // message type: text
         webSocket.print(input);
         webSocket.endMessage();
      }
   }
}

void connectToServer() {
   Serial.println("attempting to connect");
   boolean error = webSocket.begin();   // attempt to connect
   if (error) {
      Serial.println("failed to connect");
   } else {
      Serial.println("connected");
   }
}
To receive messages, you will use webSocket.parseMessage() and webSocket.readString().
// while websocket is connected, listen for incoming messages:
if (webSocket.connected()) {
   int msgLength = webSocket.parseMessage();  // get message length
   if (msgLength & gt; 0) {                       // if it's > 0,
      String message = webSocket.readString(); // read it
      Serial.println(message);                 // print it
   }
}
Conclusion
Websockets are ways to do realtime communication between server and client within the context of HTTP. They can be done on any client device or software which implements the WebSocket protocol, like the ones we mentioned here. For further readings, see the references below.