This page will be updated occasionally.
Class Times
Fall 2019
Friday 9:00am – 11:30am | Room 410
Contact
yeseul.song@nyu.edu
Office Hours Calendar Link
Class Date Exceptions
There is no class during the Thanksgiving break (November 27-29, 2019).
Useful links
- Arduino website
- Where to get parts ***Take a look at the shop, ER, and FREE STORE before you buy anything!
- Components at the ER
- Electronics/Mechanical/Materials Suppliers
- Tinkersphere (overpriced) in Lower East Side and Micro Center are nearby places you can go to shop or take a look at various electronic parts in person.
A Few Good Reads
- Tom Igoe’s Physical Computing Blog
- Learn Electronics with Arduino: An Illustrated Beginner’s Guide to Physical Computing
Class Notes
- Class 1(September 4, 2019): Lecture slides from the class
- Topics: physical computing, interaction, class structures
- You can view the slides when you log-in with your NYU account. Please use them only for your own reference and don’t distribute them without my permission.
- Class 2 (September 11, 2019)
- Figure 1 and Figure 2 show the LED circuit I demonstrated during the class, which you can use for your LED+switch circuit project. You don’t need to use a breadboard for this assignment unless you want to, but it should be useful for prototyping at least. The value of the resistor in the images is 220 ohm, which is the smallest value you have in your kit. If you want the LED to be brighter, you can use a 80~100 ohm resistor instead. You can break any point of the circuit and insert your switch that will enable you to turn on and off the LED.
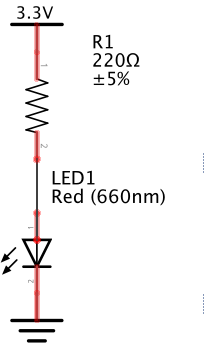
Figure 1. LED circuit schematic 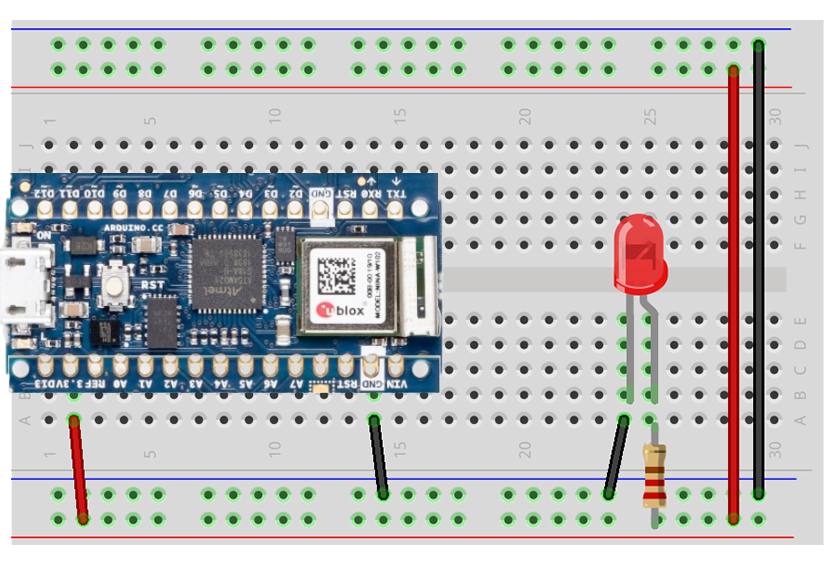
Figure 2. LED circuit powered by arduino nano 33
- Figure 1 and Figure 2 show the LED circuit I demonstrated during the class, which you can use for your LED+switch circuit project. You don’t need to use a breadboard for this assignment unless you want to, but it should be useful for prototyping at least. The value of the resistor in the images is 220 ohm, which is the smallest value you have in your kit. If you want the LED to be brighter, you can use a 80~100 ohm resistor instead. You can break any point of the circuit and insert your switch that will enable you to turn on and off the LED.
- Class 3 (September 18, 2019)
- Arduino Nano 33 IoT pinouts
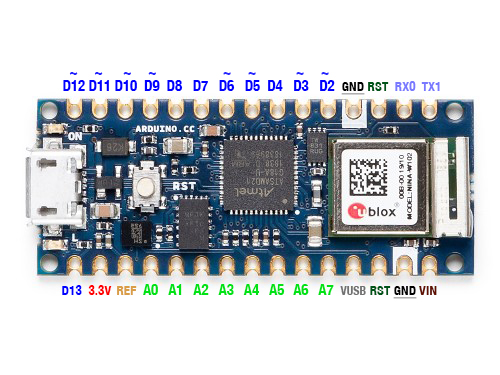
Figure 3. Arduino nano iot 33 pinouts - How to Solder by Andy Sigler
- Arduino Nano 33 IoT pinouts
- Class 4 (September 25, 2019)
- List of parts inlcuded in the physical computing kit
- Tips
- Ranges of values
-
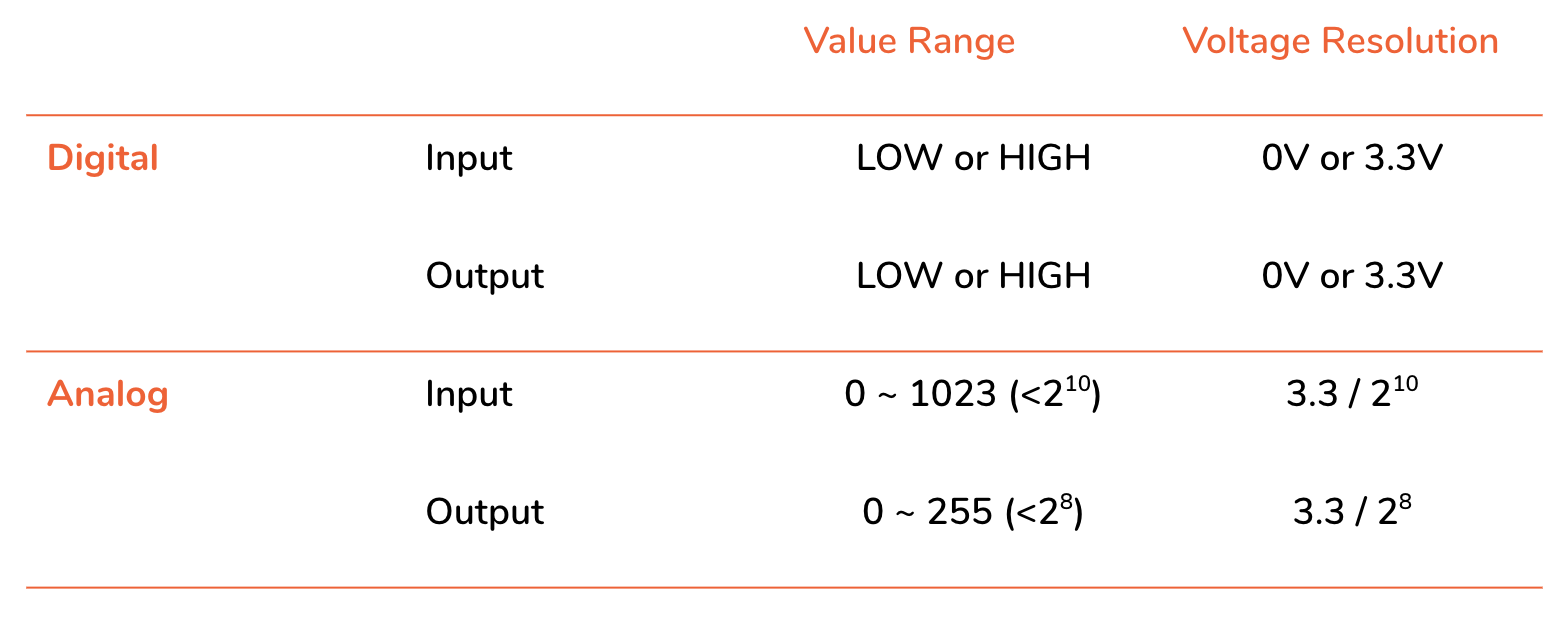
Table 1. Digital and Analog Input/Output value ranges
-
- Class 5 (October 2, 2019)
- Class 6 (October 9, 2019)
- Serial Communication: Arduino to p5.js (see Table 2)
- When you send a stream of data that is between 0 and 255, you can simply use Serial.write() from Arduino and serial.read() from p5.js to send and receive 1 byte at a time. No parsing involved.
- When you send numbers that is out of range of 0-255 or characters, you need to package each data by putting each data on each line–to do that, use Serial.println() from Arduino. To unpack the data, use serial.readLine() from p5.js. To use it as a number, use Number() function on p5.js.
Data to Send A single value
within 0-255
(< 2^8 = 1 byte)Larger numbers & characters in Ascii Table,
Multiple valuesSend as:
Binary Ascii Arduino -> Serial.write() Serial.println() -> p5.js serial.read() serial.readLine()
=readStringUntil('\r\n')
Table 2. Serial Communication: Arduino to p5.js
Notes about sending Ascii data: *Using Serial.println() on Arduino and serial.readLine() on p5.js is one of many different ways of sending Ascii data from Arduino to p5.js with serial communication. *If you want to use the value as a numeric value not a string, convert the value into number by using Number(). - Codes from the in-class lab: see your email
- Serial Communication: Arduino to p5.js (see Table 2)
- Class 7 (October 16, 2019)
- Serial Communication: p5.js to Arduino (see Table 3)
- “The serial.write() function is versatile. If you give it a variable or literal that’s a numeric data type, it will send it as its raw binary value. If you give it a string, however, it will send out that ASCII string” (quoted from Lab: Serial output from p5.js
Number of Bytes 1 Byte Multi Bytes Data to Send A single number < 255 A single character A single number > 255, multiple values Send as: Binary Ascii Ascii p5.js -> serial.write(integer) serial.write(string) serial.write
(valueToSend + ",")-> Arduino Serial.read() Serial.parseInt()
Table 3. Serial Communication: p5.js to Arduino - Codes from the in-class lab: see your email
- “The serial.write() function is versatile. If you give it a variable or literal that’s a numeric data type, it will send it as its raw binary value. If you give it a string, however, it will send out that ASCII string” (quoted from Lab: Serial output from p5.js
- Serial Communication: p5.js to Arduino (see Table 3)