In this lab you’ll learn about converting voltage levels to make components communicate better.
Introduction
Different microcontrollers and other digital devices operate on a range of different voltages. For many microcontrollers, 5V has been a common standard operating voltage for many years. Recently, however, new controllers are coming on the market that operate only at lower voltages. 3.3V has become common, and some controllers even operate as low as 1.7V. Just as microcontrollers are changing, the sensors and actuators that attach to them are changing as well. For example, many accelerometers on the market now operate at 3.3V instead of 5V. Because of this, you sometimes need to convert the output voltage of one device to match the input voltage of another. This is called level shifting. There are a number of ways to do it.
To get the most out of these notes, you should know what a microcontroller is and have an understanding of the basics of microcontroller programming. It will also help if you understand digital input and output on a microcontroller, analog input on a microcontroller, and the basics of serial communication.
Level Shifting With a Voltage Divider
Most of the time that you need to shift voltage levels, you’re working with a voltage source that’s very low amperage, like a microcontroller’s I/O pins or the signal output from a sensor. Another common application is when you’re connecting a 5V microcontroller Like the Uno to a 3.3V board like the Raspberry Pi. You need to shift the Uno’s 5V signals to 3.3V for the Pi.
You know from the introductory electronics notes that two resistors in series can form a voltage divider (Figure 1). This is one way to reduce the voltage of a circuit. You need to calculate the ratio of the resistors based on the ratio of the input voltage to the output voltage. Here’s a handy calculator for working those values out. The tricky part about this is having the exact right resistors for the job. Also, resistors can slow down a high-speed signal because they have a built-in impedance, meaning that the voltage across them doesn’t change instantaneously. This can be a problem if you’re sending a high-speed serial signal, for example.

See this voltage divider calculator for more.
In the image above, Vout = Vin * R2 / (R1 + R2).
If the resistors are equal, Vout = Vin/2.
If R2 = 2*R1, then Vout = Vin*2/3.
Level Shifting With a Zener Diode
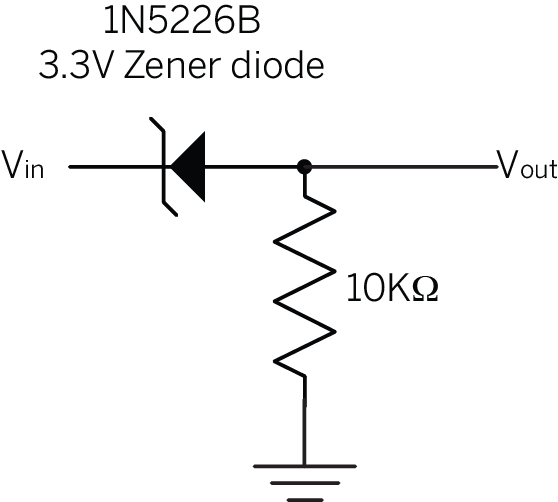
You can also use a zener diode to reduce the voltage. Zener diodes are diodes that allow current to flow from anode to cathode just like a regular diode, but also allows current to flow from cathode to anode up to a particular voltage, called the breakdown voltage. Zener diodes come in various breakdown voltages, so you can choose the one that works for your application. For example, the 1N5226 is a common 3.3V Zener diode, and the the 1N4733 is a common 5.1V Zener diode. When you’re using a Zener diode as a voltage shifter, you connect the cathode to the source, and the anode to the output, usually with a pulldown resistor as shown below in Figure 2.
Level Shifting With a Level Shifter IC
If you’ve got several of I/O pins to shift, then you can use a level shifter IC. These chips contain all the circuitry to shift from one level to another for you automatically. They are generally the most expensive solution, but the most reliable and convenient. Texas Instruments makes a series, the TXB010X family, that are popular in physical computing applications. The TXB chips can automatically detect the input and output levels and do the shifting for you. They come in 4-channel and 8-channel models, (TXB0104 and TXB0108) and both Sparkfun and Adafruit stock breakout boards for them. Texas Instruments has a detailed introduction to logic guide, and an application note for these chips as well. Many other manufacturers make level shifters; this family is just one convenient model. Figure 3 shows how you’d use a TXB0104 to connect an Uno to a Raspberry Pi.

The TXB101X level shifters have two voltage input pins, VccA and VccB VccB is the higher voltage input and VccA is the lower. You can see in the diagram above, VccA is connected to the Pi’s 3.3V out pin. Both devices are connected to the level shifter’s ground, so there is a common ground. Wired this way. the level shifter knows that all the A pins will be 3.3V and the B pins will be 5V, and it will convert between them. For more information, Sparkfun has a nice hookup guide for this chip. Note that their breakout board has a different pin arrangement than Adafruit’s, but operates in the same way.