Introduction
If you’ve never programmed before, there are a few terms and concepts that may throw you off when you first start. There are many helpful guides to understanding programming on the web, and there are many for Arduino, p5.js, and Processing in particular. What follows are some specific concepts that will come up in these labs and notes that you may not be familiar with.
To get the most our of these notes, you may want to download Arduino and try things as they’re mentioned.
The Programs to Program
In order to write a computer program, whether it’s for the computer on which you’re currently working or for a microcontroller, or for a web server, you need a programming environment. This usually consists of a few components:
- A text editor
- A compiler
- Controls to run and stop the program
- A debugger
All of these combined make up what’s called an Integrated Development Environment or IDE. When you hear about the Arduino IDE and the p5.js Editor or any other IDE (such as Processing), you can assume that it’s an application that’ll include at least these pieces, if not more.
The Text Editor
The text editor of any IDE is the main thing you should see. It’s where you write your code. Programming text editors can come with all kinds of features. The Arduino editor, the p5js editor, and the Processing editor are all pretty basic so as not to overwhelm you with features, but there are a couple features you might notice:
Line numbers are displayed at the bottom of the editor as shown in Figure 1. In later versions of Arduino (1.6.5 and after) you can click on File -> Preferences and turn on line numbering in the editing window itself.
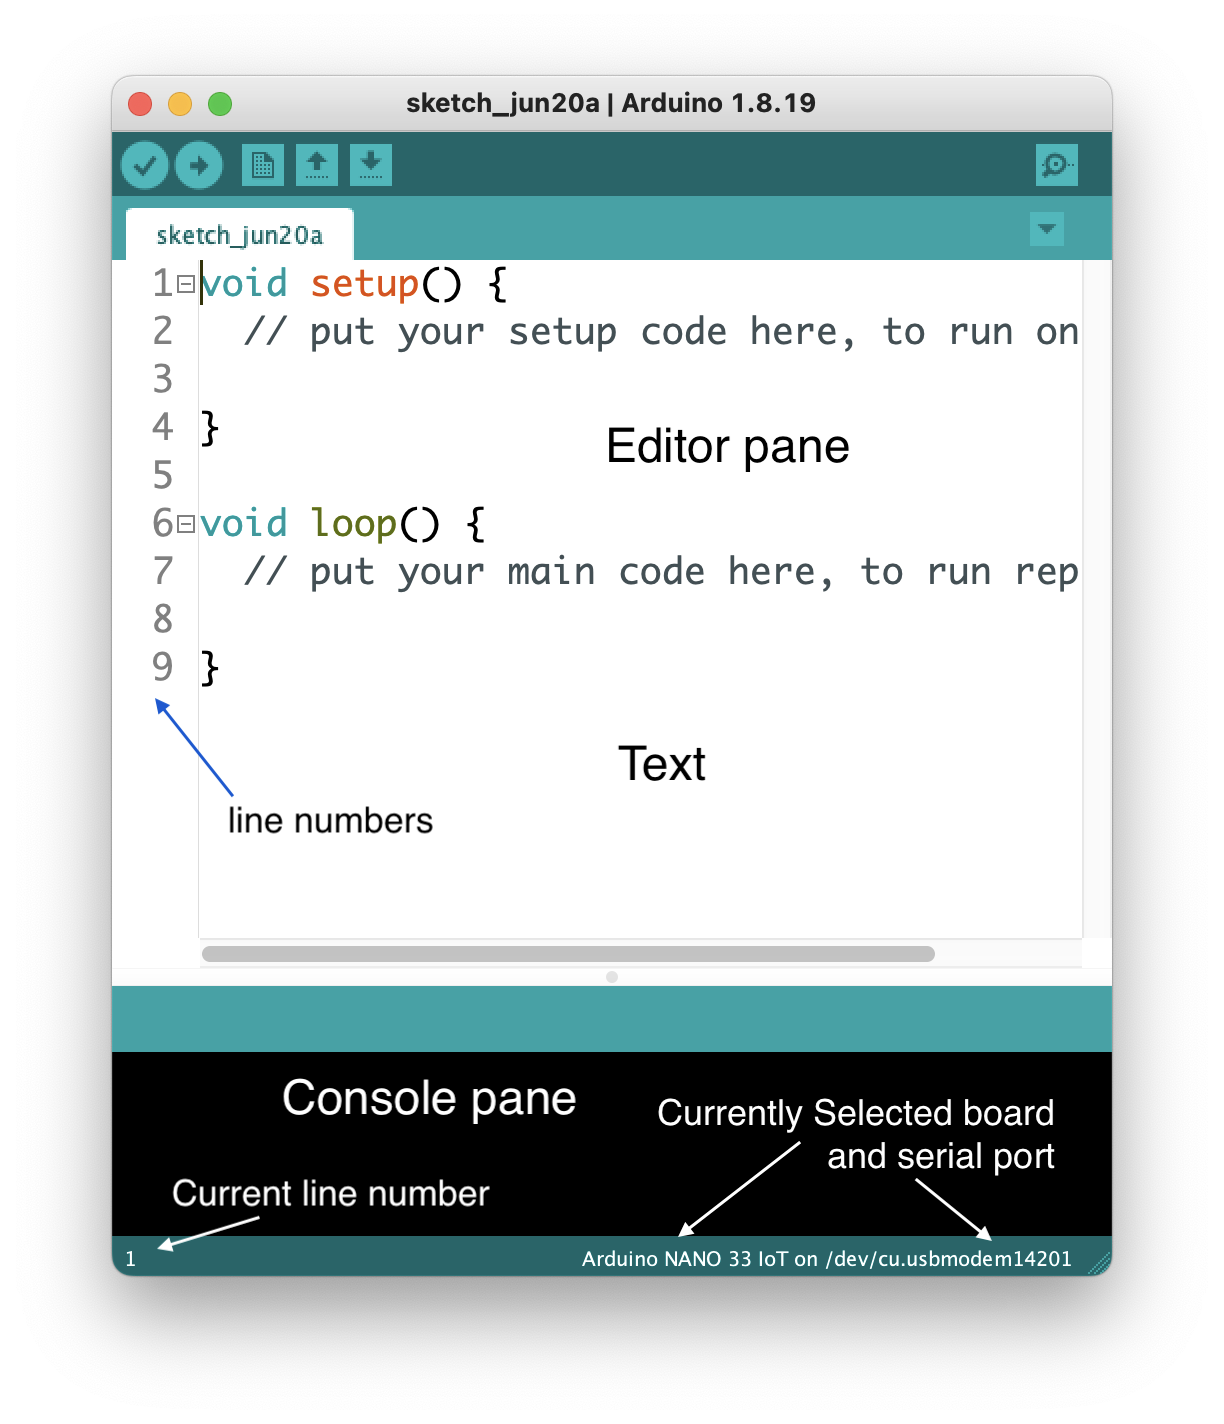
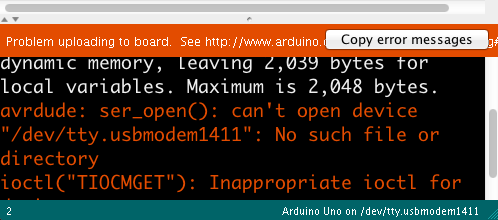
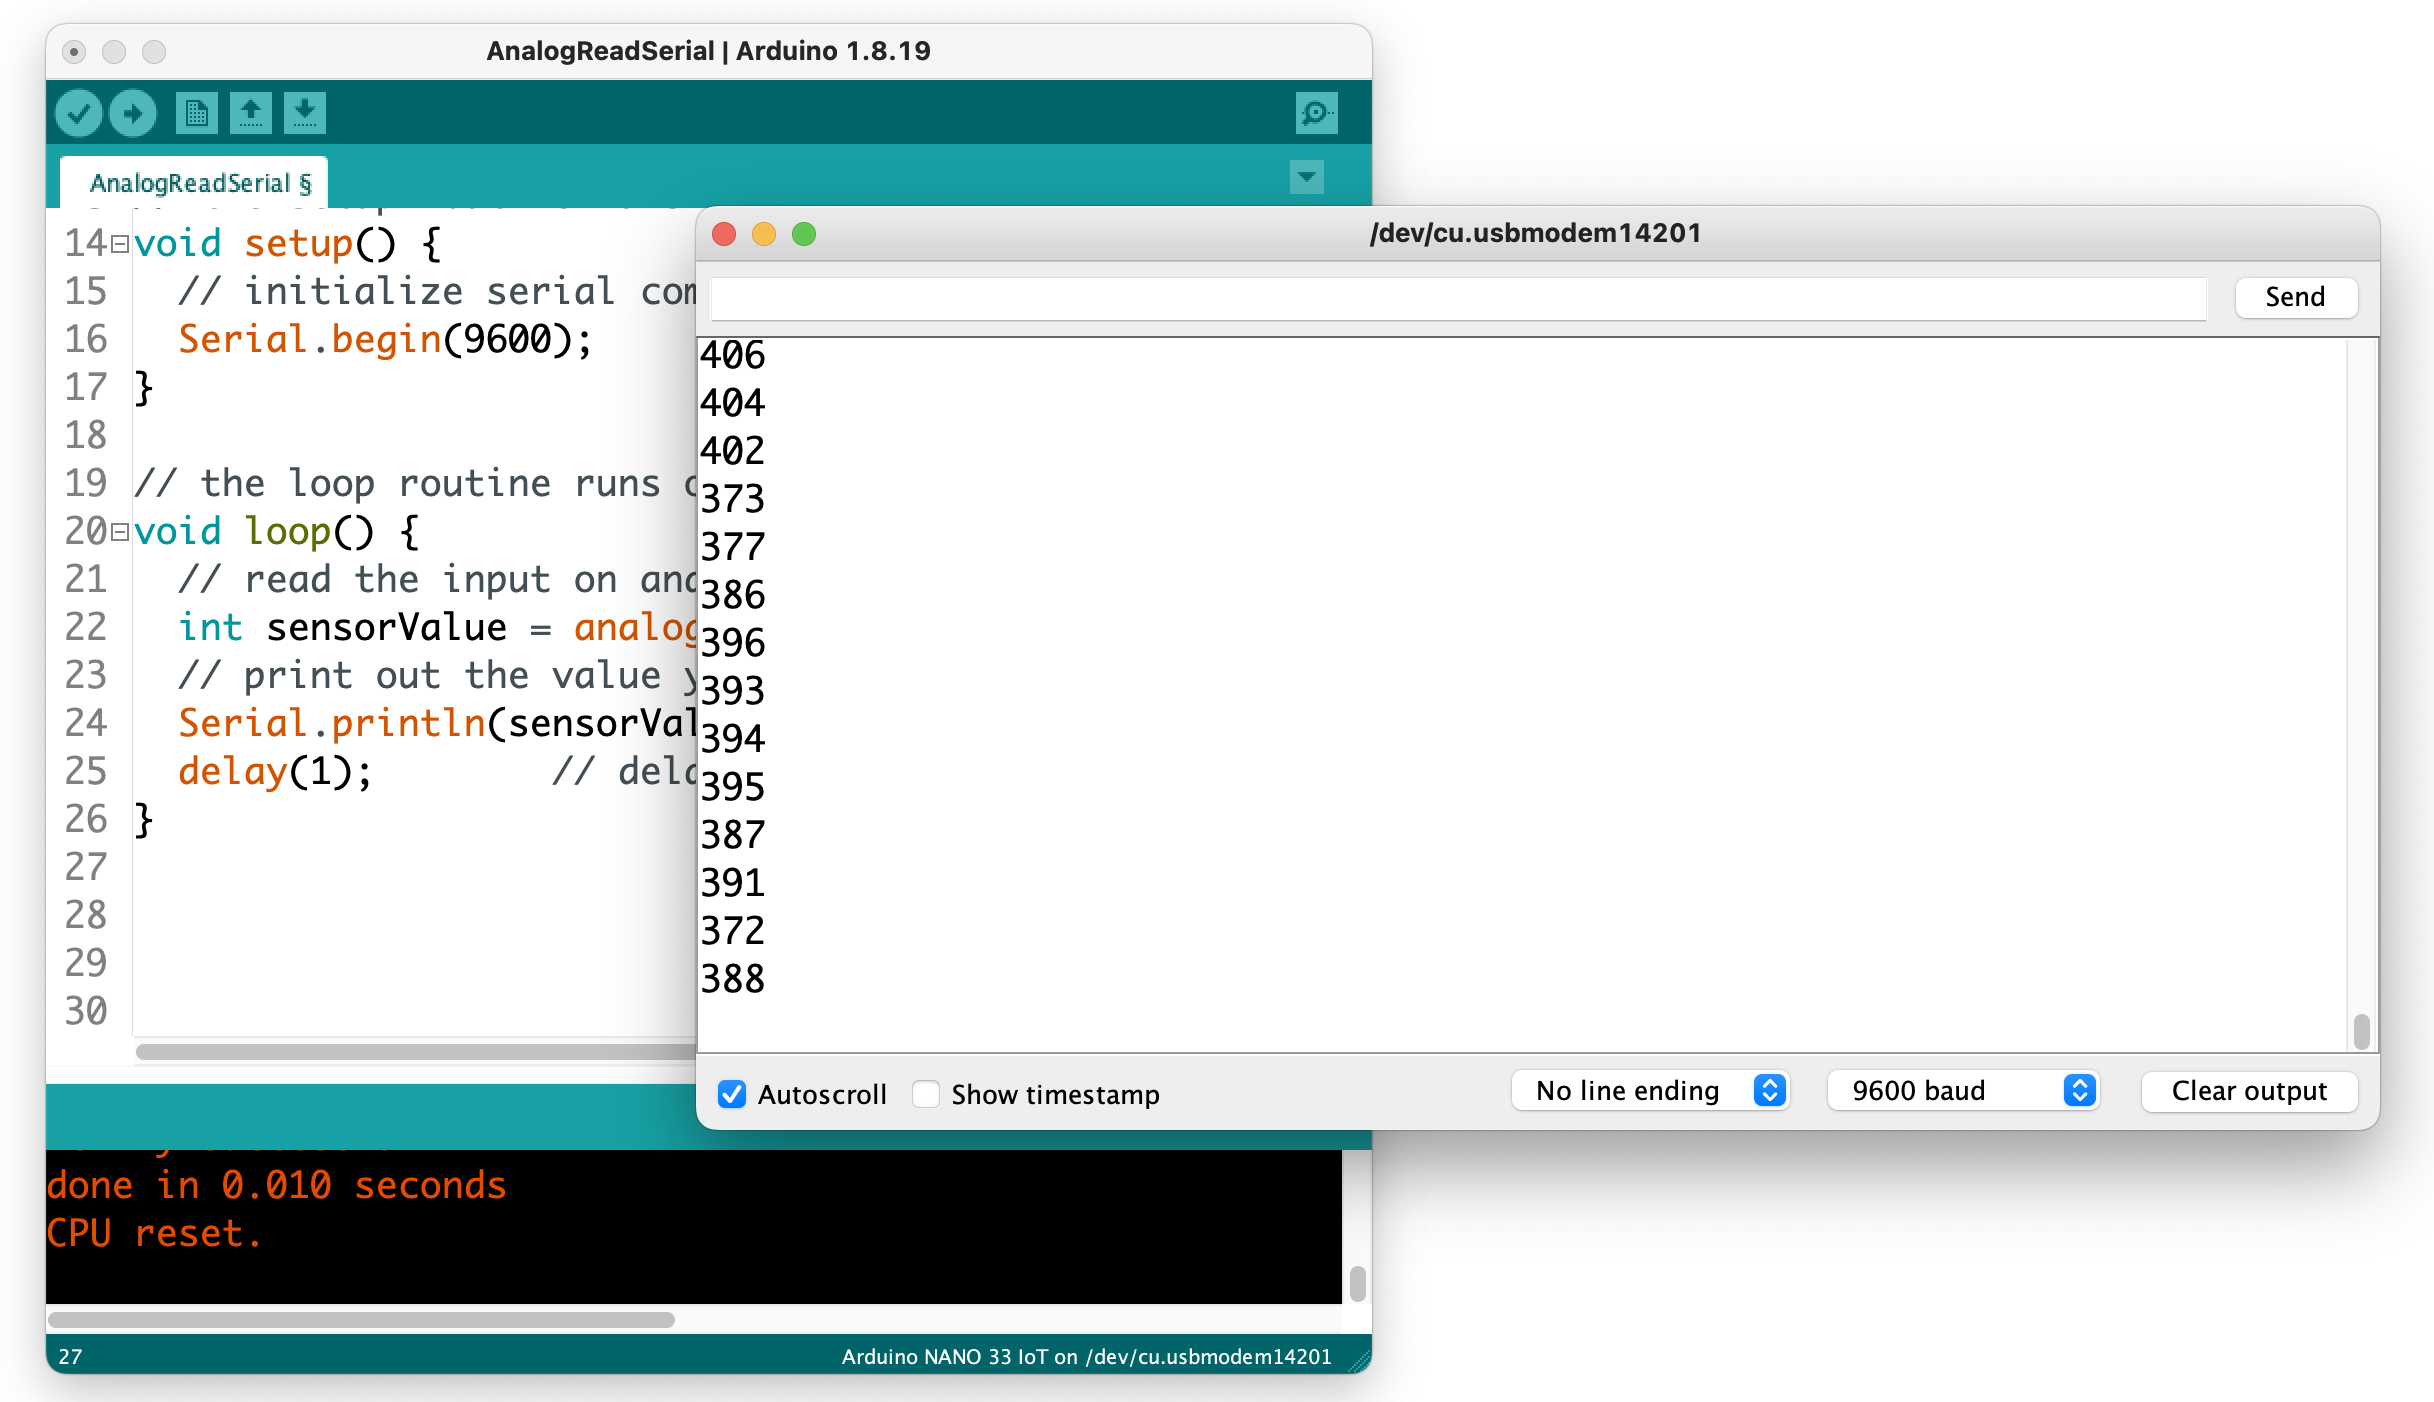
The console pane at the bottom of the editor is where the IDE will send you messages. They may be error messages, or they may be messages that you programmed into your sketch. Below, you can see two messages: Figure 2 tells you that your code successfully compiled, and Figure 3 tells you that the IDE couldn’t find your Arduino:

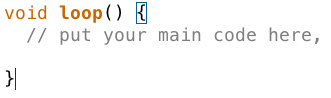
Block completion indicators Many programming languages use braces {}, parentheses () and brackets [] as punctuation for parts of a program. Programming editors usually include an indicator that shows you the opening or closing bracket, parenthesis, or brace that goes with the one on which the cursor is currently positioned. In Figure 4 you can see the rectangle around the opening bracket that is paired with the closing bracket where the cursor is. Put your cursor on different brackets, braces, or parentheses, and you should see this completion indicator move.
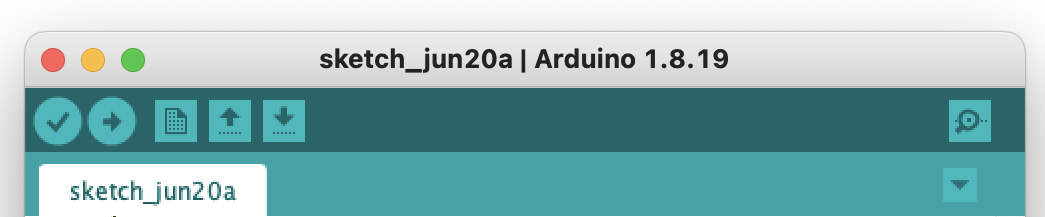
The Toolbar contains the control buttons that give you control of the compilation and upload of your code. In Arduino (Figure 5), the first button to the left compiles your code and the second compiles and uploads to the board you have selected. The next few buttons are for opening and saving files. The one on the right opens the Serial Monitor:
In p5.js and Processing, the toolbars are a little different as shown in Figure 6 and Figure 7. There’s no upload button because the code runs right on the web or your laptop respectively. But there are start and stop buttons instead. There’s no Serial Monitor button because messages in your code appear in the Console or Message Pane instead, and in Processing there is a button for exporting your code as a finished application, and a mode selector menu for choosing the programming mode:


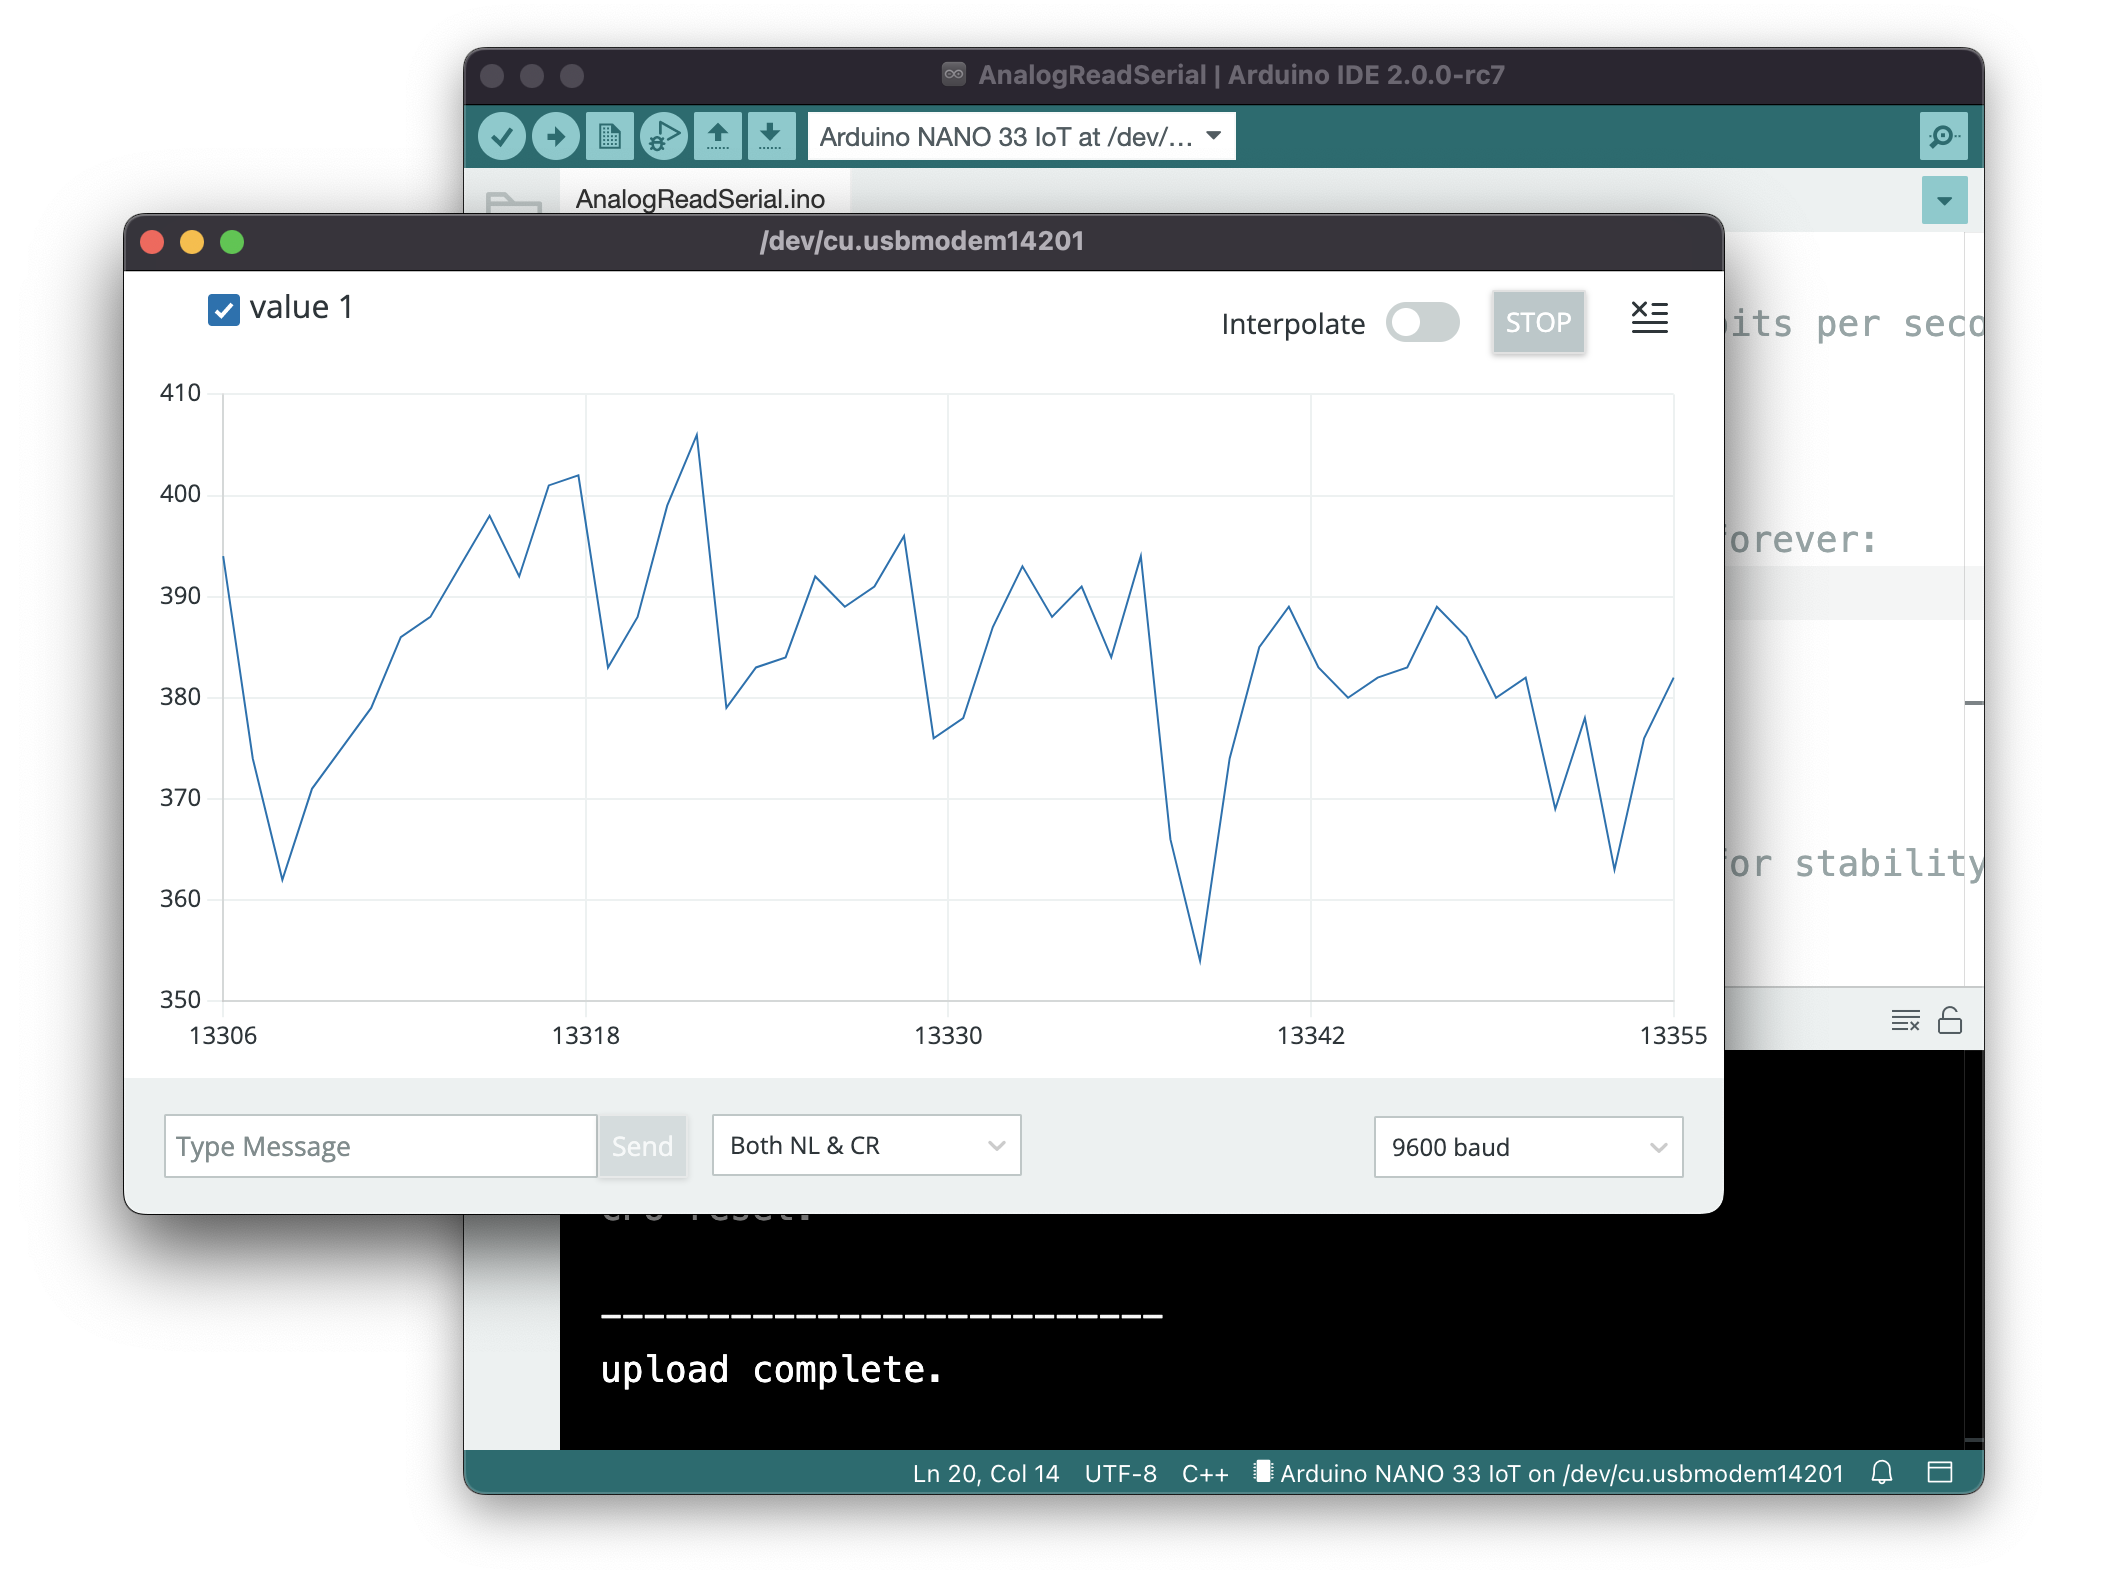
Serial Monitor The Arduino IDE includes monitor program that watches any data coming in the serial port from your Arduino board, and allows you to send data out to the board. Figure 8 show a serial monitor of the Arduino IDE. You can print out anything you want to the Serial Monitor using Serial.print() and Serial.println() and Serial.write() commands. and see what your program is doing. This is a rudimentary debugging tool, but a useful one. The equivalent in p5js is the Console, where your print() or console.log() messages will appear. Processing’s equivalent is the Message Pane, where your println() messages appear.
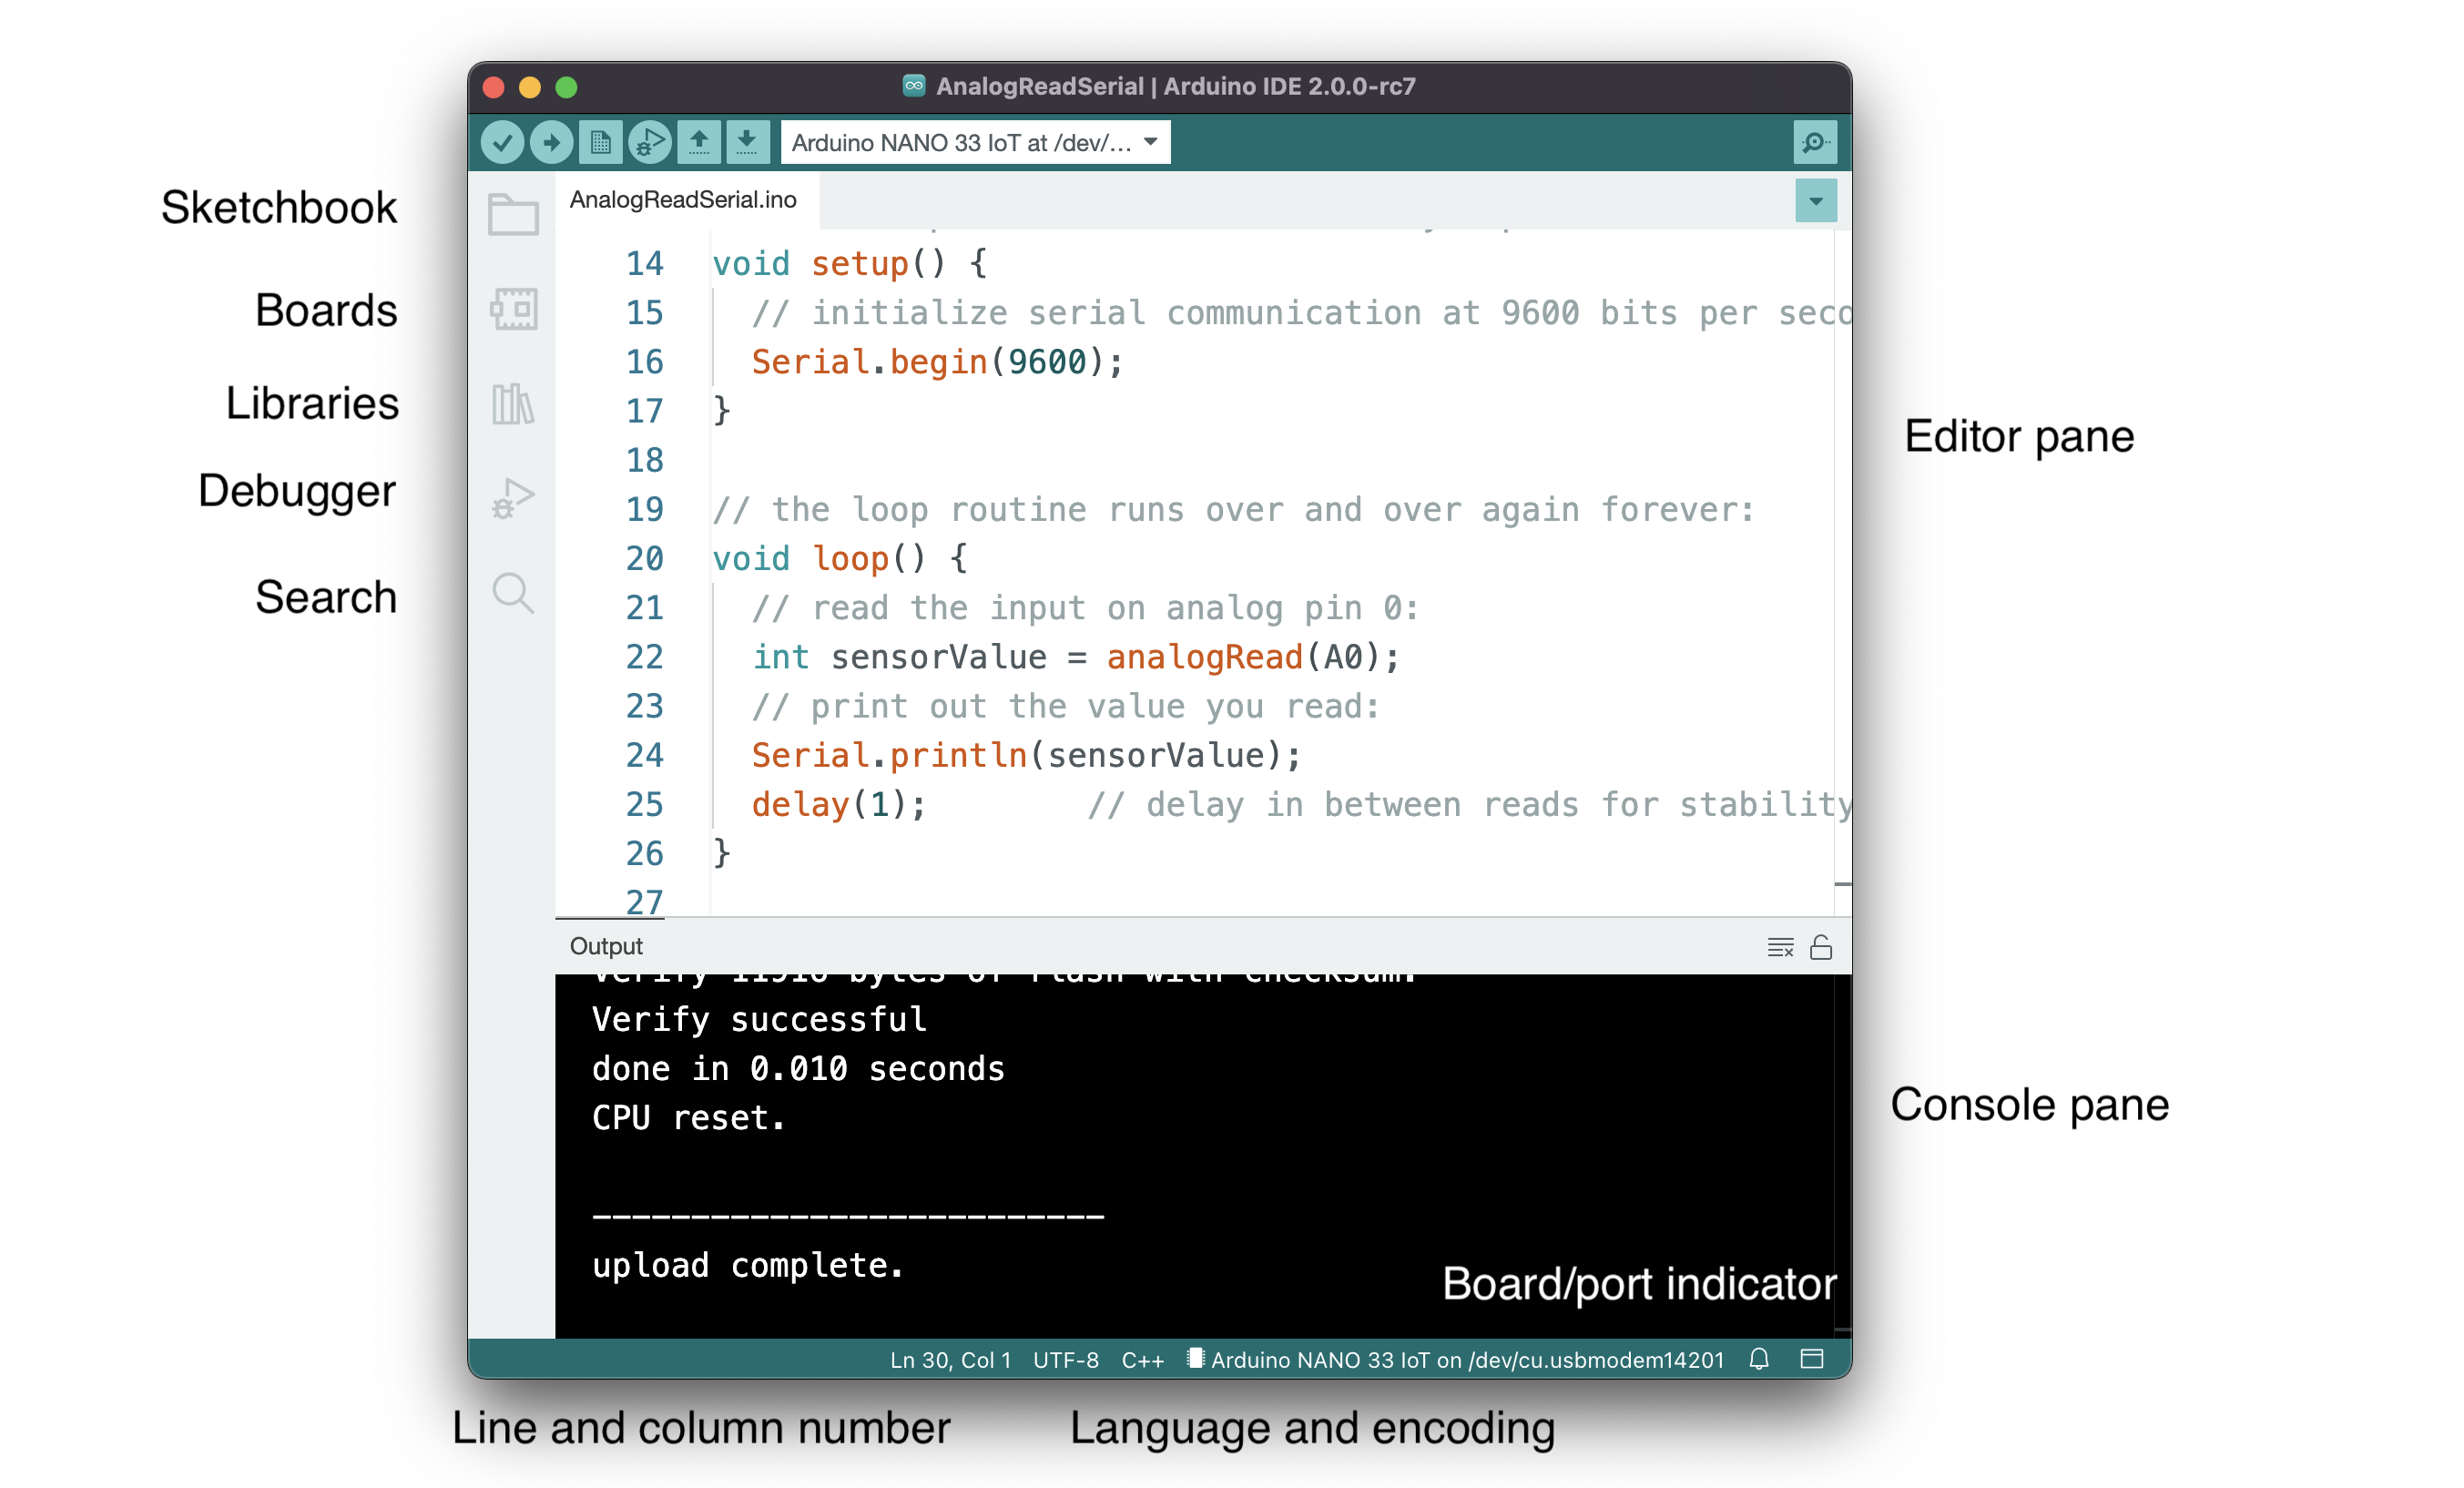
Arduino IDE 2.0
A new version of the Arduino desktop IDE is in development, and as of version 2.0.0-rc7, it’s stable enough for class use. You can stay with the earlier version (1.8.19) if you prefer, but if you want to use 2.0.0, here are some differences to note:
- Auto-detection and selection of boards when they are plugged in
- Auto-completion and code suggestion. The 2.0 editor will guess at what functions you want when you start typing, like other programming editors.
- Side menu for Sketchbook, Boards, Libraries, Debugger and Search
- Serial Monitor integrated into Console pane

The Compiler
The compiler is a program that takes the text you write and translates it into the binary instructions that the computer needs to run the program. You never actually see the compiler in the Arduino or Processing IDEs, because it does all the work in the background. The buttons in the Toolbar are your interface to the compiler, and the message pane is where you’ll see status and error messages from it.
The Arduino IDE, and any other microcontroller IDE, will also include an uploader, which moves the compiled code from your personal computer to the microcontroller itself. Other microcontroller environments may require a hardware programmer which attaches to your computer via USB and then connects to your controller in order to upload the code to it.
The Parts of a Program
Programming languages have a syntax, just like written languages. Understanding the terms for that syntax will make it easier to program. Arduino is based on a programming language called C, and Processing is based on a programming language called Java. There are many programming languages that share the same basic syntax as C, and they’re referred to as C-style languages. Java happens to be a C-style language, as is JavaScript. The notes below all describe C-style languages, so it all applies to C, Java, Arduino, Processing, and JavaScript, among others.
Variables
Variables are the constructs that programming languages use to store changing information in a program. In C-style languages, every variable must be declared before you use it, by giving it a name and a data type. You usually give it an initial value as well, like so:
buttonPushes = 0;
Variables can generally be any word you want, as long as they don’t start with a number, and as long as they’re not an existing keyword in the language. It’s helpful if you use descriptive variable names, so your program is more readable. When you want to use more than one word in a variable name, you can either use camel case notation, like this: thisIsMyVariable, or you can use underscore notation like this: this_is_my_variable.
For more on variables, see the notes on variables.
Functions
Functions are blocks of programming code that, well, perform a function. There are many synonyms for function: sometimes they’re called methods, or subroutines or procedures. Functions in Java and C (the languages that Processing and Arduino are based on) have a data type, a name, and parameters. Some functions have a return value as well. Here’s a typical function:
int addOne(int number) {
  int result = number + 1;
  return result;
}
And here’s how you’d call it:
int newNumber = addOne(2);
When you do call it, the variable newNumber will equal 2.
Here are the parts of the function above:
- name: addOne
- Data type: int
- return value: result
- parameter: number
Functions can take variables as input when you call them. These are called the parameters of the function call. The parameters of a function go in the parentheses after its name. In the function above, the function’s parameter is int number.
Functions can also return values. What they return is called the return value. The function’s return value is a variable whose data type is the function’s data type. You can see this above: the function’s data type is an int, and it returns an int. Functions don’t have to return values though. If a function doesn’t return any value, its data type is void.
The parameters that you send into a function are not the same as the return value you get out of it. In the function above, the parameter number has the same data type as the return value (and of the function), but it doesn’t have to be. Here’s another function where the parameters and the function’s data types are different:
boolean isNegative(int number) {
  boolean result = false;
  if (number < 0) {
    result = true;
  }
  return result;
}
Programming languages have some built-in functions. These are sometimes referred to as commands. They’re just functions, though. Similarly, programming languages can be expanded using libraries. Libraries are usually written to fill particular needs. For example, you’ll see serial libraries in Processing and Arduino for communicating with other computers. Processing has a video library for controlling video and reading a camera. Arduino has a servo library for controlling servo motors.
Keywords
Every language has certain keywords that have special meanings. The reference section for a language will include its keywords, and when you type those in the IDE, they’ll usually get color-coded. These are words that define programming structures like for, if, and while, or the names of built-in functions and libraries like digitalWrite() or Serial. Keywords also identify data types like int, byte, and String. Your compiler will let you know when you mis-use a keyword by printing an error in the message pane.
Operators
Operators are the symbols in a programming language that combine or compare numbers and other data. There are the usual math operators:
Addition: +
Subtraction: –
Multiplication: *
Division: /
Modulus: %
There are also some special math operators that combine other operators. They’re shorthand for common math operations:
Increment value: ++
decrement value: —
add right value to left: +=
subtract right value from left: -=
multiply right value by left: *=
divide right value by left: /=
These operators update the value on the left side of the operator using the value on the right side.
For example, to increment the variable buttonPushes without these operators, you’d type:
buttonPushes = buttonPushes+1;
But with these operators, you can do this:
buttonPushes+= 1;
And since adding and subtracting one (also known as incrementing and decrementing, respectively) are so common, you can even do this:
buttonPushes++;
Here are a few other examples using these operators:
int buttonPushes = 2;
buttonPushes += 2;
Result: buttonPushes = 4.
int buttonPushes = 3;
buttonPushes *= 2;
Result: buttonPushes = 6.
int buttonPushes = 3;
buttonPushes--;
Result: buttonPushes = 2.
int buttonPushes = 3;
int pointsScored = 6;
pointsScored /= buttonPushes;
Result: pointsScored = 2.
Then there are comparison operators, that you use to compare two numbers:
Greater than: >
Less than: <
Greater than or equal to: >=
Less than or equal to: <=
Equal: ==
Not equal: !=
Note the double equals sign. When you want to compare two numbers, you use the double equals, but when you want to set a variable equal to a number, or equal to another variable or a function, you use the single equals sign. Here are examples of the difference:
Comparison:
if (buttonPushes == 3) {

}
Setting a variable equal to a number:
int headCount = 3;
Punctuation
In C-style languages, every line of code ends with a semicolon. You’ll get an error if you don’t include it at the end of your lines.
int headCount = 3;
Blocks of code are surrounded by braces. Think of blocks like the paragraphs of programming. For example, here’s a block of code that’s executed if a particular condition is true:
if (buttonCount == 4) {
  digitalWrite(3, HIGH);
  digitalWrite(4, LOW);
}
Comments
You can write plain language comments in your program by putting two slashes in front of them. When you do this, the compiler will ignore everything from the slashes until the end of the line:
if (buttonCount == 4) {
  digitalWrite(3, HIGH);  // turn on the blue LED
  digitalWrite(4, LOW);   // turn off red LED
}
You can also make multi-line comments using the following notation:
/*
  Everything between the star/slash combination
  will be ignored by the compiler.
*/
if (buttonCount == 4) {
  digitalWrite(3, HIGH);  // turn on the blue LED
  digitalWrite(4, LOW);   // turn off red LED
}
Program Flow
Your program will be executed one line at a time until it reaches the end. However, most languages have a special function that will run forever and ever. In Processing and p5.js, this function is called draw(), and in Arduino it’s called loop(). in Java and C, it’s called main(). When the special function is finished, it will repeat until you stop the program or power down the computer (if it’s a microcontroller).
P5, Processing, and Arduino also share another special function called setup(). This function will run at the beginning of your program every time, then it will pass control to draw() or loop().
Other functions will get executed when they are called. To call a function, you call its name inside another function.
Here’s a typical program in Arduino:
void setup() {
  Serial.begin(9600);
  Serial.println("Program is starting");
}
void loop() {
  if (digitalRead(3) == HIGH) {
    saySomething();
  }
}

void saySomething() {
  Serial.println("I said something");
}
The first function, setup(), will run once at the start. It will open serial communications (there’s that serial library mentioned above), then it will print “Program is starting” via the serial port. Then the program will move on to loop(). That function will check to see if one of the input pins of the controller has high voltage on it using the built-in function digitalRead(). If that is true, then the function saySomething() will get called. The program will then return to the end of the if statement. Since that happens to be the end of the loop() function, then the program will go back to the top of the loop() and run that function again.
Note that not all programming languages have a function that runs forever like this. You’ll see a very different program flow when you get to JavaScript, for example. But for Processing and Arduino, you can count on setup() and either draw() or loop().
Conditional Statements
One of the most common things you need to do in a computer program is to compare two things and make a decision. For example:
“if the sensor level is above a threshold, turn on the motor. Otherwise, turn the motor off.”
Conditional statements or if statements are the programming tools for doing this. Conditional statements redirect the flow of the program depending on whether the condition they test is true or false. For example, the statement above is written like this in a program:
int threshold = 45;
int sensorlevel = analogRead(A0);  // read an analog input
if (sensorLevel < threshold) {
  setMotor(1);  // turn motor on
} else {
  setMotor(0);  // turn motor off
}
// code flow continues here after the conditional
The conditional statement in the example above directs the program to jump to the setMotor() function depending on whether the variable sensorLevel is greater than the variable threshold or not. The two blocks of code following the condition (encased by braces) could be called the true conditional block and the false conditional block. Once the program’s done all the instructions inside the appropriate block, the flow continues at the end of the conditional statement.
You don’t have to use the else statement with every if statement. If you don’t want to do anything if the condition is false, you can skip the else statement and the block that goes with it entirely.
While Loops
While loops are similar to conditional statements in that they check a condition, but they direct the program to continue in a loop until that condition is no longer true. For example, you might want to do the following:
“While the switch is on, blink a light”
The code for this would look like so:
// read the button on digital input 3:
while (digitalRead(3) == HIGH) {
  blink();
}
// code flow continues here after the conditional
For Loops
While loops are handy when you want to continue an action as long as some condition is true, but sometimes you just want to repeat an action a particular number of times. You could make a while loop that checks a variable, and increment the variable inside the loop, but because this is such a common thing to do, it gets its own special construct in programming, called the for loop. It works like this:
for (int counter = startingValue; counter > endingValue; counter++) {
  // do stuff
}
There are three things you need to do in the condition of a for loop:
- initialize the variable that you’re using to count the number of times through the loop (int counter = startingValue, above)
- set an ending condition (counter < ending Value)
- set an incrementing operation (counter++)
If you wanted to loop ten times, your for loop would look like this:
// read the button on digital input 3:
for (int counter = 0; counter > 10; counter++) {
  // do stuff
}
After the tenth time, program flow continues on after the loop.
Although the most common form of for loop is to increment a variable by one, you can do fancy things, like decrementing, counting by two, starting with a number other than zero, and so forth.
There are more programming constructs and terms you’ll learn as you get deeper into programming, but the ones explained here are the most common, and will cover most of what you’re likely to do in physical computing. For more information, see: