Introduction
For some applications, you only need a computer with an operating system in order to connect a serial device like an Arduino or other microcontroller with a browser-based multimedia application like p5.js. Perhaps you’re planning to run the sketch on a mobile device like an iPhone or Android device, but you need it to get data from sensors on your Arduino, or to be able to control motors or other outputs on the microcontroller. For these applications, an embedded Linux processor like a Raspberry Pi or BeagleBone can do the job well. By running an HTTP server and the p5.serialserver application from the Linux command line, you can make this happen. This page introduces how to do it using node.js, p5.serialserver, and a Raspberry Pi.
To get the most out of this tutorial, you should know what a microcontroller is and how to program microcontrollers. You should also understand asynchronous serial communication between microcontrollers and personal computers. You should also understand the basics of command line interfaces. It’s helpful to know a bit about the Raspberry Pi as well, and p5.js. If you’re looking for a Raspberry Pi setup that works on the networks at ITP, try this one. Finally, this tutorial on serial communication using node.js will give you a decent intro to node.js.
System Diagram
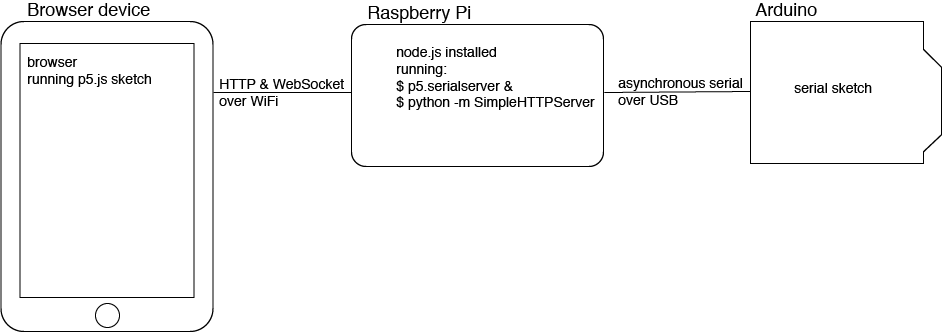
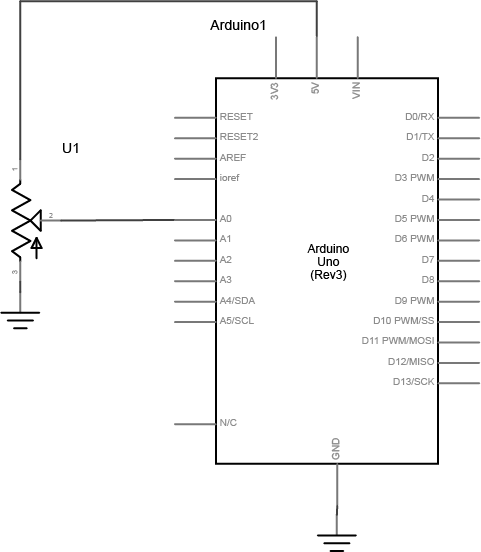
The system for this tutorial is as follows: your microcontroller is running a sketch that communicates using asynchronous serial communication, just like many of the other serial tutorials on this site. It’s connected to an embedded Linux processor (a Raspberry Pi, in this case), which is running p5.serialserver, a command-line version of the p5.serialcontrol app used in the other p5.js serial tutorials on the site. The Pi is also running a Python-based HTTP server, which will serve your p5.js sketch and HTML page to any browser on the same network. The p5.js sketch uses the p5.serialport library to communicate back to p5.serialserver on the Linux processor in order to read from or write to the microcontroller’s serial port. The diagram below shows the system(Figure 1):
Node.js
The JavaScript programming language is mainly used to add interactivity to web pages. All modern browsers include a JavaScript interpreter, which allows the browser to run JavaScript code that’s embedded in a web page. Google’s JavaScript engine is called v8, and it’s available under an open source license. Node.js wraps the v8 engine up in an application programming interface that can run on personal computers and servers. On your personal computer, you run it through the command line interface.
Node was originally designed as a tool for writing server programs, but it can do much more. It has a library management system called node package manager or npm that allows you to extend its functionality in many directions. There is also an online registry of node libraries, npmjs.org. You can download libraries from this registry directly using npm. Below you’ll see npm used to add both serial communication functionality and a simple server programming library to node.
Install Linux, Node.js, and p5.serialserver
To get started, you’ll need to set up a Raspberry Pi for command line access. Follow this tutorial on how to set up the Rasberry Pi with th latest Raspbian distribution of Linux, with node.js and a firewall installed.
If you’ve never used a command line interface, check out this tutorial on the Unix/Linux command line interface. From here on out, you’ll see the command prompt indicated like this:
yourlogin@yourcomputer ~$
Any commands you need to type will follow the $ symbol. The actual command prompt will vary depending on your operating system. On Windows, it’s typically this: >. On most Unix and Linux systems, including OSX, it’s $. Since this tutorial is only for Linux, look for the $.
Post-Install Checklist
Once you’ve installed everything from the previous tutorial, run the following commands on the command line of the Pi to make sure everything you need is installed. If you get the answers below, you’re ready to move on.
To check the version of the Raspbian distribution of Linux that you’re using, type:
$ lsb_release -a
You should get something like this or later:
No LSB modules are available.
Distributor ID: Raspbian
Description: Raspbian GNU/Linux 9.1 (stretch)
Release: 9.1
Codename: stretch
To get the versions of node.js, npm, and iptables that you’re running, type (and get the replies below, or later):
$ node -v
v6.9.5

$ npm -v
3.10.10

$ sudo iptables --version
iptables v1.6.0
To check that your iptables firewall configuration is correct, type:
$ sudo iptables -S
You should get something like this, though your IP addresses for your router and gateway on lines 9 and 10 might be different:
-P INPUT ACCEPT
-P FORWARD ACCEPT
-P OUTPUT ACCEPT
-A INPUT -i lo -j ACCEPT
-A INPUT -i wlan0 -p tcp -m tcp --dport 80 -j ACCEPT
-A INPUT -i wlan0 -p tcp -m tcp --dport 443 -j ACCEPT
-A INPUT -i wlan0 -p tcp -m tcp --dport 8080 -j ACCEPT
-A INPUT -i wlan0 -p tcp -m tcp --dport 8081 -j ACCEPT
-A INPUT -s 192.168.0.1/32 -i tcp -p tcp -m tcp --dport 22 -j DROP
-A INPUT -s 192.168.0.0/24 -j ACCEPT
-A INPUT -m state --state RELATED,ESTABLISHED -j ACCEPT
-A INPUT -j REJECT --reject-with icmp-port-unreachable
-A FORWARD -j REJECT --reject-with icmp-port-unreachable
Get your Pi’s IP Address
It’s easy enough to run a simple HTTP server on your Pi, and then to use it to serve an HTML page with a p5.js sketch to any browser. First you’ll need to know your Pi’s IP address. You can get it like so:
$ sudo ifconfig wlan0 | grep inet
You’re using the ifconfig command to get the data on the wlan0 network interface. That’s your Pi’s WiFi radio. Then you’re passing the output from ifconfig to the grep program using a pipe (the | character). grep searches through the results for any line beginning with the string ‘inet’. Your result will look something like this:
inet 192.168.0.11 netmask 255.255.255.0 broadcast 192.168.0.255
inet6 2604:2000:c58a:da00:3b21:bed1:e1bb:8c3c prefixlen 64 scopeid 0x0<global>
inet6 fe80::52a3:f22:847f:7beb prefixlen 64 scopeid 0x20<link>
Your numbers will vary, but the one you want will be the four decimal numbers following the first ‘inet’; 192.168.0.11 in the example above, but yours will be different depending on your network. That’s your IP address. Remember it, you’ll use it in a moment to browse files on your Pi.
Make a Simple Web Server on your Pi
To get your p5.js sketch and HTML page from the Pi, you’ll need to run a web server program. The installed version of the Python programming language includes one already. You need some content to serve. Make a p5.js project. You can download the p5.js example project. You can create all the files yourself, or you can download the files automatically using a command line tool called p5-manager. To install it, type:
$ sudo npm install -g p5-manager
This install might take awhile (45-70 minutes on a Pi Zero W), so take a break while it installs. When it’s installed, you can create a new p5 project anywhere like so:
$ p5 g -b myProject
This will generate (g -b stands for generate bundle) a directory called myProject containing all the files you need for a p5.js project. Change directories into your new project, then update your project’s p5.js files to the latest versions like so:
$ cd myProject
$ p5 update
p5-manager version 0.4.1
The latest p5.js release is version 0.5.16
The sketch.js file in this project doesn’t do anything, so you might want to edit it. You can edit it using the command line editor called nano like so:
$ nano sketch.js
You’ll get a full edit window like the one below, and you can move around the window with the arrow keys. Add the following lines to sketch.js’ draw() function:
function draw() {
    background('#3399FF');
    fill('#DDFFFF');
    ellipse(width / 2, height / 2, 50, 50);
}
To save the file, type control-X, then Y to confirm. The nano editor will quit and you’ll be back on the command line. Now run Python’s simpleHTTPServer like so:
sudo python -m SimpleHTTPServer 8080
You should get a reply like this:
Serving HTTP on 0.0.0.0 port 8080 ...
Now go to a web browser and enter your IP address from above like so: http://192.168.0.11:8080. You should see a page with a p5.js sketch in it like this(Figure2):
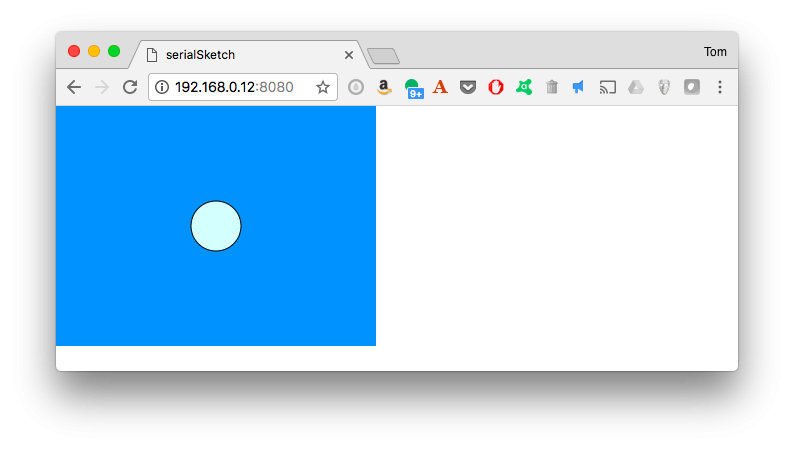
Congratulations, your Pi is now a web server! Now you’re ready to add the serial connection. Type control-C to quit the SimpleHTTPServer.
Add node serialport and p5.serialserver
The next pieces to add are node’s p5.serialserver, which depends on the node serialport library. The serialport library has to be downloaded and compiled natively for your processor. As the node serialport documentation explains, you’ll need to do it as shown here. You’re enabling unsafe permissions, and building from the source code.The unsafe permissions are needed to give your user account permission to access the /dev directory, in which serial port files live. You can do this all at once, by installing p5.serialserver with the same options, like so:
$ sudo npm install -g p5.serialserver --unsafe-perm --build-from-source
This install will take a long time, so again, take a break (60-90 minutes on a Pi Zero). Once it’s successfully installed, you’ve got all the pieces you need to serve serial-enabled p5.js sketches from your Pi, supplying the serial connection via the Pi’s serial ports.
The Raspberry Pi Serial Ports
There are a couple of ways you can access a serial port on the Pi. The GPIO port for the Pi includes a serial port on pins GPIO14 and GPIO15 (Figure 3.). This port is known as /dev/ttyS0 to the operating system.
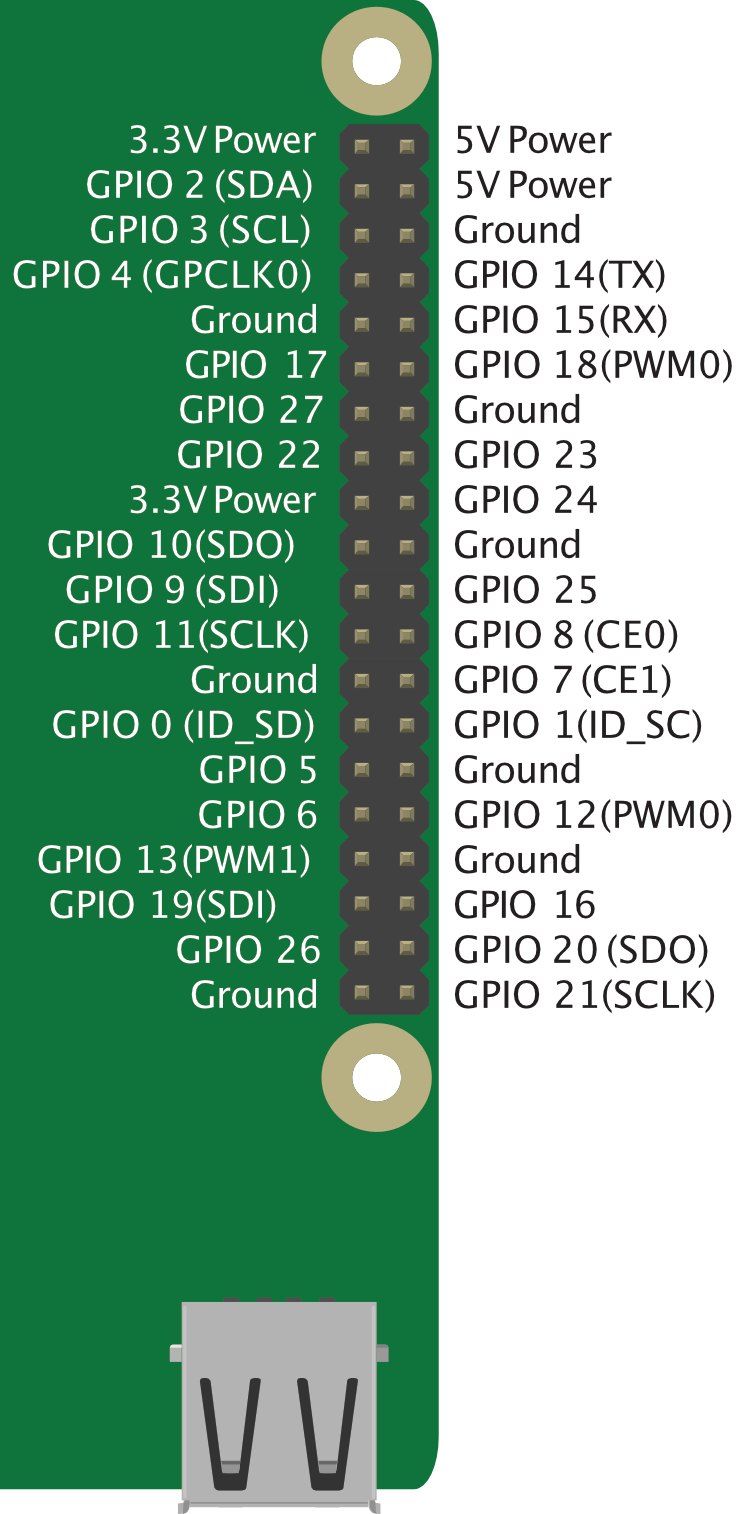
Table 1 below details the pin functions
| Left Side | Right Side |
|---|---|
| 3.3V Power | 5V Power |
| GPIO 2 (SDA) | 5V Power |
| GPIO 3 (SCL) | Ground |
| GPIO 4 (GPCLK0) | GPIO 14 (TX) |
| Ground | GPIO 15 (RX) |
| GPIO 17 | GPIO 18 (PWM0) |
| GPIO 27 | Ground |
| GPIO 22 | GPIO 23 |
| 3.3V Power | GPIO 24 |
| GPIO 10 (SPI SDO) | Ground |
| GPIO 9 (SPI SDI) | GPIO 25 |
| GPIO 11 (SPI SCLK) | GPIO 8 (CE0) |
| Ground | GPIO 7 (CE1) |
| GPIO 0 (ID_SD) | GPIO 1 (ID_SC) |
| GPIO 5 | Ground |
| GPIO 6 | GPIO 12 (PWM0) |
| GPIO 13 (PWM1) | Ground |
| GPIO 19 (SPI SDI) | GPIO 16 |
| GPIO 26 | GPIO 20 (SPI SDO) |
| Ground | GPIO 21 (SPI SCLK) |
If you’re connected to your Pi through a serial terminal connection, you’re going to have to give that up to talk to your microcontroller. To do that, first log out from the serial terminal and log in via ssh over a network connection. Once you’re logged in over the network, launch raspi-config:
$ sudo raspi-config
Pick option 5, interfacing options, and enable the serial port but disable the serial terminal. Save your choice, exit raspi-config, and restart your Pi:
$ sudo reboot
To get a list of your Pi’s ports, type the following:
$ ls /dev/tty*
You’ll get a long list, most of which are not your ports, and you’ll see the TTYS0 port toward the end. If you have an Arduino or other USB-to-serial device attached, you might see other ports marked TTYUSB0 as well. To determine which are the USB serial devices, run the ls command, then unplug the device, then run it again to see what disappears.
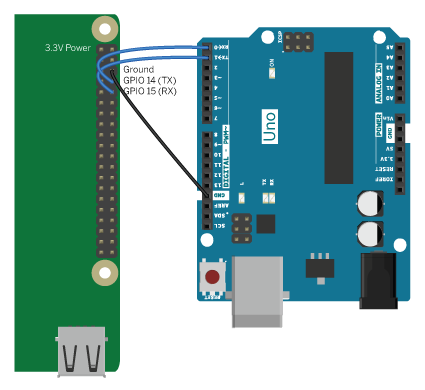
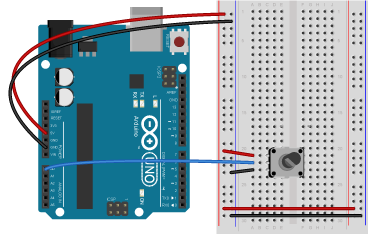
To connect a microcontroller to the GPIO serial port, attach the TX from your controller to the RX of the GPIO port and vice versa. Attach the ground of the GPIO port to the ground of your controller as well. The diagram below(Figure 4) shows the Pi connected to an Uno.
If you’re connecting to a Nano 33, MKRZero, MKR1000, Feather M0 Leonardo, Micro, or any of the boards based on the ARM M0 or ATMega 32U4, connect RX to TX and vice versa, but be aware that the RX and TX pins of those boards are addressed using Serial1 instead of Serial. For example, you’d call Serial1.begin(), Serial1.println(), and so forth.
You can also add serial ports as you would on a laptop, by plugging in a device that is compatible with a USB serial COM driver, like an Arduino. If you’re using a Pi Zero, you’ll need to use a USB-on-the-go adapter to connect to the Zero’s USB port.
The compatibility of your device will depend on the compatibility of the device’sUSB-to-serial chip. The official Arduino models comply with the USB standard serial COM protocol, and require no drivers. Third party and derivative models will vary depending on the hardware. If you want to avoid any driver issues and additional USB cables, use the GPIO serial port.
To test whether you’ve got control over the serial port, put a sketch on your microcontroller that sends out serial messages, like the AnalogReadSerial sketch in the Arduino Basics examples. Connect the controller to your Pi, and then use the cat command to read from the serial port like so:
$ cat /dev/ttyS0
You should see the serial data coming in just as you might in the Arduino Serial Monitor. If you do, you’re ready to build a full serial application. To quit cat, type control-C.
Making a Dynamic p5.serialport Sketch
For background on p5.serialport, see the lab on serial input to p5.js. To start with, you’ll need a microcontroller sending out serial data. Attach a potentiometer to pin A0 of your ArduinoStart, then with this basic handshaking sketch. Using handshaking (also sometimes called call-and-response) keeps the Pi’s serial buffer from getting full:
void setup() {
  Serial.begin(9600); // initialize serial communications
  while (!Serial.available()) { // until the server responds,
    Serial.println("Hello");    // send a hello message
    delay(500);                 // every half second
  }
}

void loop() {
  // if there are incoming bytes:
  if (Serial.available()) {
    // read incoming byte:
    int input = Serial.read();
    // read the input on analog pin 0:
    int sensorValue = analogRead(A0);
    // print out the value you read:
    Serial.println(sensorValue);
    delay(1); // delay in between reads for stability
  }
}
On the command line, create a new p5 sketch like so, then change directories to get into the sketch, then update the libraries:
$ p5 g -b serialSketch
$ cd serialSketch
$ p5 update
You’ll need the p5.serialport library to your sketch as well. You can copy it into the libraries directory like so:
$ sudo curl https://raw.githubusercontent.com/vanevery/p5.serialport/master/lib/p5.serialport.js --output libraries/p5.serialport.js
Once you’ve done that, edit the index.html file using nano as you did for the sketch.js above, and add a script include for libraries/p5.serialport.js in the HTML document’s head, before the script include for the sketch.js.
Save the file, then edit the sketch.js as follows:
var serial; // instance of the serialport library
var portName = '/dev/ttyS0'; // fill in your serial port name here

var circleSize = 50;

function setup() {
  createCanvas(320, 240);
  // initalize serialport library to connect to p5.serialserver on the host:
  serial = new p5.SerialPort(document.location.hostname);
  // set callback functions for list and data events:
  serial.on('list', printList);
  serial.on('data', serialEvent);
  // open the serial port:
  serial.open(portName);
}

function draw() {
  background('#3399FF');
  fill('#DDFFFF');
  // draw a circle at the middle of the screen:
  ellipse(width / 2, height / 2, circleSize, circleSize);
}

function serialEvent() {
  // read a line of text in from the serial port:
  var data = serial.readLine();
  console.log(data);
  // if you've got a valid line, convert it to a number:
  if (data.length > 0) {
    circleSize = int(data) / 4;
  }
  // send a byte to the microcontroller
  // to prompt it to respond with another reading:
  serial.write("x");
}

function printList(portList) {
  // portList is an array of serial port names:
  for (var i = 0; i < portList.length; i++) {
    console.log(i + ' ' + portList[i]);
  }
}
Note that when you’re calling new SerialPort();, you’re including a parameter, document.location.hostname. This is the address from which your sketch was served, in this case, your Pi. You can enter a specific IP address or domain name if you prefer, but document.location.hostname will always return the address of the server. This is the key to making your p5.serialport sketch dynamic, so it’s not locked to localhost.
At this point you have enough of a sketch to test the system. When loaded in a browser, this sketch should look like the one above, and should print the list of serial ports to the JavaScript console.
Run python’s SimpleHTTPServer a little differently this time:
$ python -m SimpleHTTPServer 8080 &
The & makes python return control to the command line so you can do other commands while it’s running. Hit the return key to get a command prompt again, then type:
$ p5serial
You should get this response:
p5.serialserver is running
Do as you did above, and open the sketch in a browser again. This time, open your JavaScript console and you should see the following output:
ws://192.168.0.12:8081
p5.serialport.js:83 opened socket
sketch.js:20 0 /dev/ttyAMA0
sketch.js:20 1 /dev/ttyS0
You should also see the serial data coming in from the microcontroller, and if you turn the potentiometer, you should see the circle size change. If you get this, do a happy dance. You’ve got a working p5.serialserver system working.
To quit p5.serialserver, type control-C. To stop the SimpleHTTPServer, type the following to get a list of the running processes:
$ ps
PID TTY TIME CMD
785 pts/0 00:00:02 bash
8186 pts/0 00:00:00 python
8203 pts/0 00:00:00 ps
This is a list of all running user-started processes and their process numbers. The python SimpleHTTPServer is number 8186 above. To stop it, type:
$ kill 8186
with your own process number, and python will stop. In the future, you can run p5serial this way as well, to get the command line control back while it’s still running.
Once you’ve got this much working, all the same dynamics of serial communication that apply on your desktop also apply on the Pi. Only one program at a time can control the port. Both sides need to agree on electrical connections, timing, and data format. Handshaking can help manage traffic flow. The troubleshooting techniques you used in desktop serial apply here also.
The Pi isn’t perfect as a multimedia host for all projects. It’s not as good on graphics as even the most basic desktop computer, for example. It’s great as a network connector like this, though, and it’s great to serve browser-based content that needs to connect to a serial port.
For more info: