Lab Assignments
Technical material will be demonstrated in class. Each week your instructor will explain a given topic, and demonstrate it by building circuits, code or fabrication techniques in class. You’ll follow along, stopping to ask questions or clarify what’s happening as we go. Then you’ll go home and try it yourself.
Once you’ve done a lab, make a project with the new techniques you learned. It doesn’t need to be large or complex, just something simple that shows what you learned and how it can be used in everyday life. We’ll look at a few of these in each class. You’ll be expected to show at least one finished lab project in the first half of the semester in class. Your instructor will pick the lab presenters at random each week. If you make something and aren’t called upon in class, write it up on your blog, with pictures and video as appropriate.
Midterm Project
The goal of this assignment is to show that you can make a simple interactive system with physical controls, and that you can keep a user engaged with your system. This will be due in week 7.
Work in pairs on this assignment. Your instructor will assign the pairs.
This year, since the midterm falls near Halloween, the midterm project can have a Halloween theme. You could make a media controller that controls spooky projections, or a music player that controls the sound in a haunted house, or a tangible interface for things that go bump in the night. You could also make a musical instrument that makes spooky music like you’d hear in a horror film. If you have another idea, discuss it with your instructor to see if it’s appropriate.
You don’t have to have a halloween theme if you don’t want to. On a technical level, though, your project should show that you understand digital input and output, analog input and output, serial communication, and good physical interaction design principles. On a conceptual level, your project should help people to enjoy whatever setting it is designed for. If it is a Halloween party, it would have just enough surprises to make it fun, with no chance for injury or psychic trauma.
Consider the behavior of the thing that the user will see, hear, or feel, and choose sensors that let you create that kind of behavior. For example, if your system featured a bouncing ball that moved with a “squishy” feeling, make sure the physical control has a similar feel. You might get this by embedding force sensors in foam, or attaching pressure sensors to a balloon. If your animation has a sharp feeling to it, you might need sensors that have a precise, sharp feel, such as pushbuttons with a good solid “click”.
If there is more than one parameter to be controlled, you will need to send data from multiple sensors to control each parameter. For example, if you’re controlling an object that moves in three dimensions on the screen, you’ll need sensors that give you control over all three dimensions. You might use a 3-axis accelerometer, or three photosensors, or some other combination.
If you or your partner on this exercise are waiving Intro to Computational Media, that means you’re good enough programmers to create this project in a desktop programming environment on your own. Good for you! You’ll be expected to show your ability to do this.
Your midterm can be art or design project, but it can also be a research project. Consider these options:
- Remix project: observe an existing system, analyze the system, and create your own version of it with your own context. For example, have you seen the game show, Jeopardy? Watch this video about the buzzer in the show. How does it work? If you were to design a buzzer system for a game show, what would that be? Any other examples?
- Research project: you’re very welcome to deeper “research” any of the things that you were introduced to in this class. For example, compare 3 different knobs/sensors/etc and review them (e.g., Knob Feel). Or, you could thoroughly research a particular sensor to learn how it works technically (e.g., FSR) and create your own version of a sensor. Any other examples?
- Sensors for environmental research
- Sensors for scientific or medical research (e.g. build a reaction timer with an LED and a pushbutton)
- Sensors in civic infrastructure (stop lights, cross walks)
- Assistive technology devices
- Tools (air quality device, temp/humidity monitor for a garden, etc)
Final Assignment
The goal of this assignment is to show that you can make a more fully detailed interactive system with physical controls, and that you can keep a user engaged with your system.
This will be due in the final week of class, but you will show progress on the project in each week from week 11 onward. Work in groups or alone, though groups are highly recommended.
Your final project will depend on you already having learned the skills from the whole semester. It should also demonstrate some of the following skills:
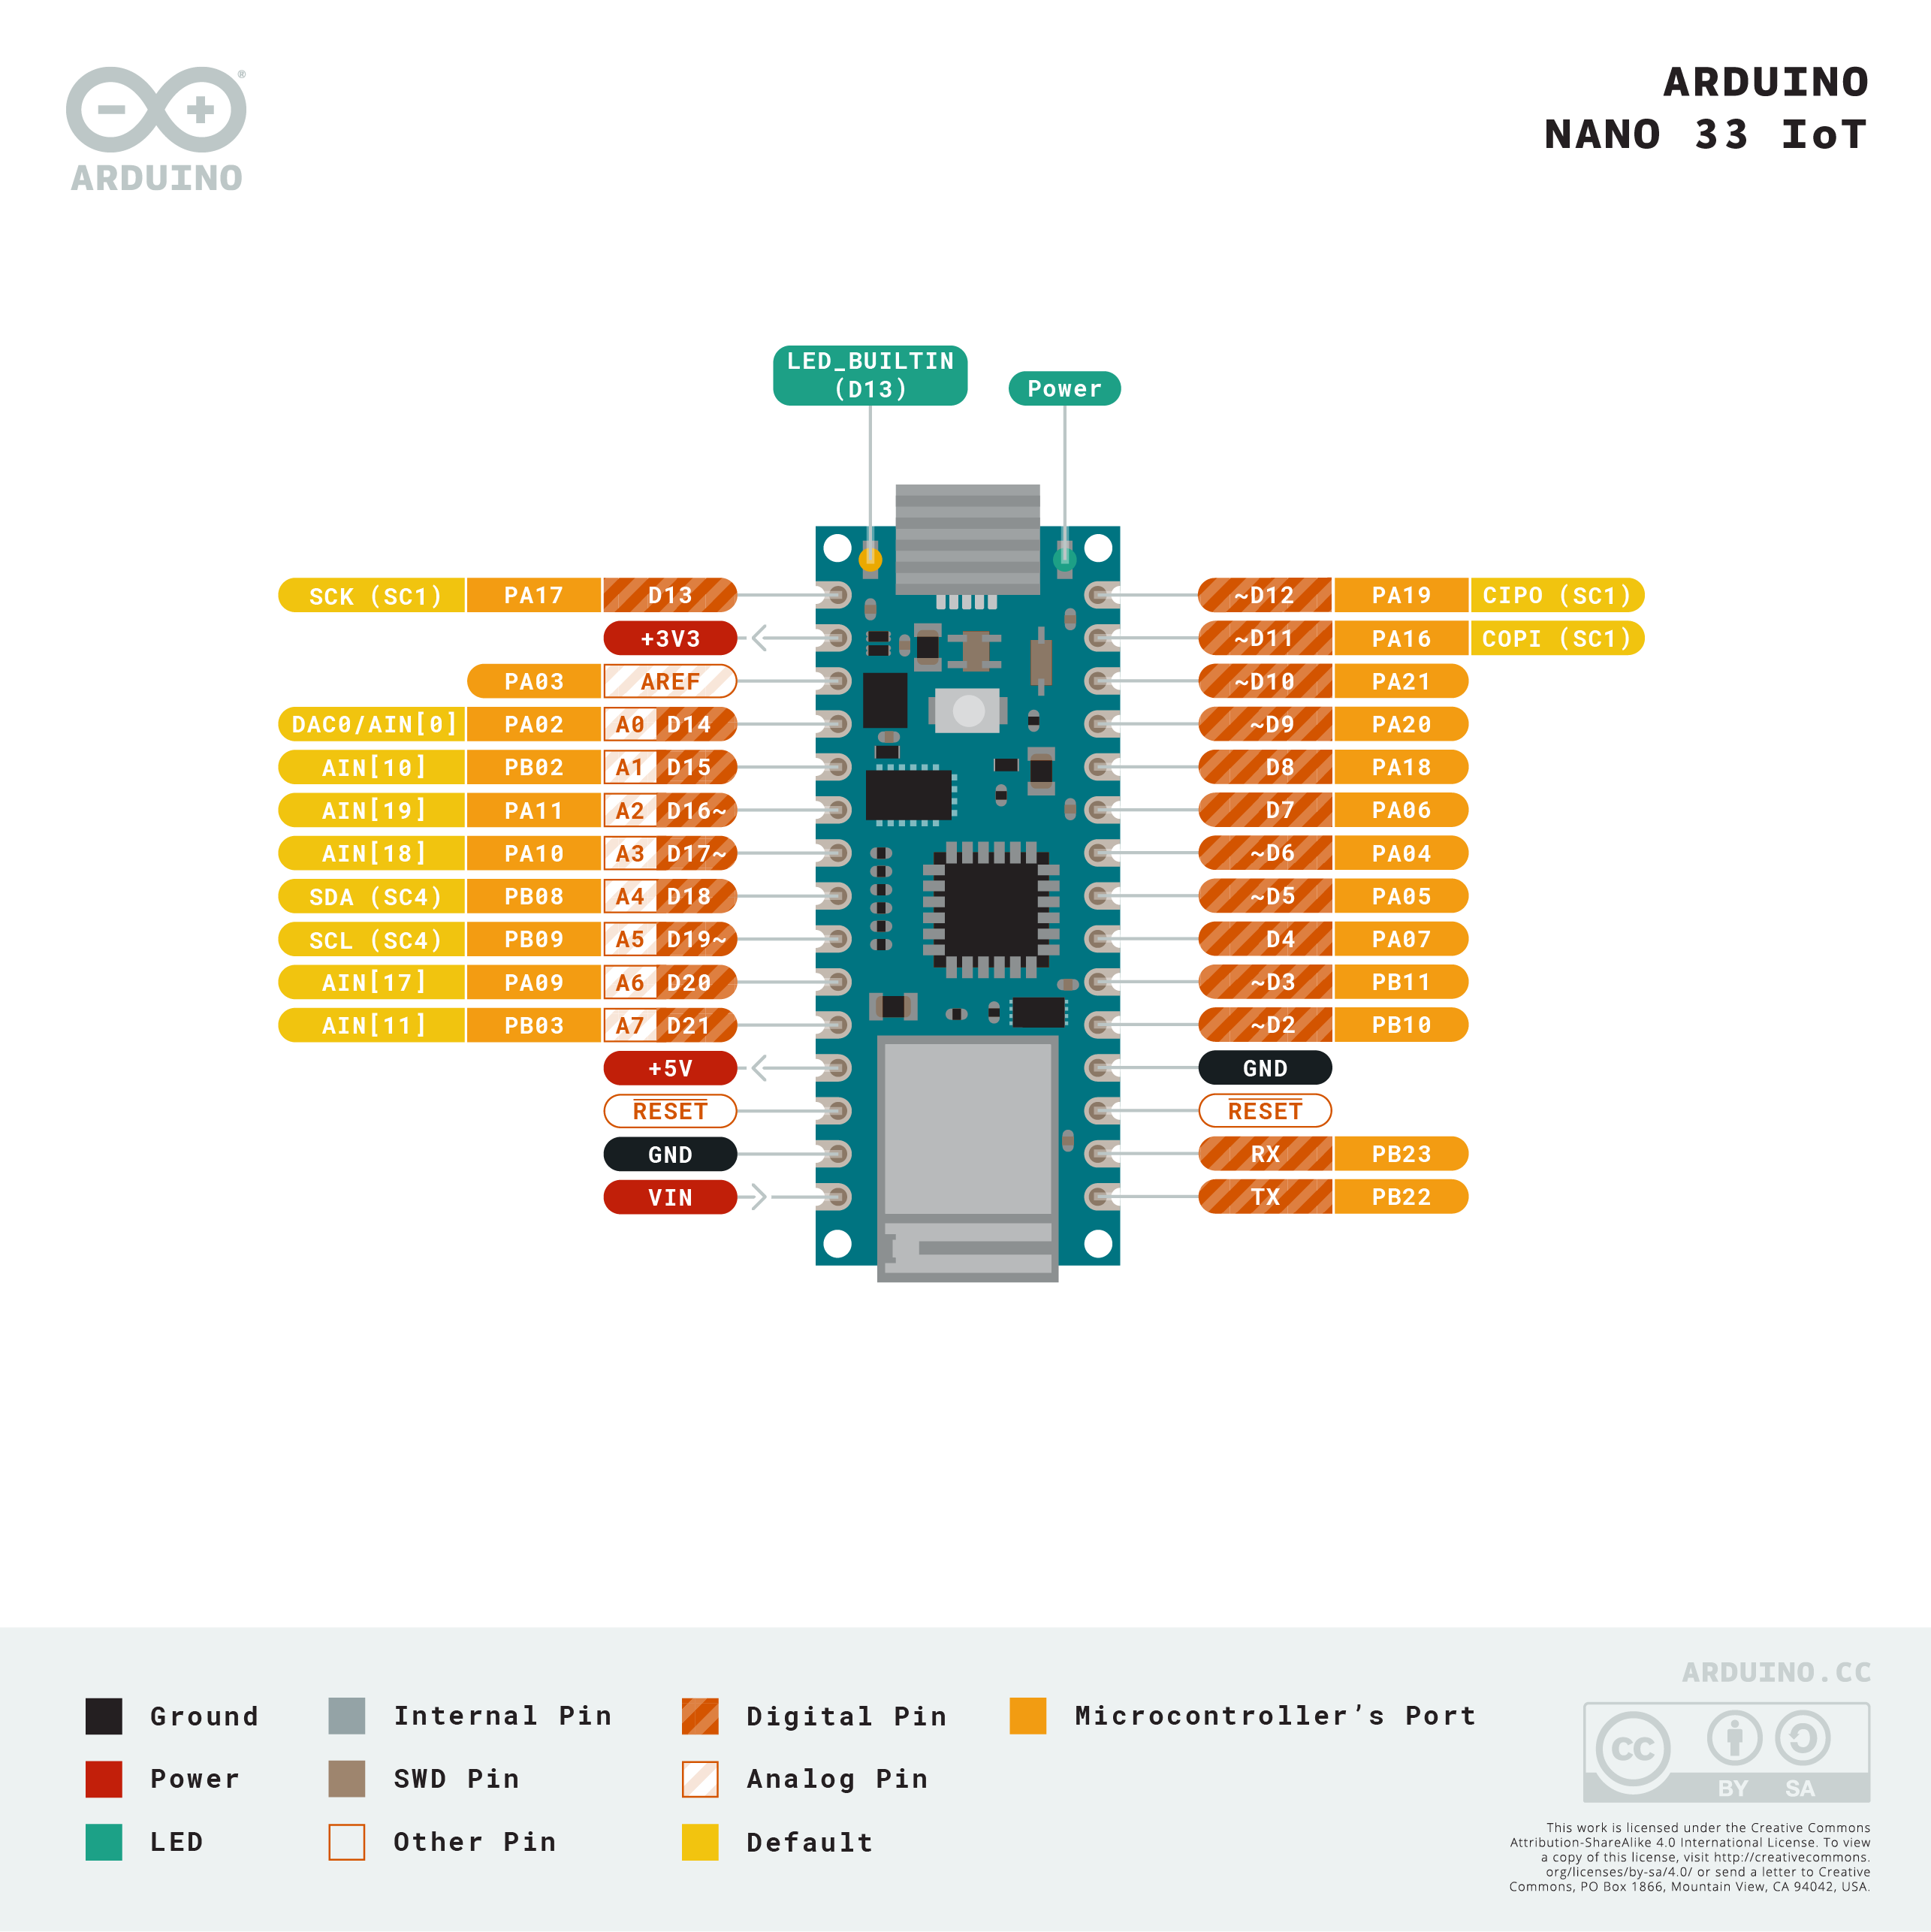
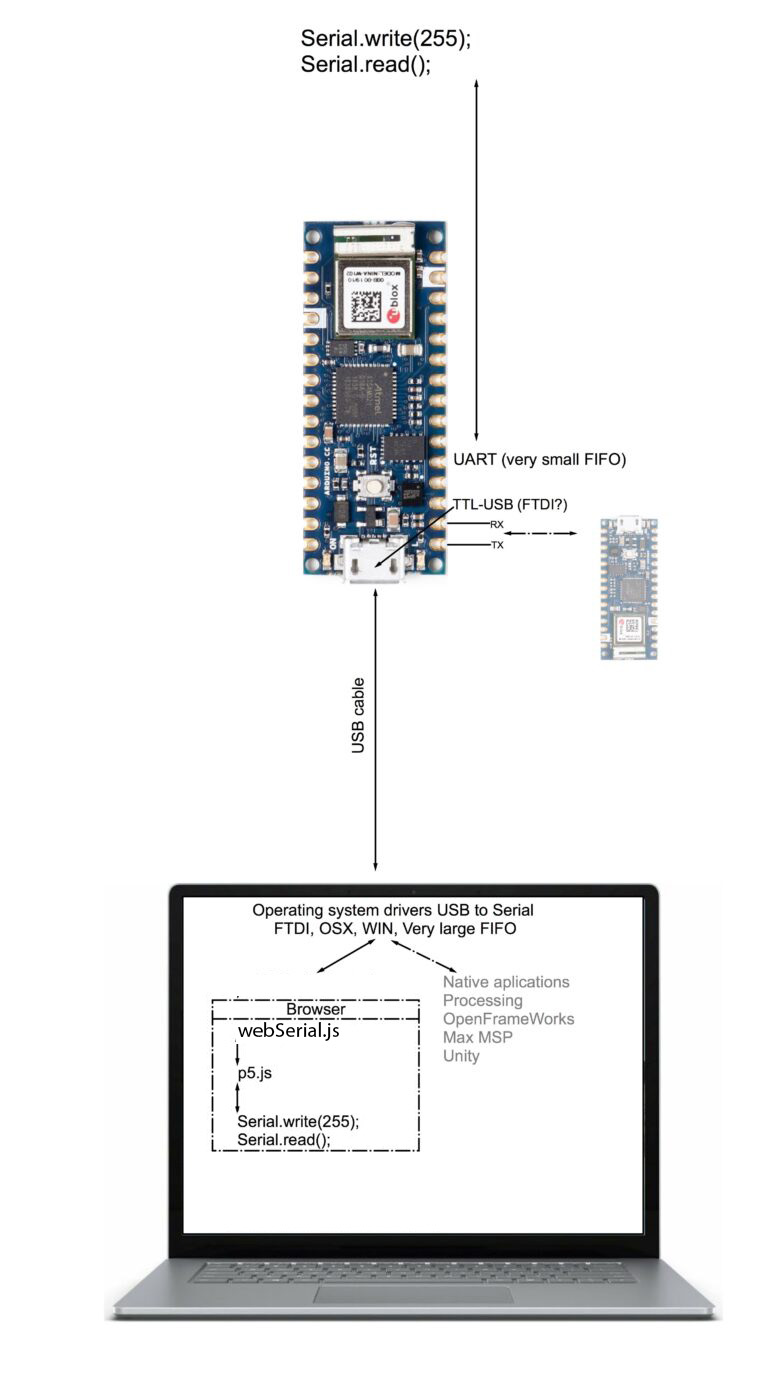
- Microcontroller-to-PC communication, through one of the following:
- Physical interaction design principles
- Is the interface understandable to the participant with minimal instruction? Do they know what to do by looking at, listening to, or touching the interface?
- Can someone besides you use it?
- Can it be started, stopped, and reset without your intervention
- Make the interaction iterative. In other words, it’s not just one action by the participant, but they read the interface, take action, read the device’s response, and take another action, in a continued loop.
- Construction principles
- Does it have a housing so that the controls, not the electronics, are exposed?
You can improve on one of your previous projects for this project, or you can start a new project. Don’t make the project larger in scope than the midterm, though, as you won’t have time to complete it if it’s too large or complex a project.
Document your work thoroughly online as you go. Include details of all phases of the project. Include a project summary as well, explaining what the system you built is, what it does, and what purpose it’s intended to serve. Your summary should introduce the project.
Project Suggestions
Many students struggle with project ideas for midterm or final. Here are a few ideas to consider:
Combination Lock
A combination lock responds after the user performs a specific sequence of actions, like pressing buttons in a sequence, or turning a knob to a series of pre-determined positions in a sequence. For example, think about the typical hotel room safe. When it’s open, you close the door, enter a code, press the enter button, and the safe locks. When you enter the code a second time, the safe unlocks. Closing the door and entering a new code resets the lock. On some safes, you can simply press enter again to use the same code.
This is a good project for the midterm.
The simplest of combination locks typically use a sequence of four or five buttons. To make it work, you have to detect when the button changes its state from pressed to released, or vice versa.
Your combination lock doesn’t have to open a lock. It could turn on a light when the sequence is entered successfully, or play a tune on a speaker. It should be possible to reset the device once it’s done its task, however, like the example above. Your device doesn’t have to just use buttons, either. You can use any sequence of physical actions that you know know how to sense in order to activate your lock.
Musical Instrument (Tone)
Make a simple musical instrument. Your instrument should be able to control pitch and to start and stop a pitch. It does not have to control more than one pitch at a time.
This is a good project for the midterm.
Consider a few things in designing your instrument:
- Do you want to play discrete notes (like a piano), or sliding pitches (like a theremin)? How do you program to achieve these effects?
- Do you want to control the tempo and duration of a note?
- Do you want the same physical action to set both the pitch and the velocity (volume) of a note?
- Do you want to be able to play more than one note at a time (e.g. chords)?
All of these questions, and many more, will affect what sensors you use, how you read them, and how you design both the physical interface and the software.
Media Controller (Serial)
Make a music or video playback controller. Your controller should be able to start, stop, and pause the playback of a media file, to fast-forward, to rewind, and to control the volume.
You can make this controller and the media player in p5.js and control it using asynchronous serial communication, or you can control it using Keyboard and Mouse controls.
This is a good project to get comfortable with asynchronous serial communication.
Game Controller (Serial)
Make a game controller. The most minimal controllers have very few controls. Consider WASD controllers, for example, in which the keys W, A S, and D control 2-dimensional movement on a screen. Or joystick controllers, where a 2-axis joystick and a pushbutton support all the action onscreen. The fun of a good controller is when you can perform complex behaviors with a limited amount of control.
Make a game in p5.js. or use an existing game like Pong.
Your controls should be arranged so that the player can watch the screen, not concentrate on the controls.
Game Controller (USB HID)
Make a game controller. The most minimal controllers have very few controls. Consider WASD controllers, for example, in which the keys W, A S, and D control 2-dimensional movement on a screen. Or joystick controllers, where a 2-axis joystick and a pushbutton support all the action onscreen. The fun of a good controller is when you can perform complex behaviors with a limited amount of control.
You do not have to make the game. You can use any pre-existing game that can be controlled by Mouse or Keyboard, since your microcontroller (Nano 33 IoT) can be programmed to operate as a mouse or keyboard. Consider browser-based games, like Lunar Lander. Here’s a different version of Lunar Lander. Consider controlling Zoom.
Your controls should be arranged so that the player can watch the screen, not concentrate on the controls.
This project will most likely rely on USB HID communication using the Keyboard or Mouse libraries. Take a look at the USB HID labs for ways to do it.
Musical Instrument (MIDI)
Make a MIDI musical instrument. Your instrument should be able to control pitch and volume and to start and stop a pitch. It should also be able to play chords; that is, to play multiple notes at the same time.
This project requires some understanding of music, and MIDI. Take a look at the MIDI labs for ways to do it.
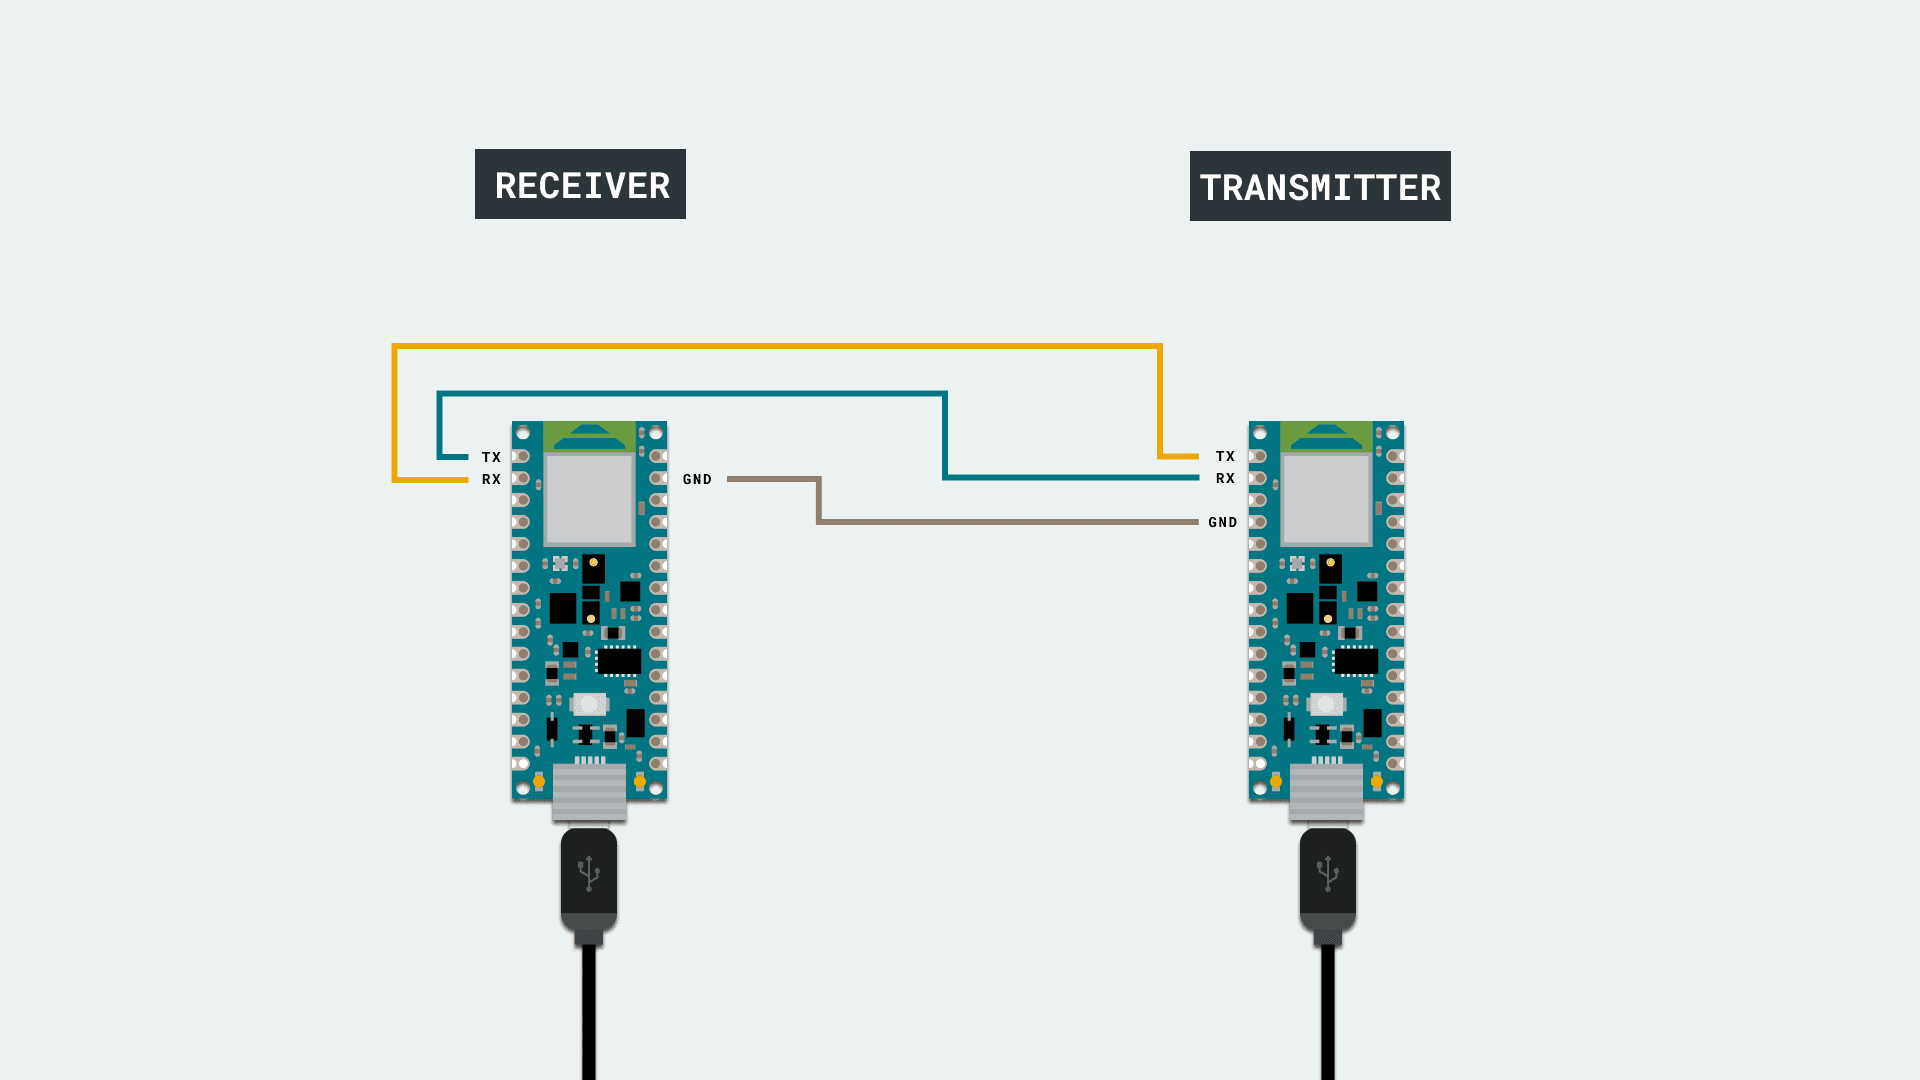
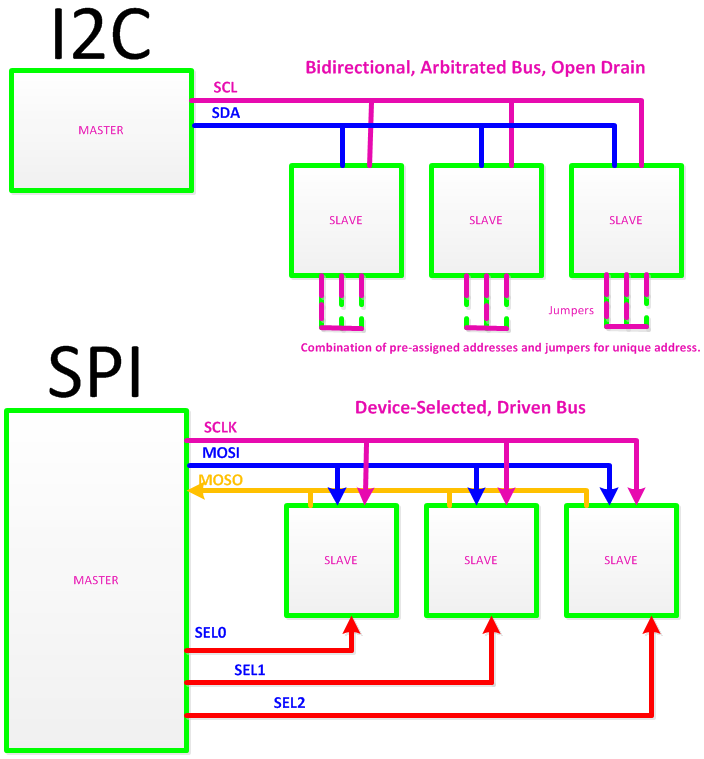
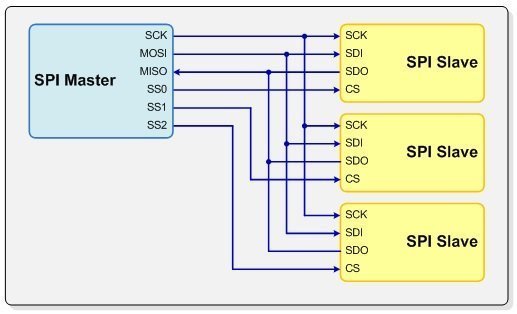
Sensor Datalogger and Visualizer (SPI, I2C SD Card)
Capture a time lapse with sensors and create a visualization or sonification that represents the changes over time.
There are many changes that are too slow for us to observe without lots of patience, but which give us good insights when we see their patterns played back in a time-lapse. For example, a graph of changes in the light in a space can tell us about the seasonal changes, or the human activity. Temperature changes can tell us how crowded a place is at different times of days. Air quality sensor readings over time can give us a picture of when production activities happen in a shop. Motion sensors graphed over time can show us traffic patterns of a space over the course of a day.
Pick a sensor that can measure changes in an environment and write a program that will take readings on a set interval and record them. Then find a way to present the readings in order to show the patterns of change over time. That might be as simple as a graph of the change over time generated by a spreadsheet, or it might be a sound program that converts the changes to pitches and plays the changes musically over time. Pick a way to represent the data that lets the viewer read and understand the changes that they can’t see in real-time.
You could capture the data by :
- Sending sensor data from an Arduino to your laptop over a few hours, and leaving the laptop alone (but secured).
- Sending the sensor data as USB keystrokes to your laptop over time and saving them to a file (command-S is also a keystroke)
- Recording data to a file on an SD card from an Arduino, then reading that data in p5.js
This project is a good project to combine asynchronous serial communication and data visualization in p5.js. Alternatively, it can be a good way to learn about reading and writing from files on an Arduino and in p5.js.
Gesture Controller (Bluetooth LE)
Make a controller that is controlled by large physical gestures. Examples:
- a media control device that responds to swiping your hand left and right.
- a game controller that responds to swordplay movements of your arm.
- a musical controller that responds to particular hand signals.
Your controller should be able to start and stop a particular output repeatably and reliably. For example, if you’re making the media controller mentioned above, it should be able to play, pause, fast forward, rewind, and stop with distinct gestures.
Since you’re using large physical gestures, this project is most likely best done using Bluetooth LE communication to the personal computer, to avoid wires.
This is a more advanced version of the media controller or musical instrument projects, in that it requires you to read sensor data, understand the patterns of the changes in that data, and write a program to send control messages when those patterns are detected.


